Databases in Intellectible
Store, enrich, and automate structured data across your workflows
Intellectible's database system gives you powerful, built-in data storage — no setup, integrations, or plugins required. With a single click, you can import or create a fully functional, SQL-compatible database and start using it instantly across your workflows.
Each database is fully relational, organizing data into rows and columns like a spreadsheet — but with the flexibility of SQL behind the scenes. You can filter, join, sort, and query data using either visual tools or raw SQL, all from within Intellectible’s no-code environment.
Databases scale effortlessly with your needs. Create unlimited tables, store high volumes of structured content, and capture everything from form inputs to full AI-generated documents — all directly within individual cells.
Use databases to:
- Capture and store structured data — from user forms, automations, or AI enrichments
- Enable persistent memory — powering agents, Q&A, and intelligent recall across workflows
- Query and filter at scale — with SQL or no-code visual queries
- Build dynamic systems — that generate, update, and reuse content in real time
- Drive insights and reporting — power dashboards, track performance, and surface trends
Why Use Databases in Intellectible?
Many assets built inside Intellectible are the result of intelligent, multi-step workflows. These are often complex to create but highly valuable to retain, reuse, and build upon.
Databases make this possible. They allow you to scale your knowledge assets, store and adjust structured outputs, and reuse them in future workflows. With SQL-compatible logic and automation nodes, you can also query, filter, and generate insights — transforming static results into dynamic systems.
Key Features
| Feature | Description |
|---|---|
| Scalable Infrastructure | Databases support high-volume usage with virtually unlimited rows and tables — no additional setup required. Built to grow with your projects and workflows. |
| Large Cell Capacity | Store full AI outputs, long summaries, or entire document sections within a single field — ideal for persistent memory and deep-context workflows. |
| AI-Compatible | Store, reference, and reuse AI-generated outputs across workflows for continuity and enrichment. |
| No-Code Access | Read, write, and update databases using visual nodes — no SQL experience needed. |
| Query with SQL | Use full SQL syntax for advanced filtering, sorting, and joins. |
| Project-Scoped | Each project has its own isolated set of databases, ensuring data separation across clients or workstreams. |
| Auto-Schema | Fields are created dynamically based on the first inserted record — no manual schema setup required. |
How to Structure Databases in Intellectible
Projects
Each project in Intellectible contains its own isolated database environment. Nothing is shared between projects.
Use a new project when you need:
- A completely separate workspace or client
- Different teams with isolated data and workflows
- Sensitive or siloed workflows (e.g., Client A vs Client B)
Databases (inside a project)
Each project-level database can contain multiple tables, like in a standard relational database.
Use a new database when:
- You’re storing a distinct dataset with its own schema (e.g., startups, grants, proposals)
- The tables are logically grouped under a shared context or workflow
Avoid putting unrelated data in the same database (e.g., don’t mix “website leads” and “project templates”).
Each database should serve a focused purpose. Mixing unrelated datasets can make querying harder, increase chances of errors, and limit your ability to scale or reuse data efficiently. Instead, create separate databases for distinct use cases — this keeps your workflows clean, organized, and easier to maintain.
Tables (inside a database)
Each table stores a single type of structured record — similar to a spreadsheet.
Use a new table when:
- You have different record types under the same theme
- Example: In
startup_insights_db, you might have:raw_startupsenriched_profilesoutreach_logs
- Example: In
- You want to separate workflow stages or lifecycle statuses (e.g.,
inbound_leadsvsqualified_leads)
Creating Databases & Tables
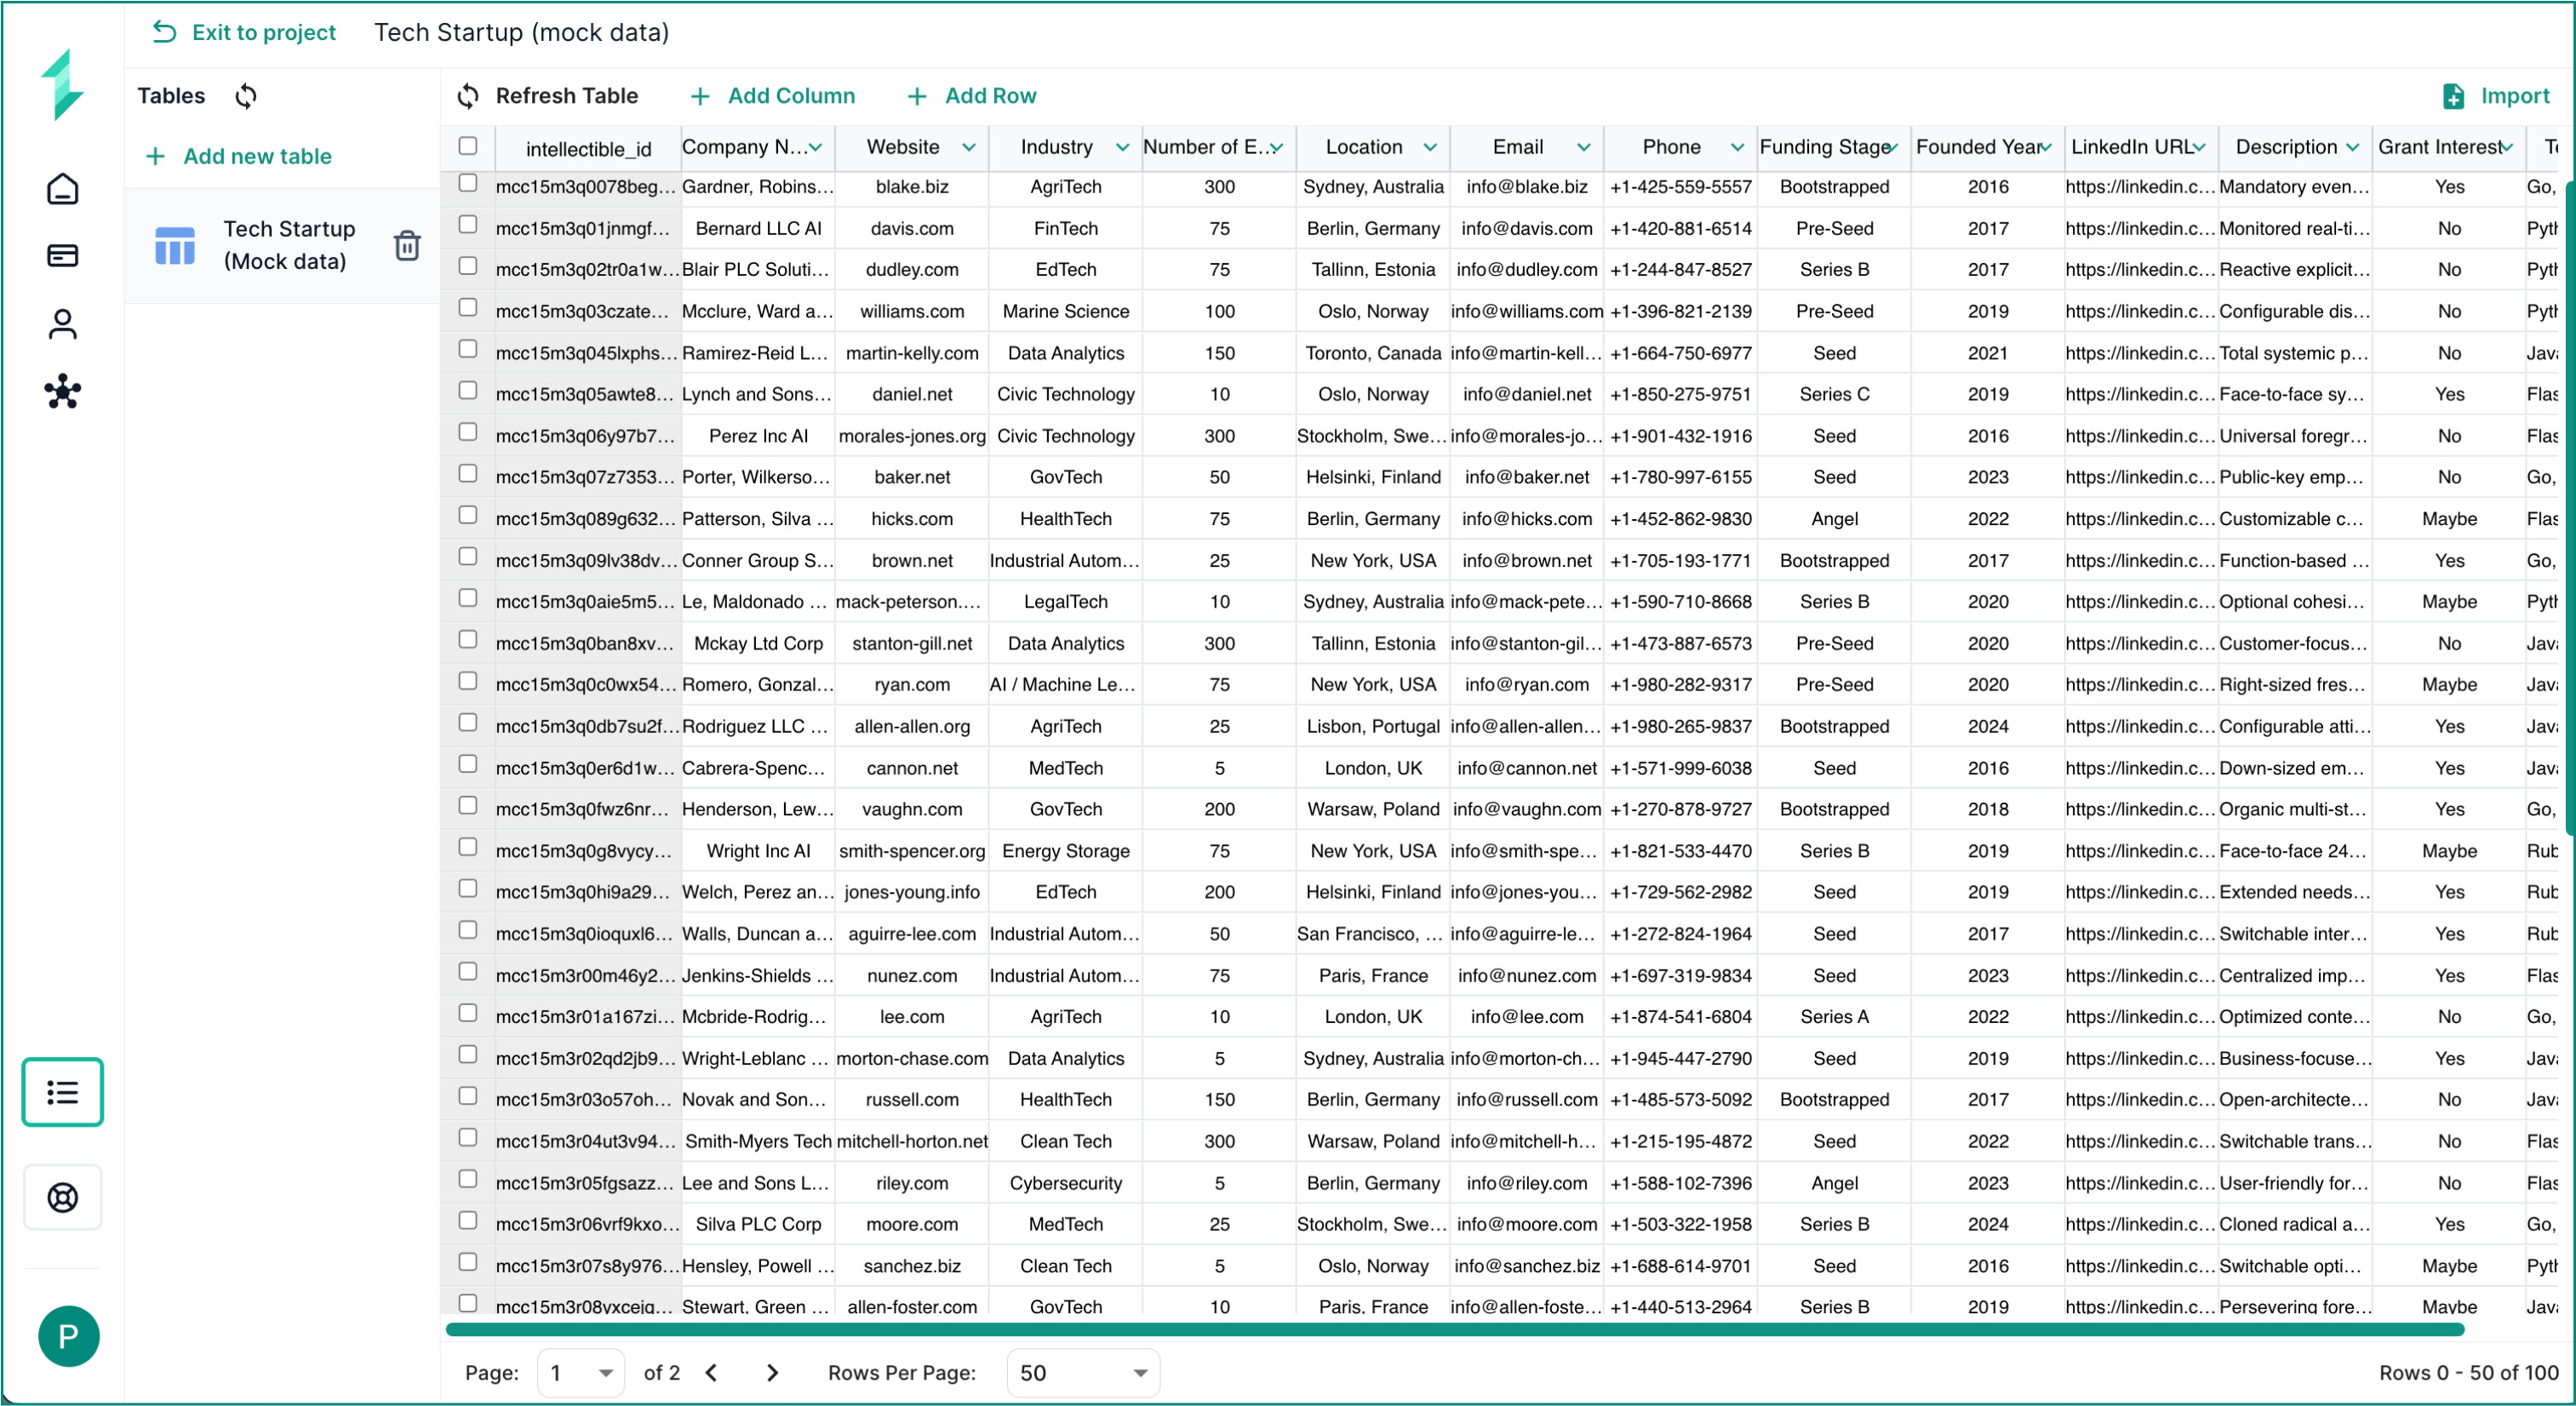
The Databases tab inside any Intellectible project allows you to visually manage your data — no workflows required. From this interface, you can create new databases, define table schemas, view records, and edit data manually or in bulk.
Creating a New Database
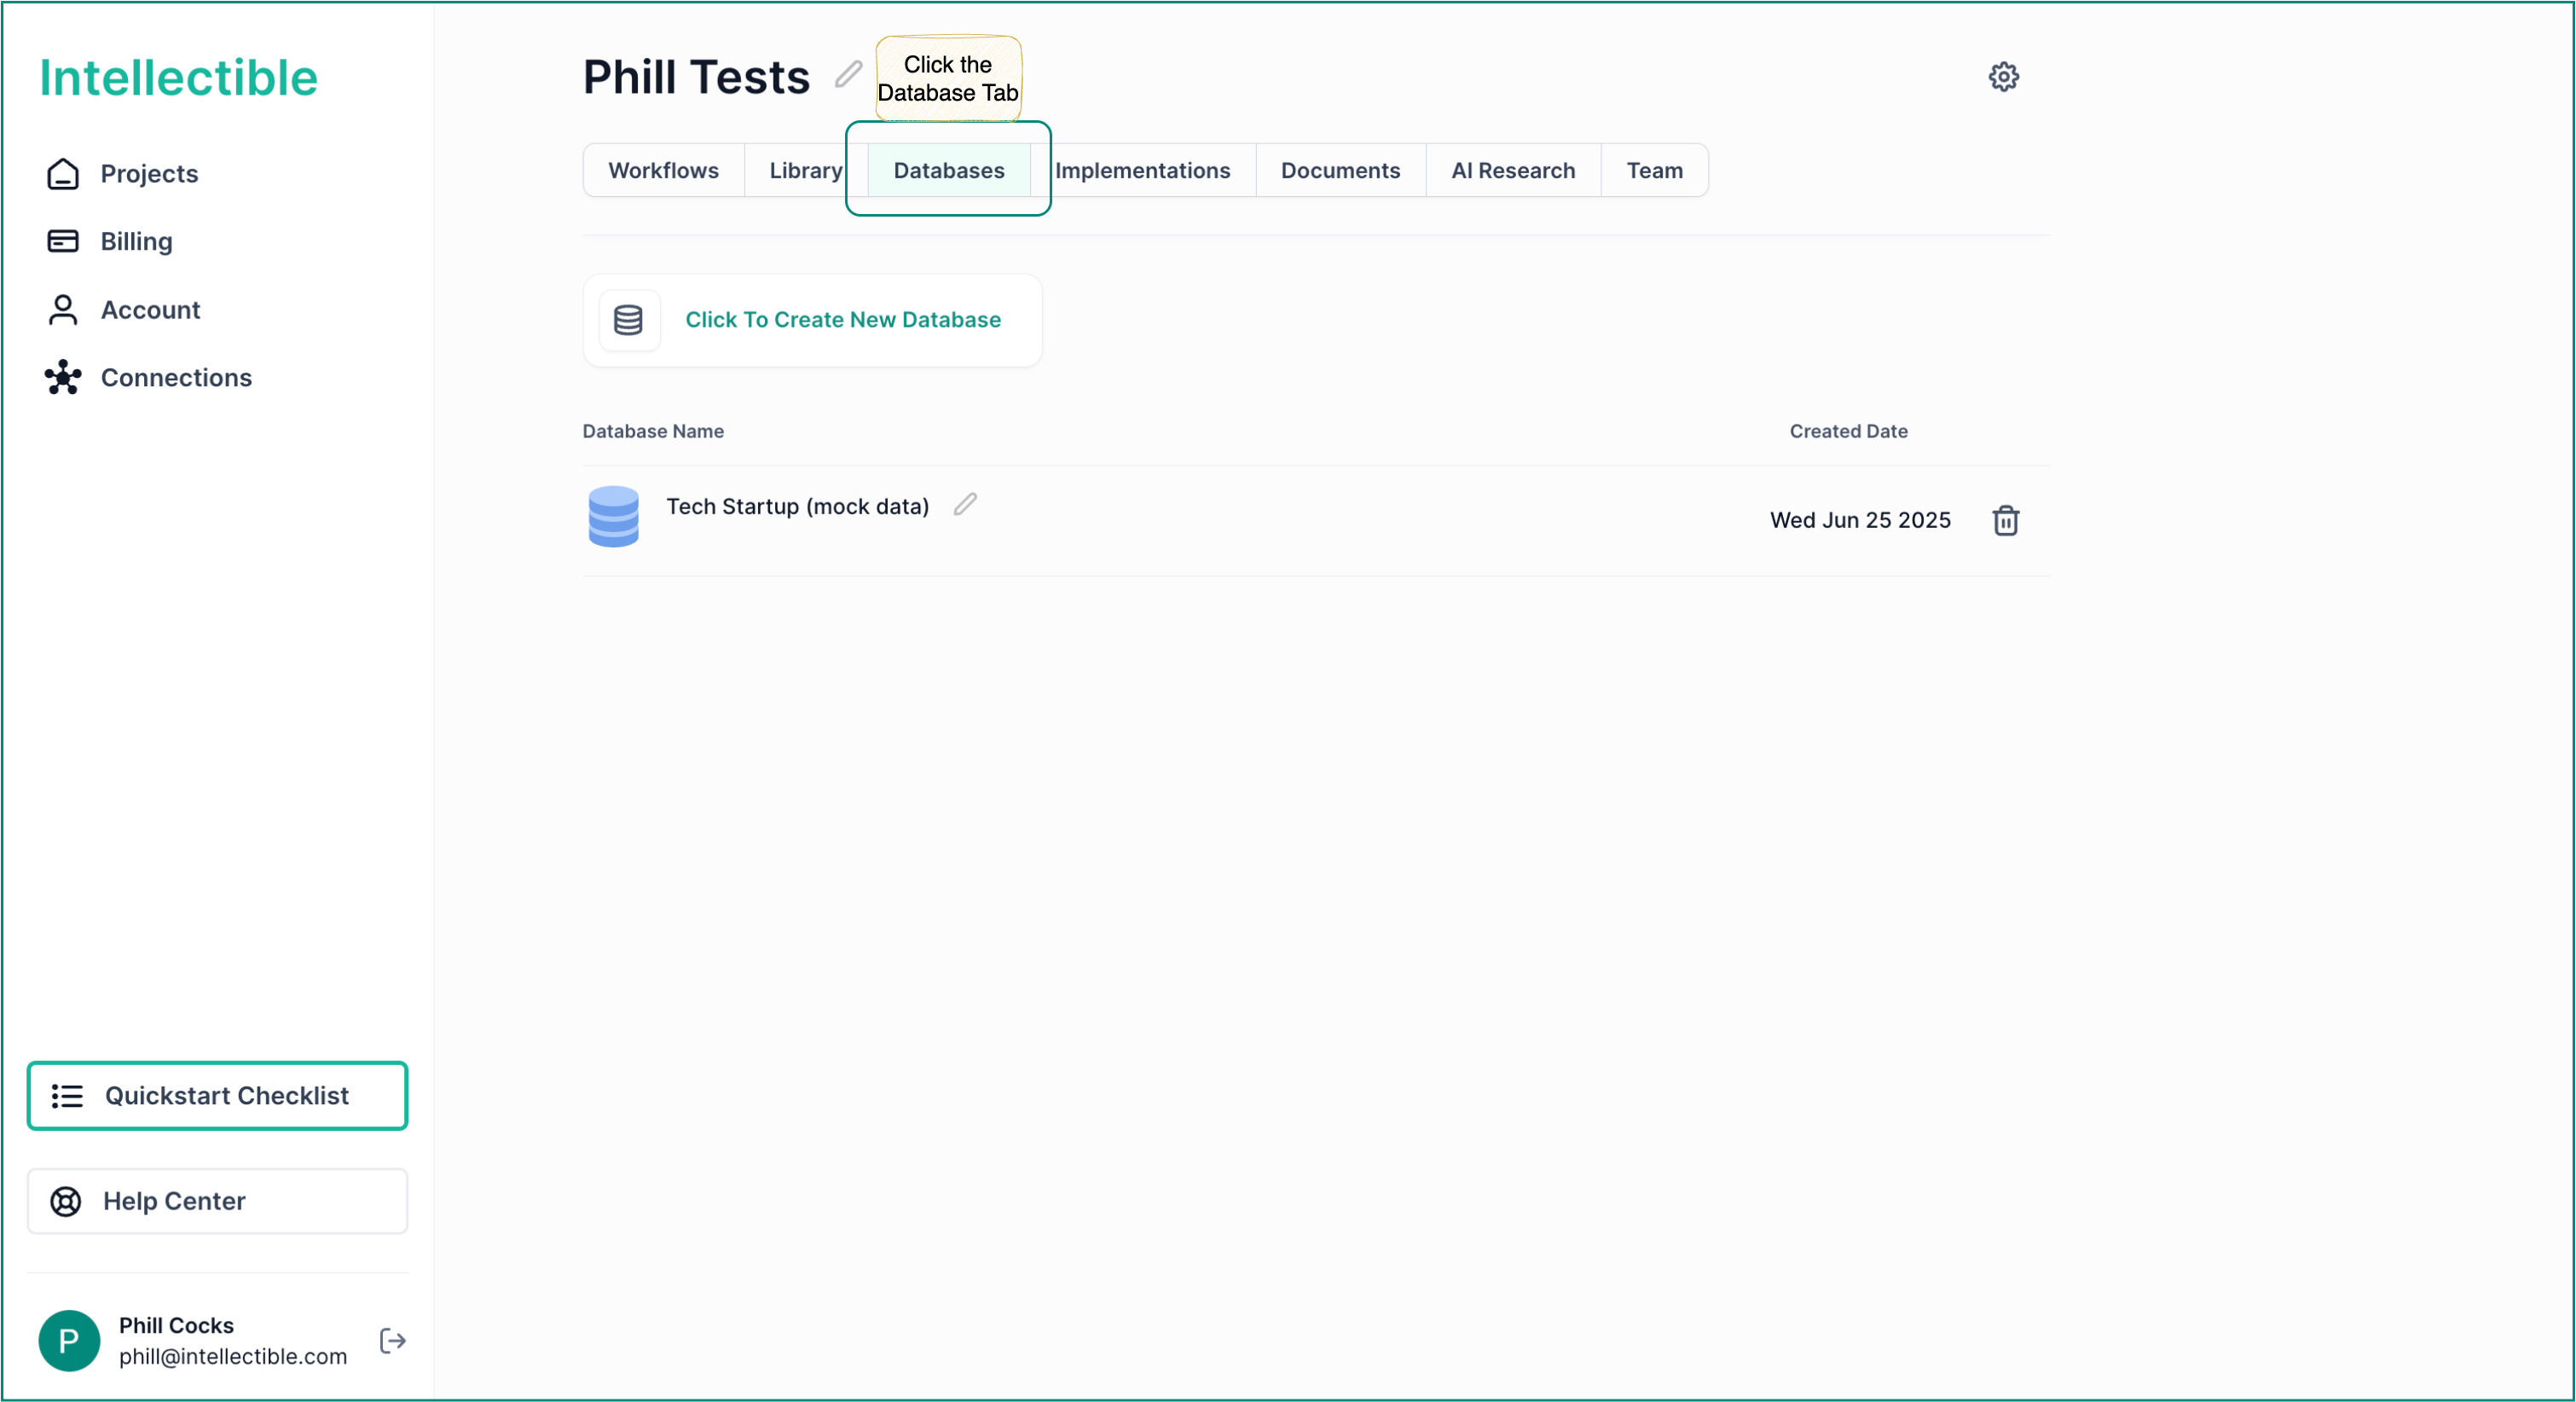
- Navigate to the Databases tab from inside your Project Dashboard.
- Click Add New Database.
- Choose a name (e.g.
startup_insights_db) and optionally add a description. - Once created, you'll be prompted to add your first table.
Creating a New Table Inside the Database Tab
You can have an almost unlimited amount of tables inside your database, with Intellectible using a scaling structure enabling very large storage, available tables as content per cell
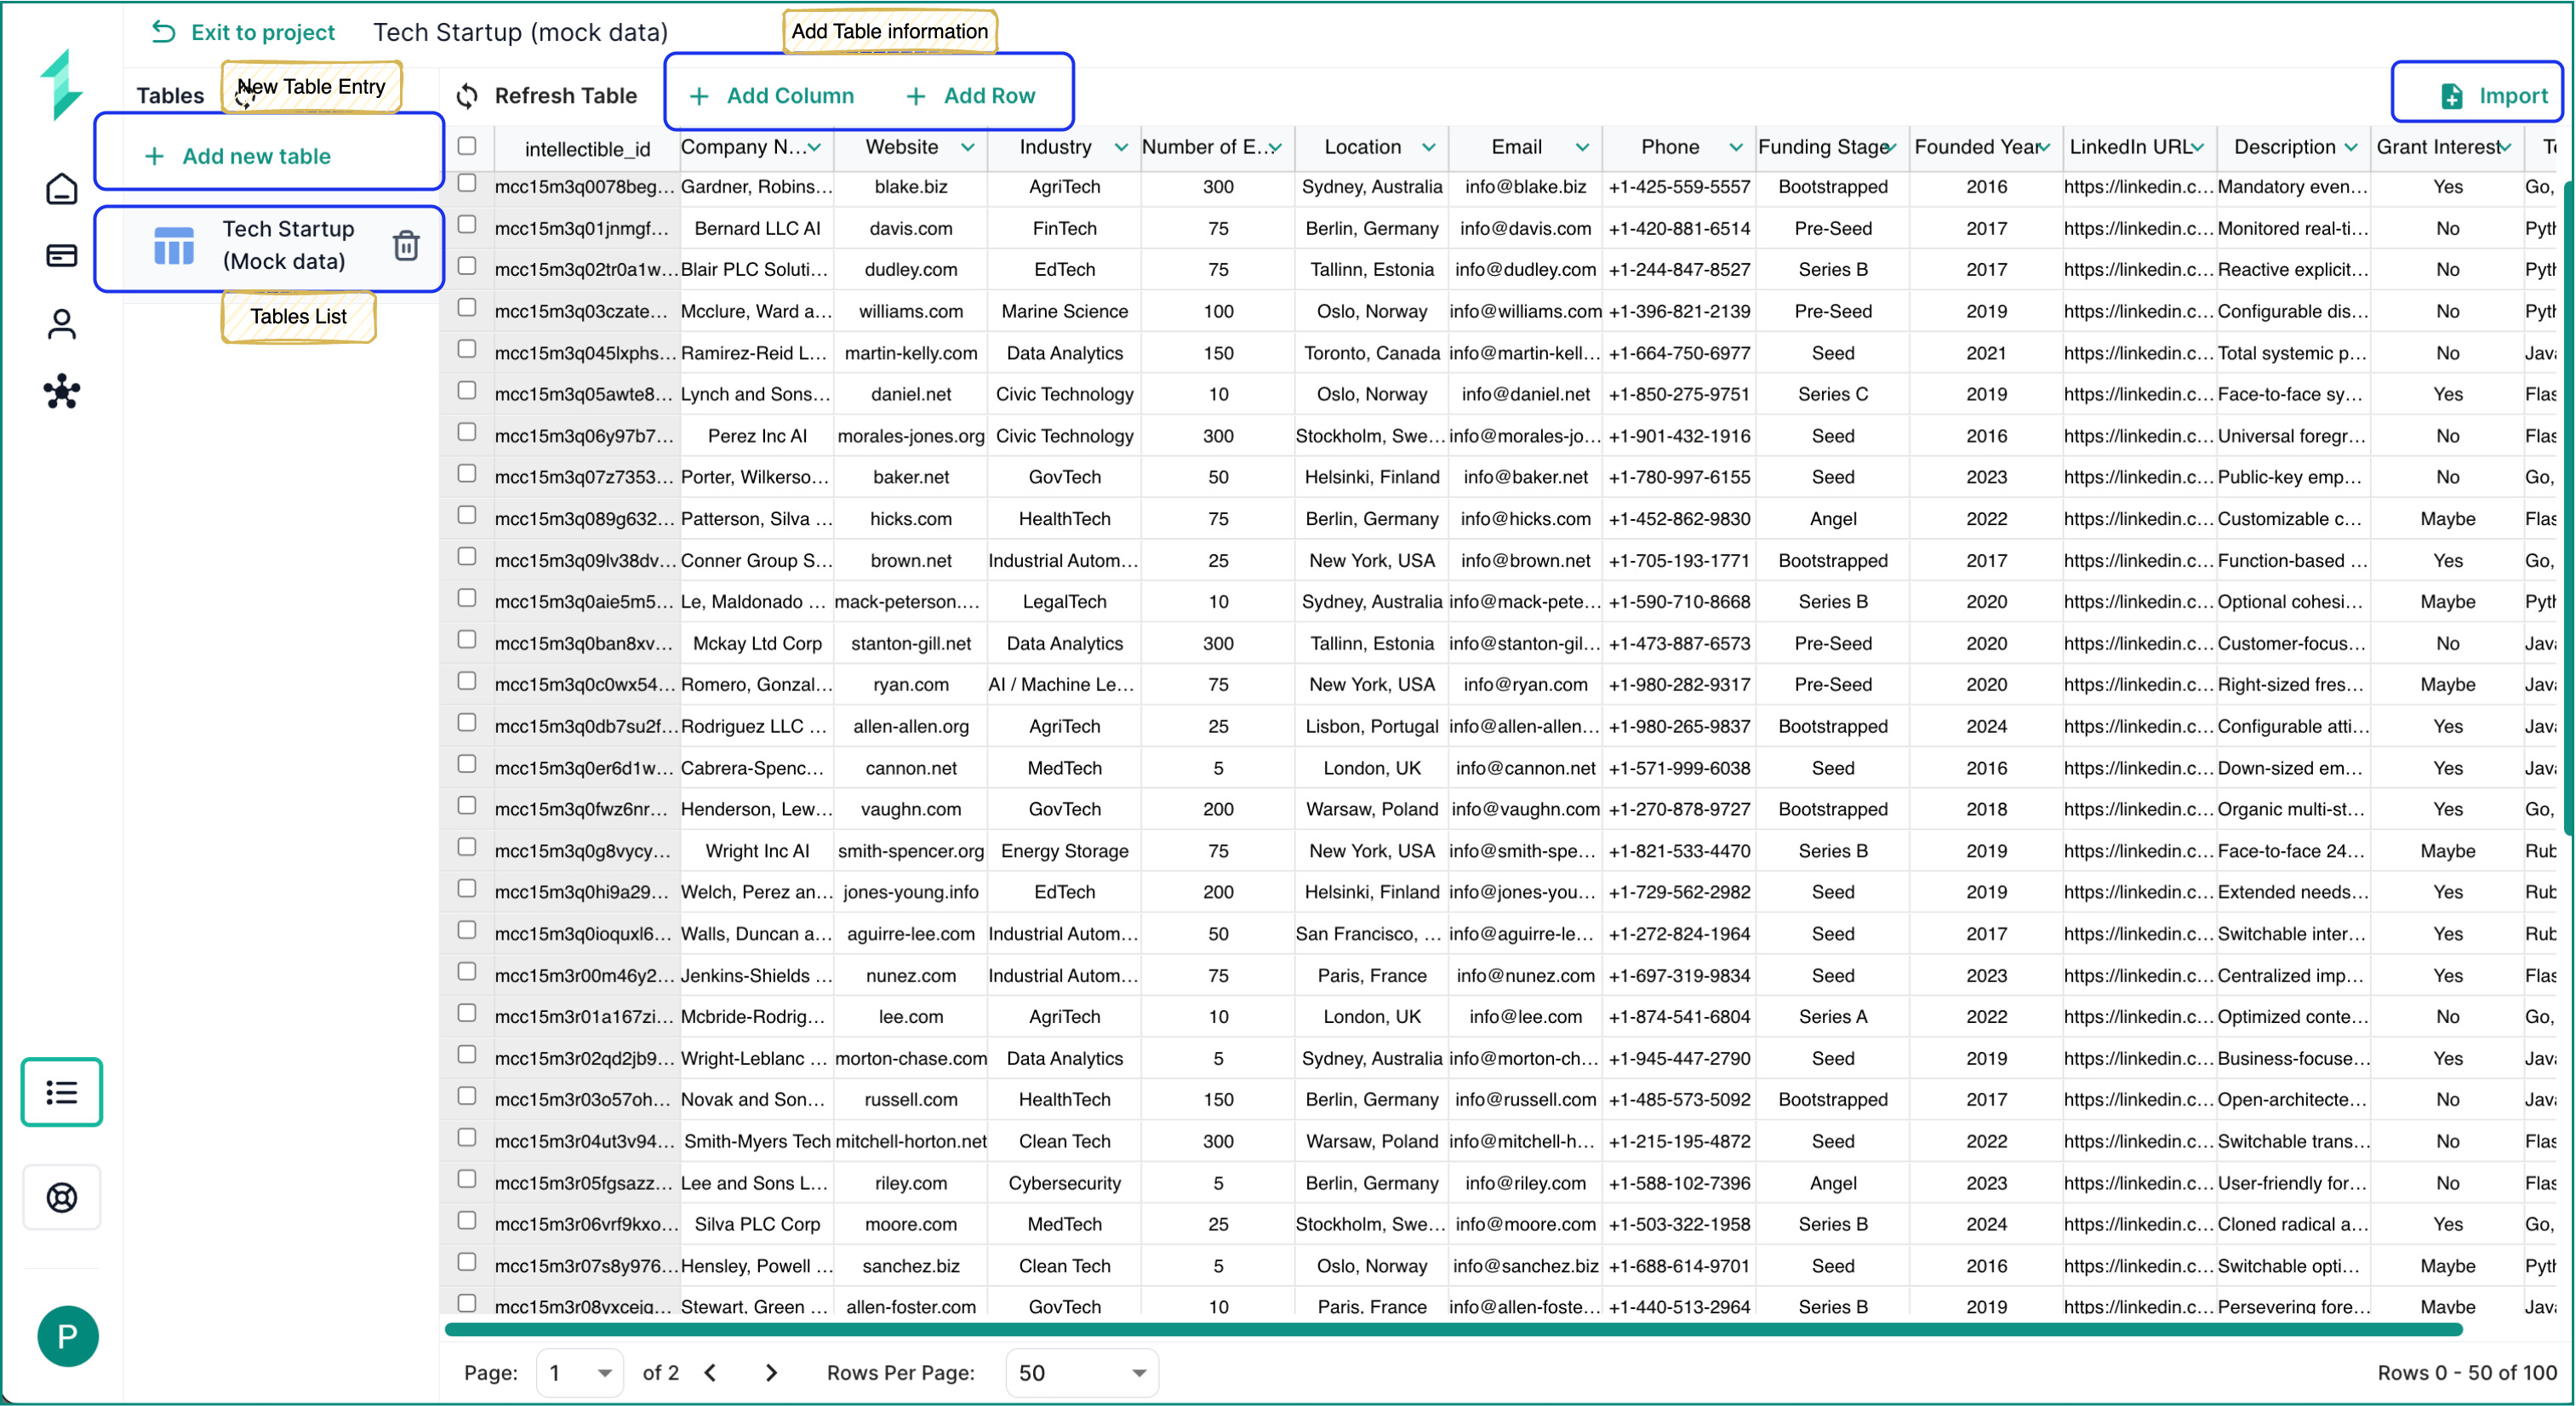
- Inside your database, click Add New Table in the sidebar.
- Name your table (e.g.,
raw_startups,grant_matches). - Add your initial columns to define the structure of the table.
You can also import a database using the Import button in the top-right corner of the table view. This allows you to upload CSVs or previously exported tables into a clean, ready-to-use structure.
Importing CSV Files in Batches
For larger CSV files, use the Import button in the top-right corner of the table view. Select a CSV file from your project library, then start the import.
Intellectible imports CSV files in the background in batches. You can leave the dialog or continue working while the import runs. The table page shows an import banner with the current status and the number of rows imported so far, then refreshes the table when the import completes.
CSV imports from the table panel use the first row as column headers. Missing columns are created automatically, and rows are inserted in bounded batches so large files do not need to finish inside one browser request.
You can also choose to receive an email notification when the import completes or fails.
Managing Your Database Table (Inserting, Adjusting & Deleting)
Adding New Columns Inside the Database Tab
To add a new column to your table:
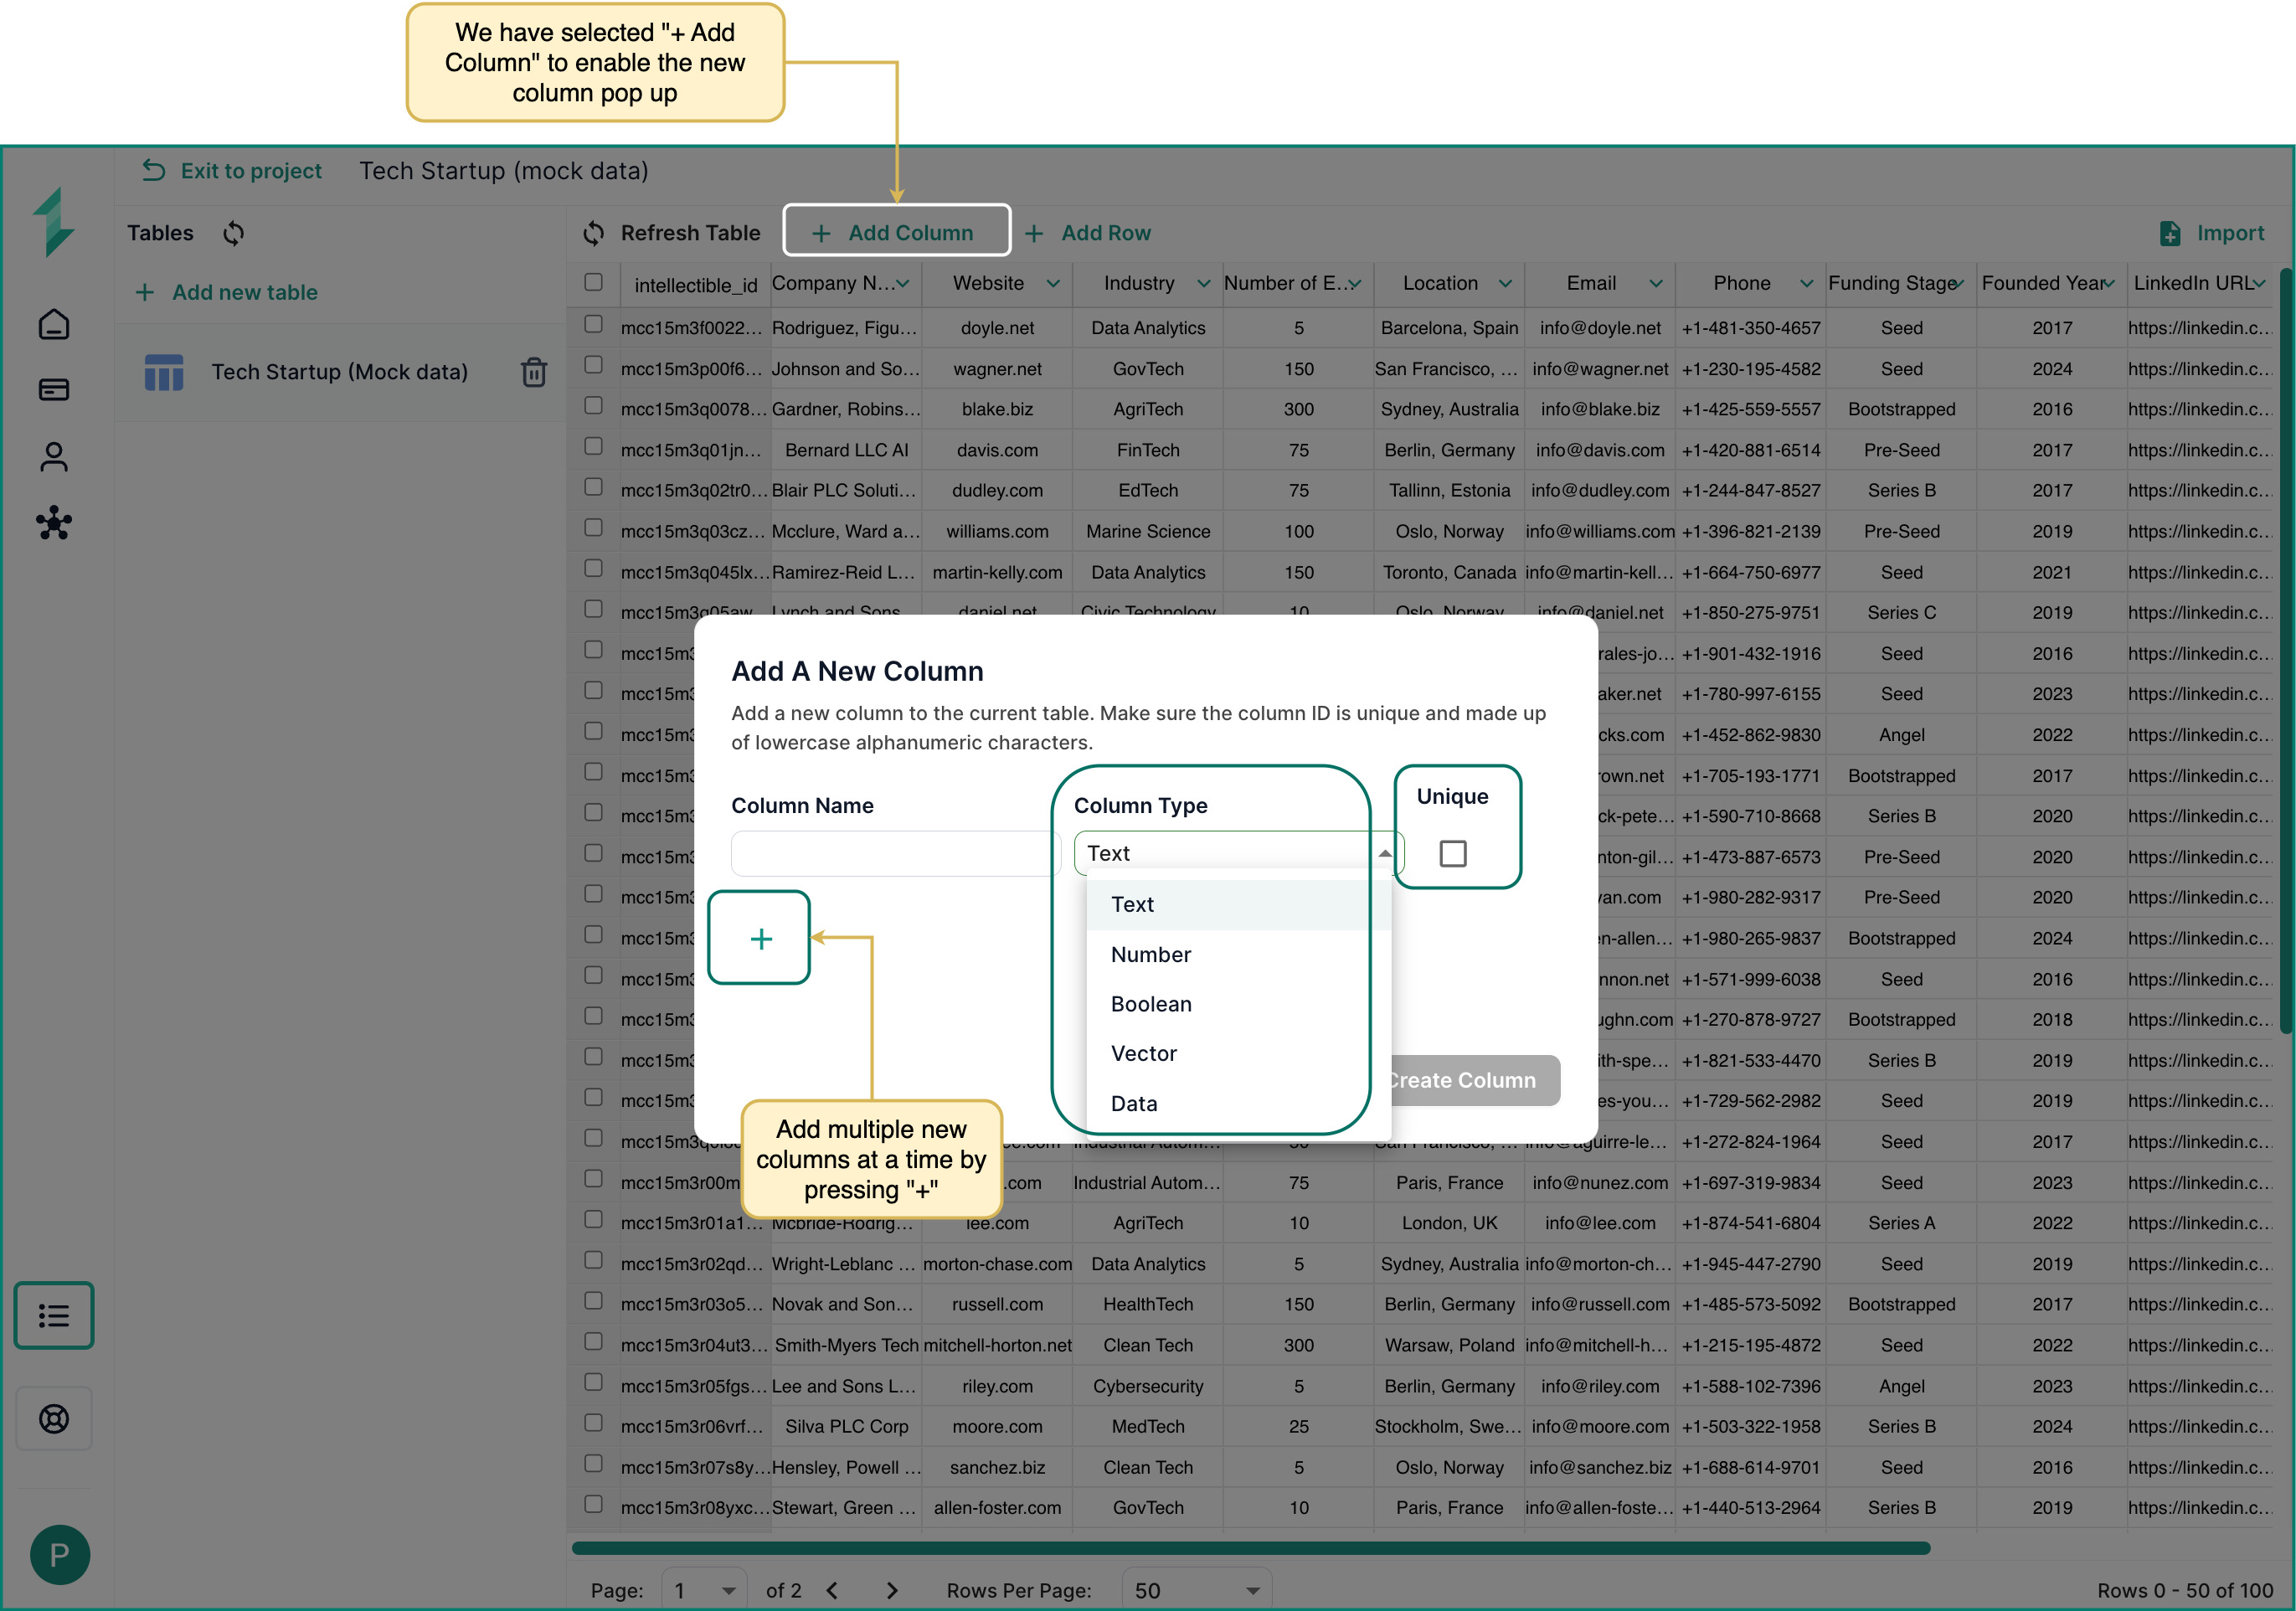
- Click the + Add Column button at the top of the table.
- A popup will appear where you can:
- Enter a Column Name (use lowercase alphanumeric characters).
- Select the Column Type.
- Mark the column as Unique if needed.
- Click the + button to add multiple columns at once before saving.
- When ready, click Create Column to apply all changes.
Column Types & When to Use Them
| Type | Description |
|---|---|
| Text | Use for names, descriptions, tags, or any freeform string content. Ideal for AI outputs or summaries. |
| Number | Use for quantities, rankings, prices, or any numeric data you want to sort, filter, or calculate. |
| Boolean | True/False fields — great for yes/no flags, toggles, or status indicators. |
| Vector | Stores AI-generated embeddings for similarity search or clustering. Advanced use only. |
| Data | Reserved for raw or unstructured system data (rarely needed for most workflows). |
When to Use the Unique Option
Enable the Unique checkbox if each row in the table should have a distinct value for this column. Common examples:
- Emails
- Company names
- IDs or reference numbers
This prevents accidental duplication and can help with deduplication or record lookups later.
Pro TipUse the
+button in the popup to define multiple new columns in a single step — useful when setting up a new table schema.
Inserting New Rows Inside the Database Tab
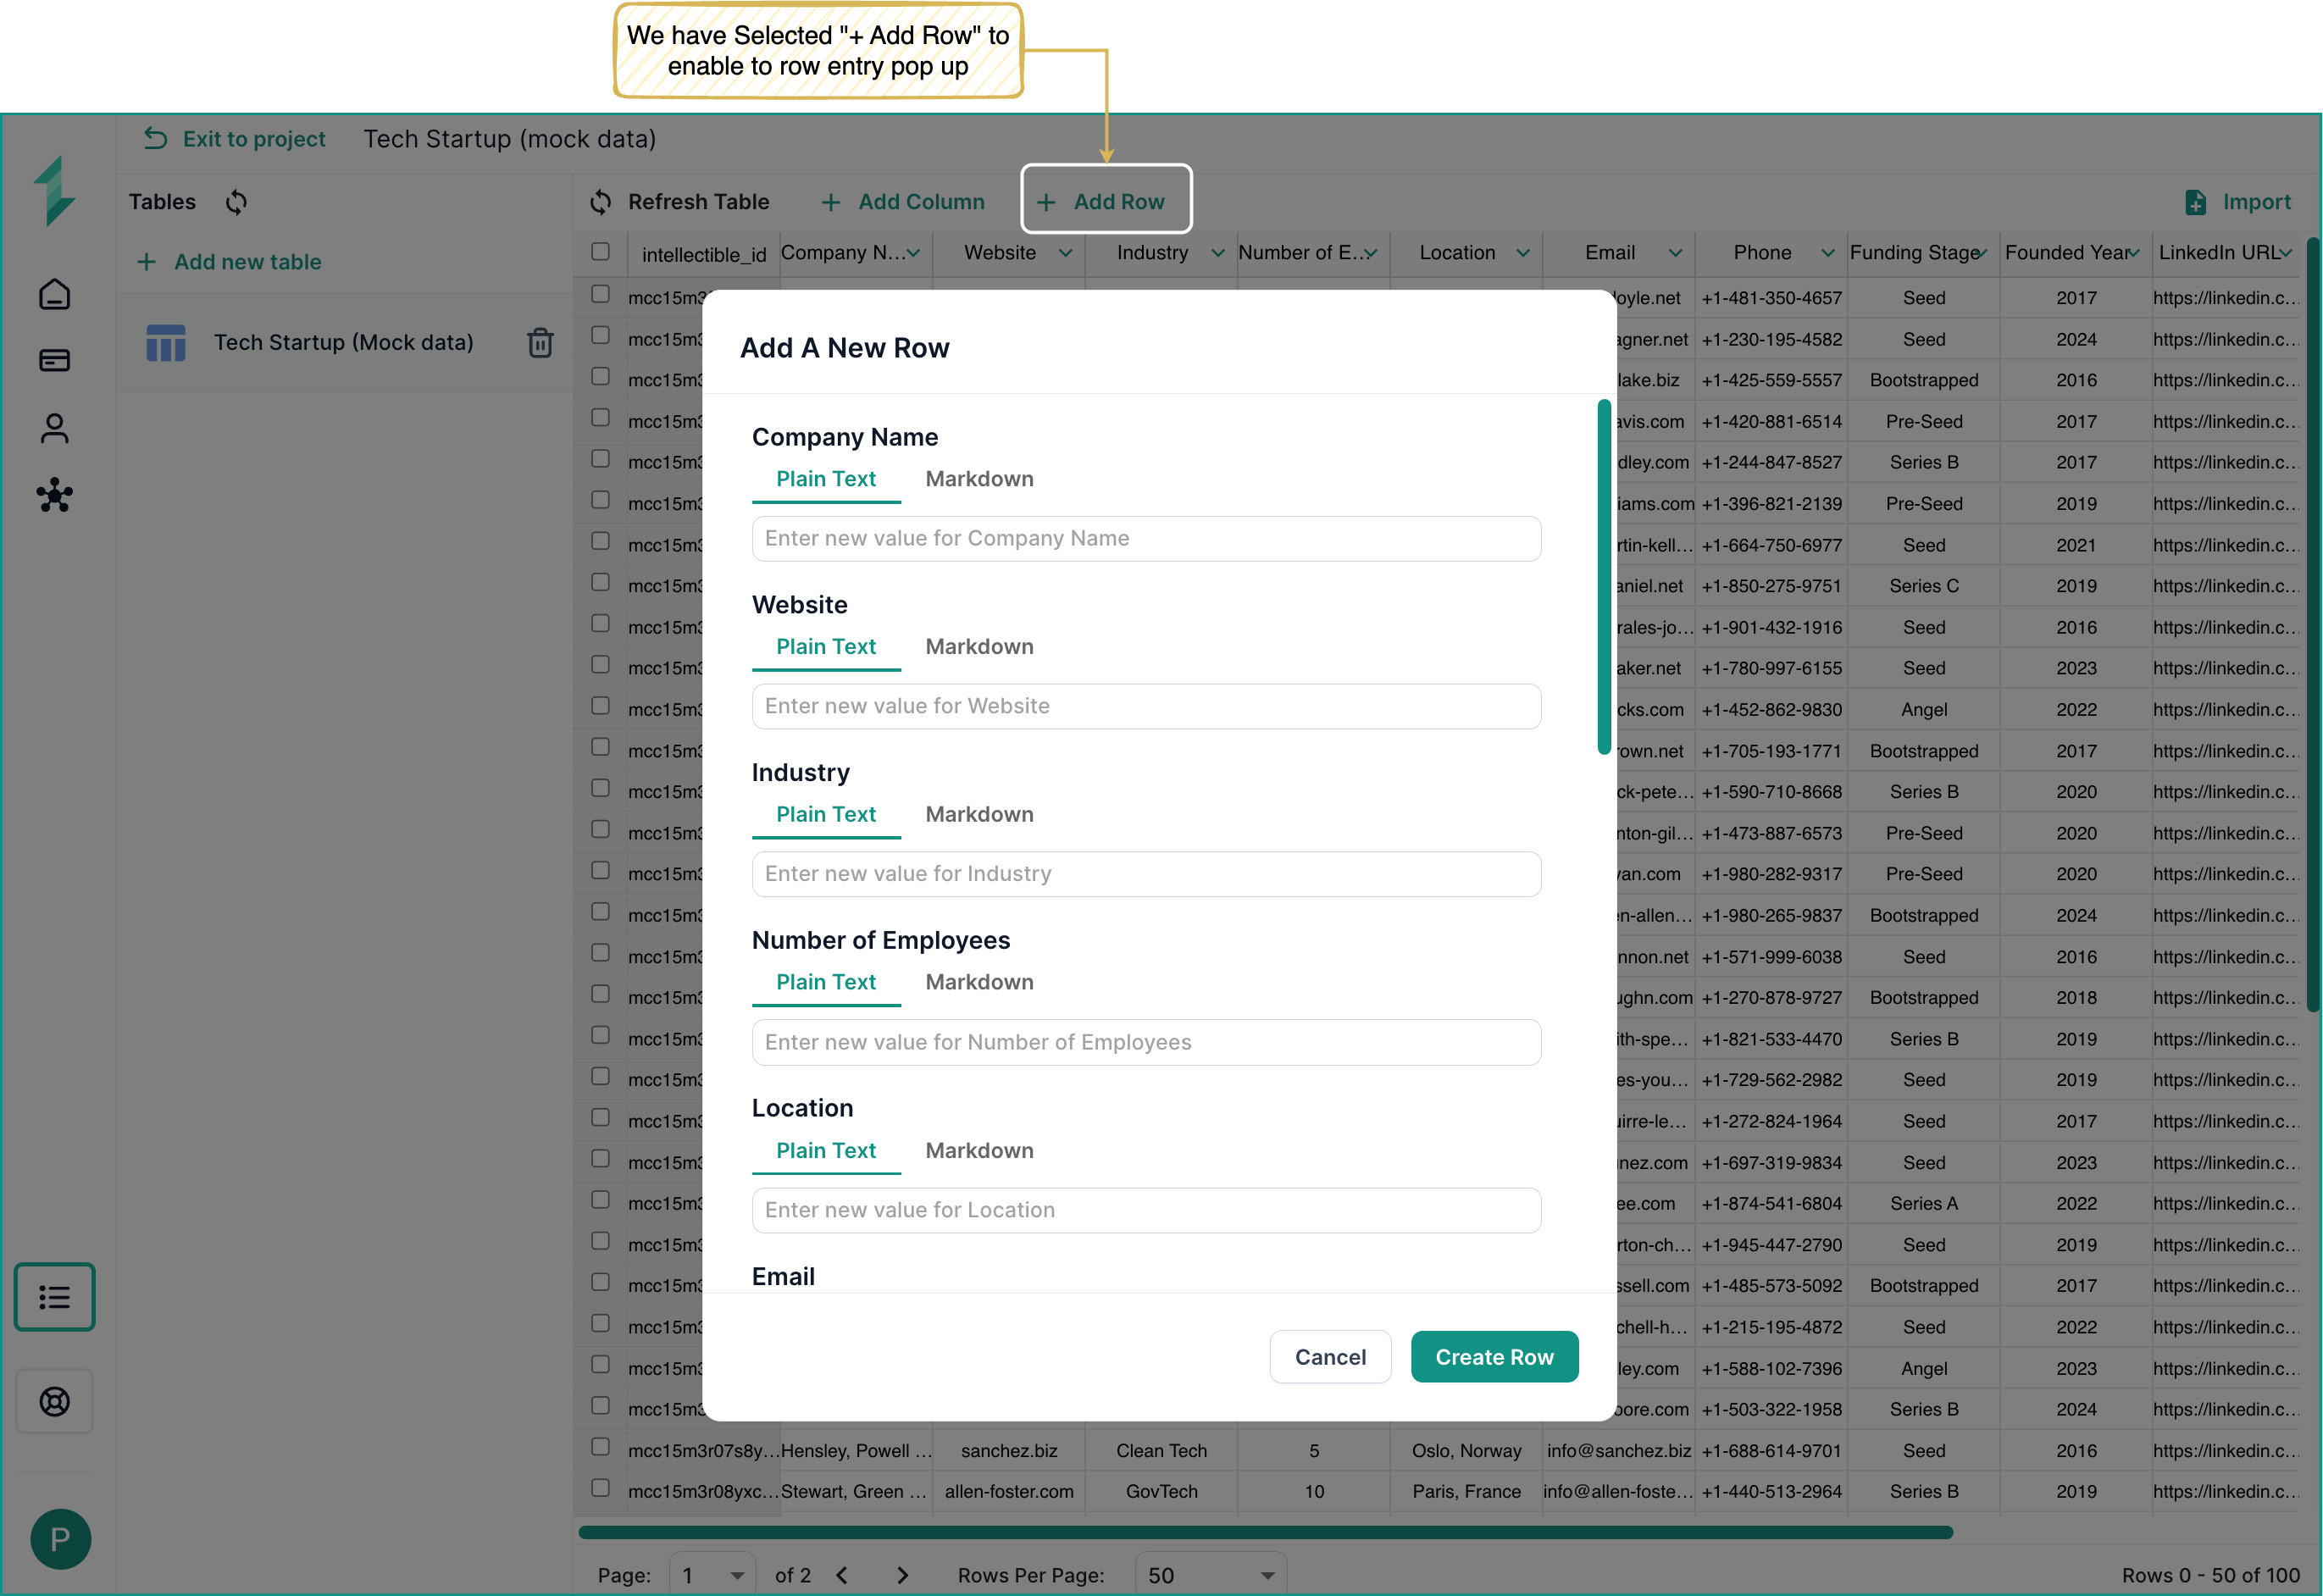
To insert a new record or row:
- Click the + Add Row button in the top bar.
- Enter values for each column. Each cell is editable.
- Click Create Row to add rows into the database table.
Deleting Columns Inside the Database Tab
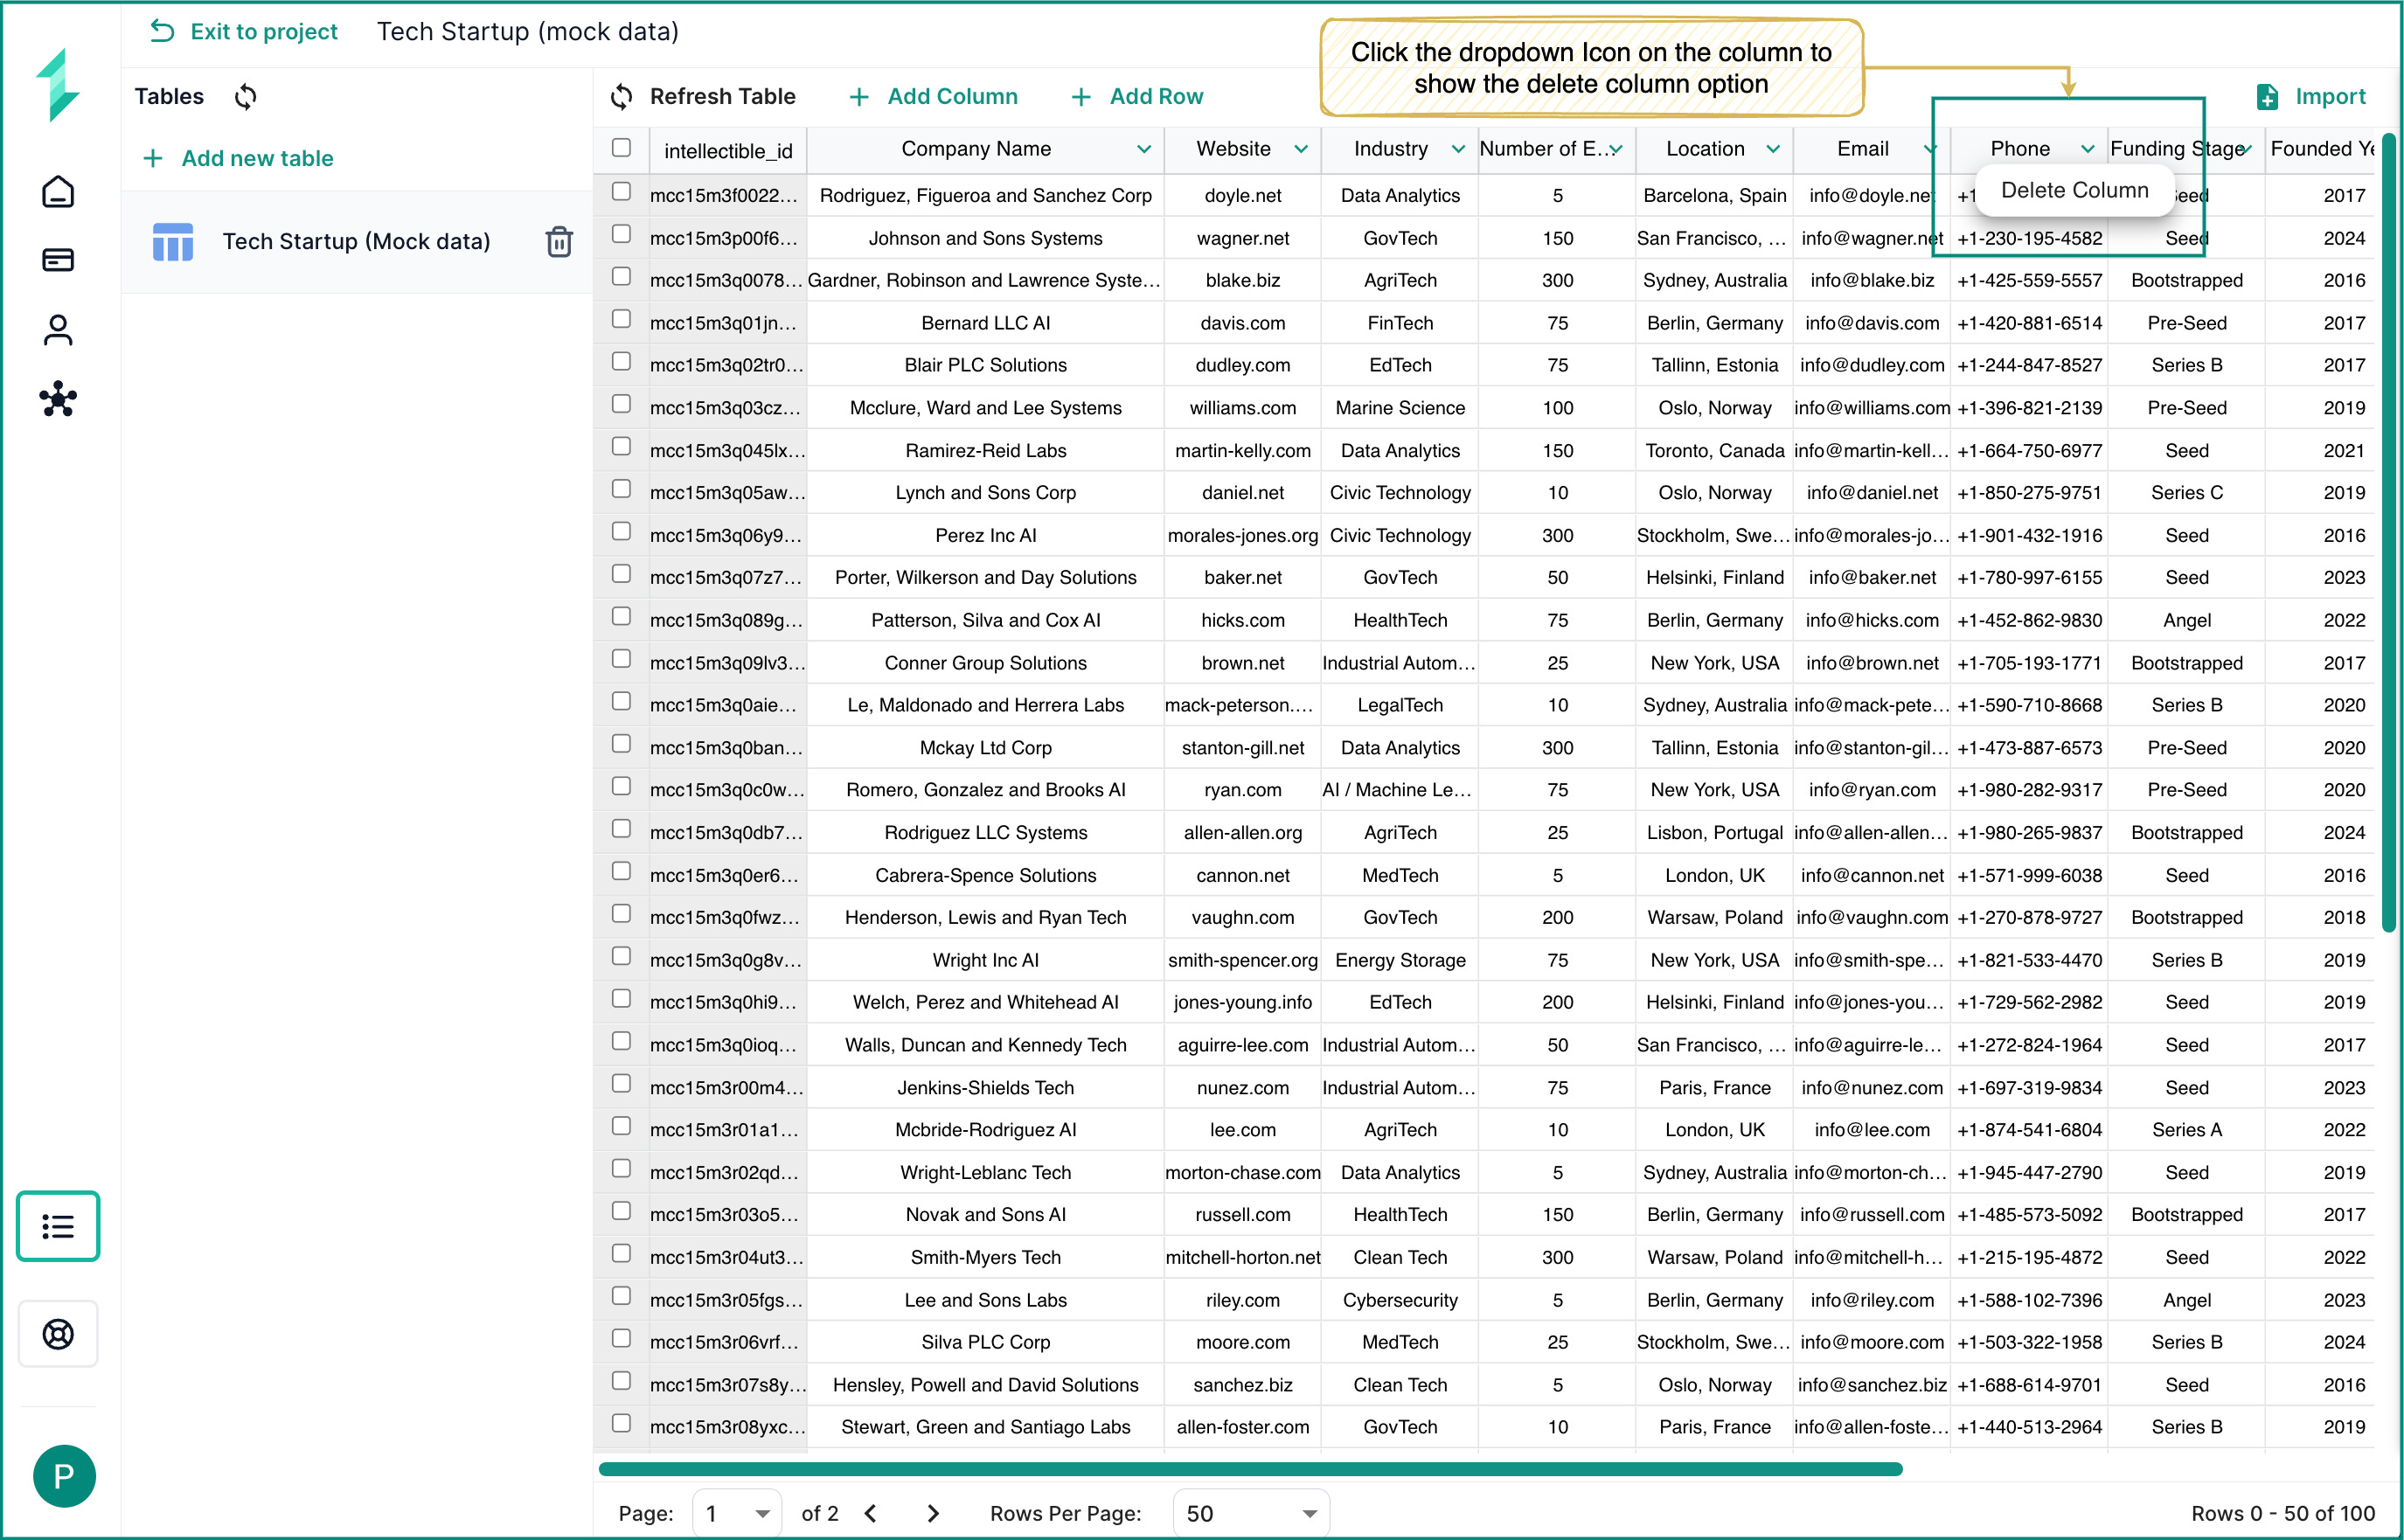
To delete a column:
- Hover over the column you wish to remove.
- Click the downward arrow in the column header.
- Select Delete Column from the dropdown.
- Confirm to apply the change. This action removes all data from that column.
Deleting Rows Inside the Database Tab
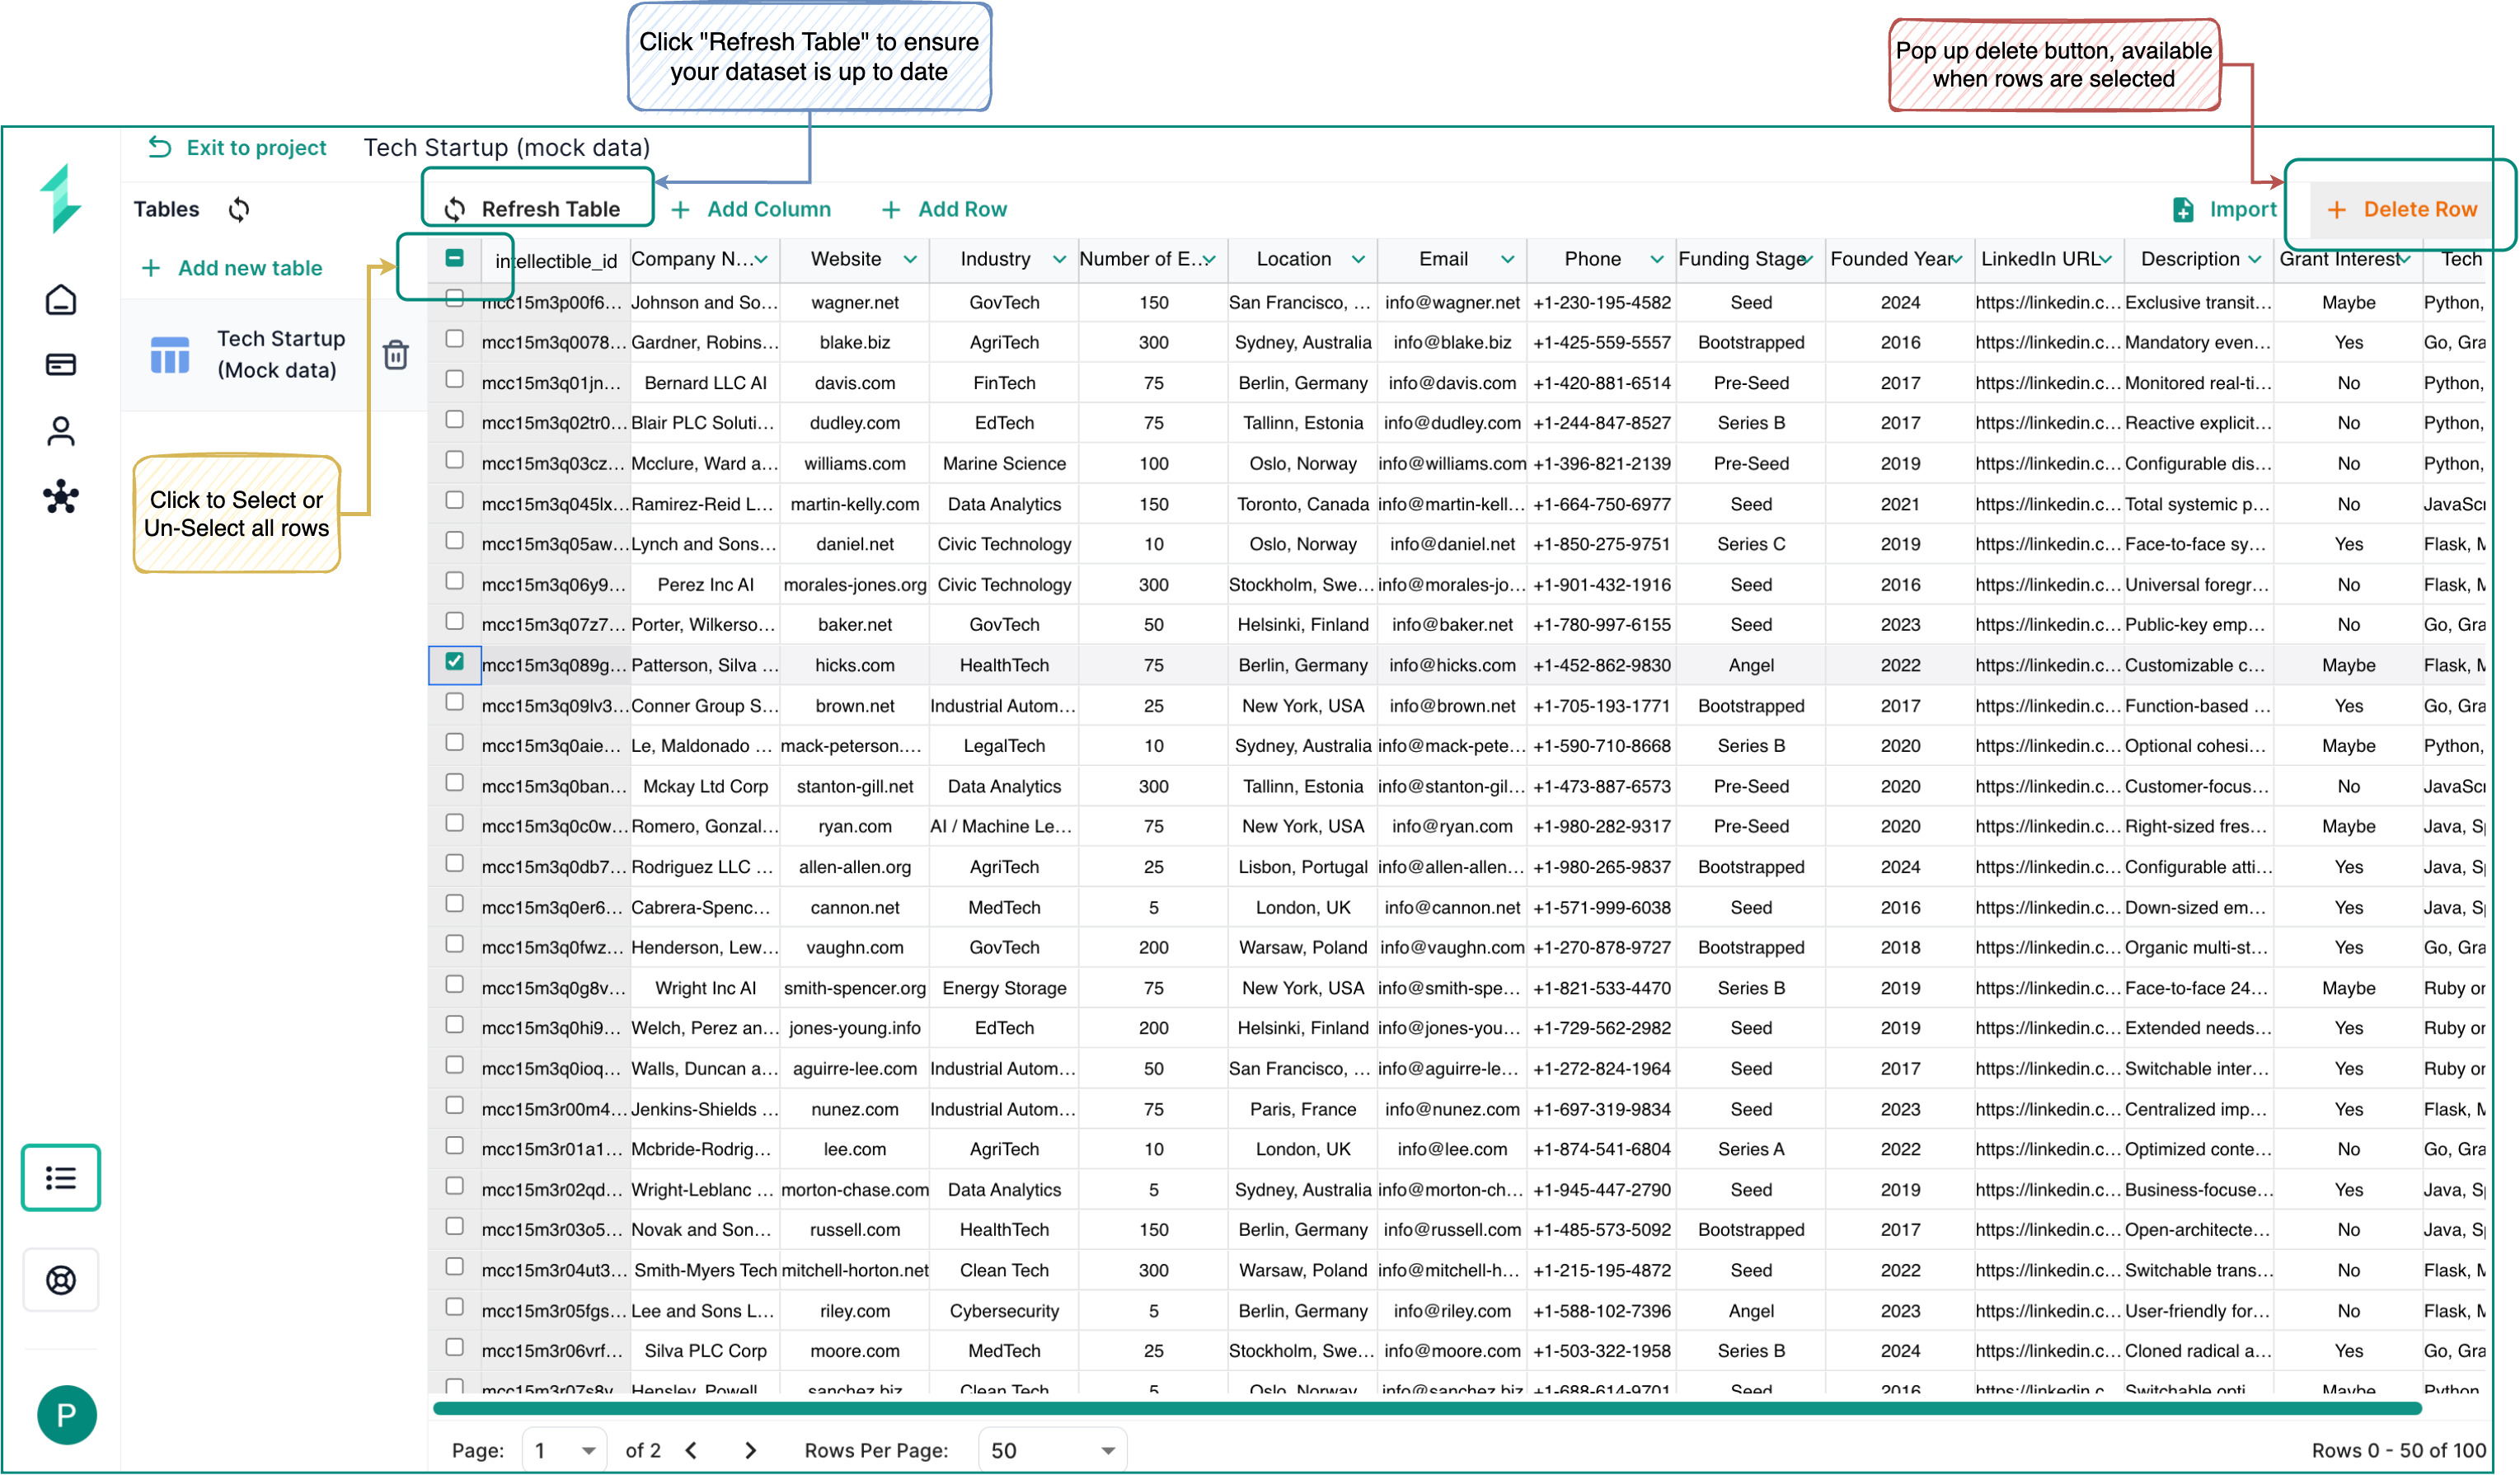
To delete specific rows:
- Select the rows using the checkboxes to the left of the
intellectible_idcolumn.- To delete all rows, use the checkbox in the top-left corner to select the full table.
- Once rows are selected, a Delete button will appear to the left of the Import button.
- Click Delete to remove the selected records from your table.
Updating or Entering Cell Values
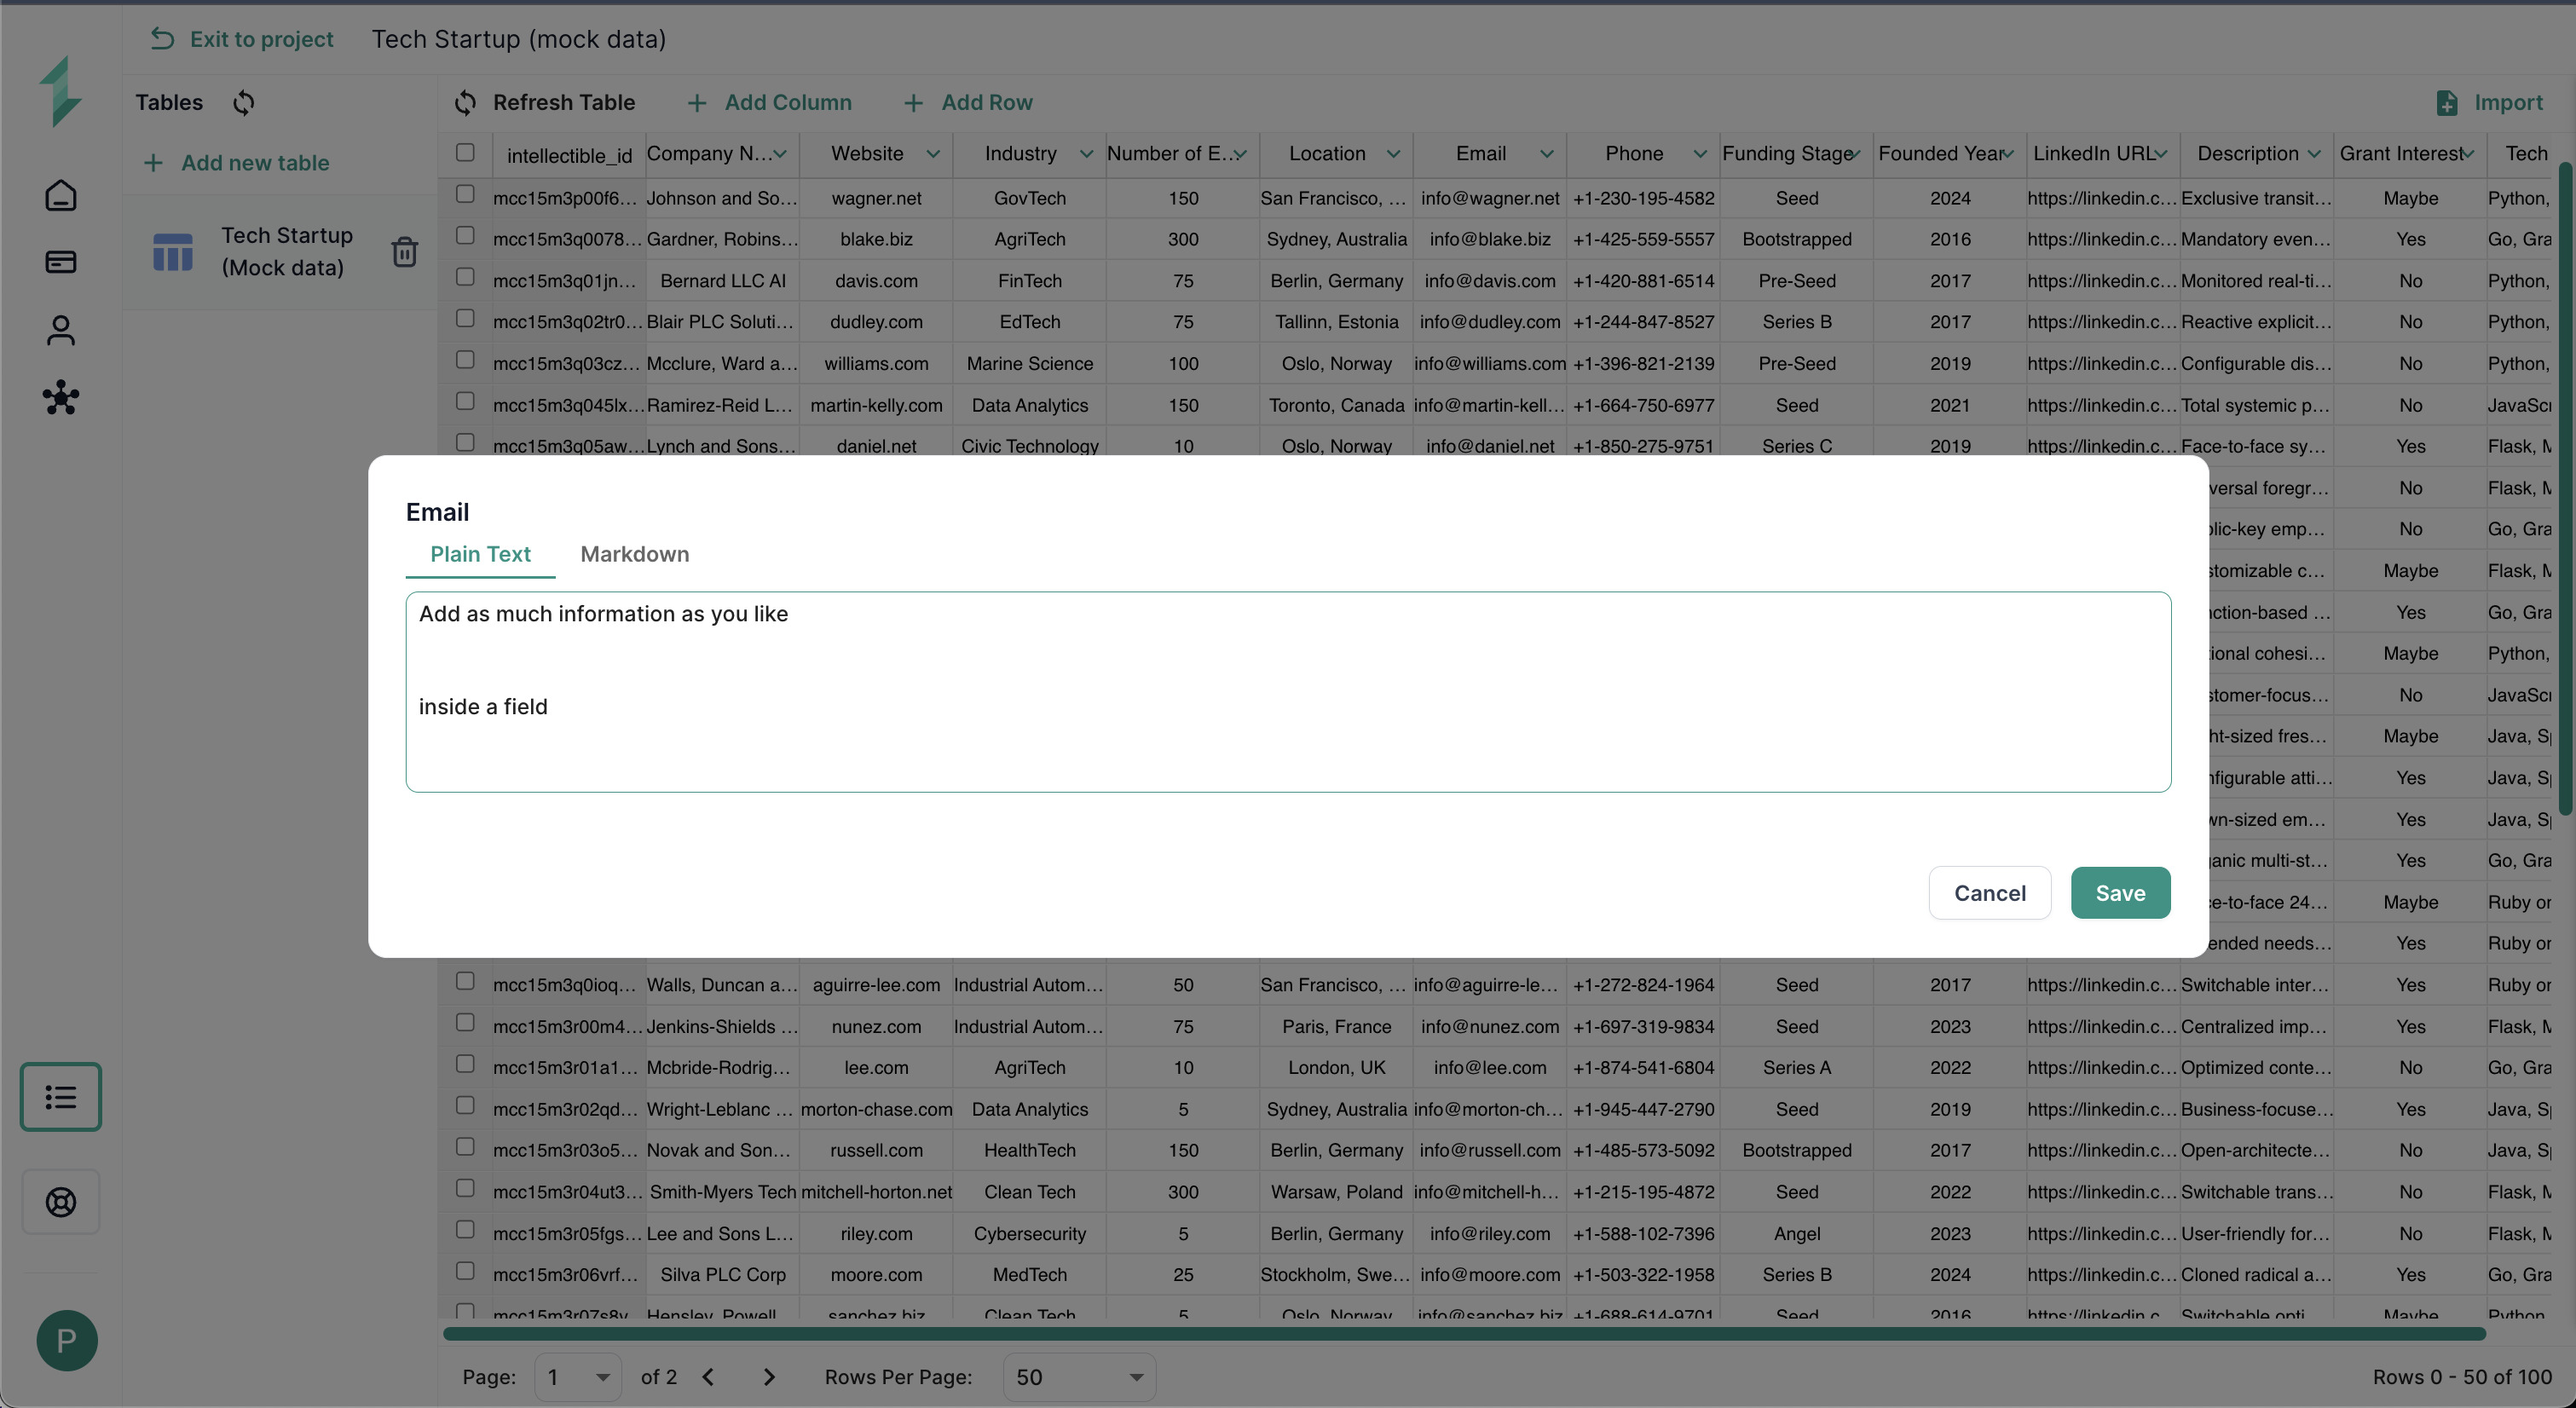
To update the content of any field in your database table:
- Double-click the cell you want to edit.
- The Column Editor Popup will appear, allowing you to modify the value.
- The input options will vary depending on the Column Type:
- Using Text column types for example, you can select between:
- Plain Text — simple input for short notes or raw values.
- Markdown — rich text formatting, ideal for structured outputs like lesson plans or proposal sections.
- Using Text column types for example, you can select between:
- Once you've made your changes, click Save to confirm the update.
Use Markdown mode in Text fields to structure outputs clearly — ideal for AI-generated summaries, formatted content, or multi-line inputs.
This editing method allows you to quickly update values without running a workflow, making it ideal for manual corrections, enrichment, or reviewing AI-generated results.
Using Database Nodes Within Your Intellectible Workflows
Whether you're capturing form submissions, generating personalized content, or uncovering trends — Intellectible's visual workflow builder makes it easy to work with databases using intuitive no-code nodes.
To help you get started, we've included a downloadable mock startup dataset that you can import directly into your Intellectible project. It’s a quick way to explore how database-powered automation works in practice.
Download the Sample Startup Database 📥
Database Nodes
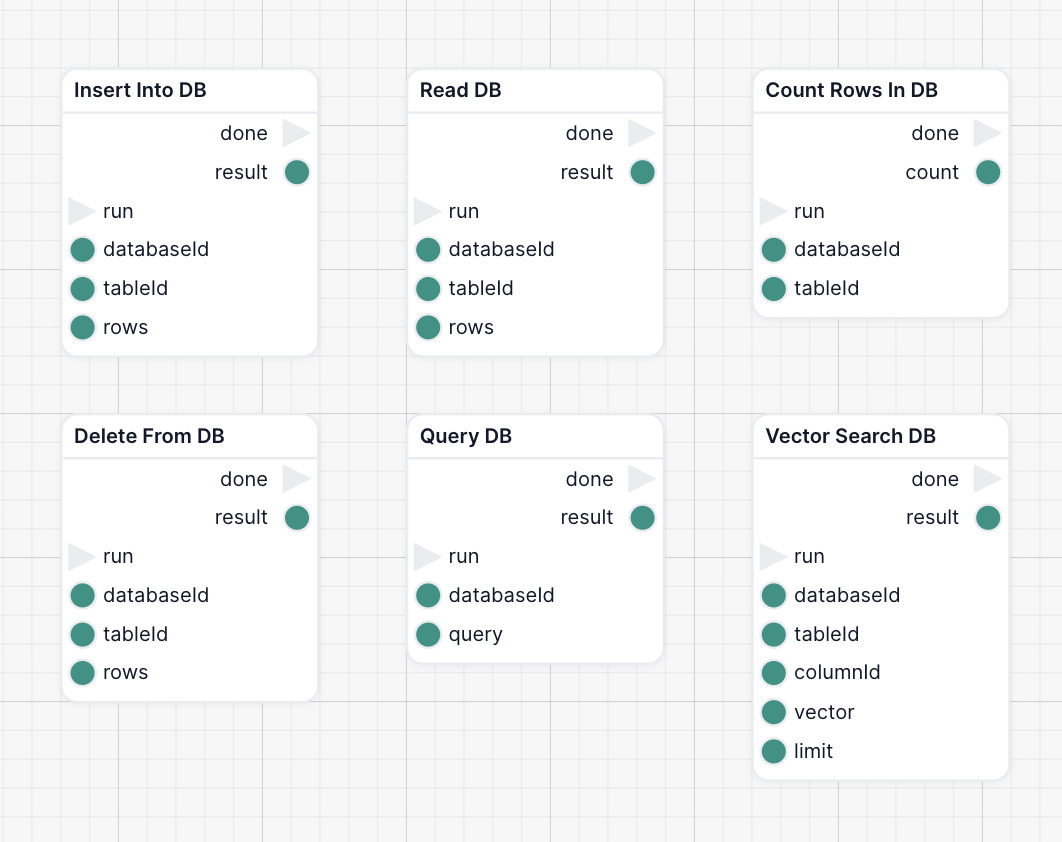
| Node Name | What It Does | Common Use Case |
|---|---|---|
| Insert Into DB | Adds one or more new rows to a table. Auto-creates the schema if it doesn’t exist. | Save a new client intake form, a scraped company profile, or an AI-generated summary into your database. |
| Read DB | Runs a custom SQL query and returns matching rows. | Pull all candidates with “Python” in their skillset and over 3 years of experience for a recruiter workflow. |
| Query DB | Uses a visual query builder (no SQL) to filter rows based on input. | Let your sales team filter by company size and industry to find prospects for targeted outreach. |
| Delete From DB | Deletes rows that match a defined condition. | Clean out archived leads, past events, or records marked for deletion by a user. |
| Count Rows In DB | Returns the number of rows (total or matching). | Trigger a follow-up if a user has fewer than 3 pending tasks or show a “no results” message when needed. |
| Vector Search DB | Finds records with the most similar meaning (not just keywords) using AI-generated vector embeddings. | Match a new user request, product description, or conversation to past entries with similar context — ideal for response reuse, memory, or recommendations. |
Vector search uses embeddings — numerical representations of meaning generated by AI — to find entries that are semantically similar, even if they don’t share the same keywords. This lets you build powerful meaning-based search. Instead of matching words, it matches concepts provided the data is stored as an embedding.
For example:
If a user searches for "onboarding challenges", vector search might return entries about "employee ramp-up struggles", "training timelines", or "early-stage performance issues" — all related in meaning, but with different wording.
This is ideal for matching:
- New support tickets to past resolutions
- Client questions to existing knowledge base content
- Grant or product descriptions to relevant past entries
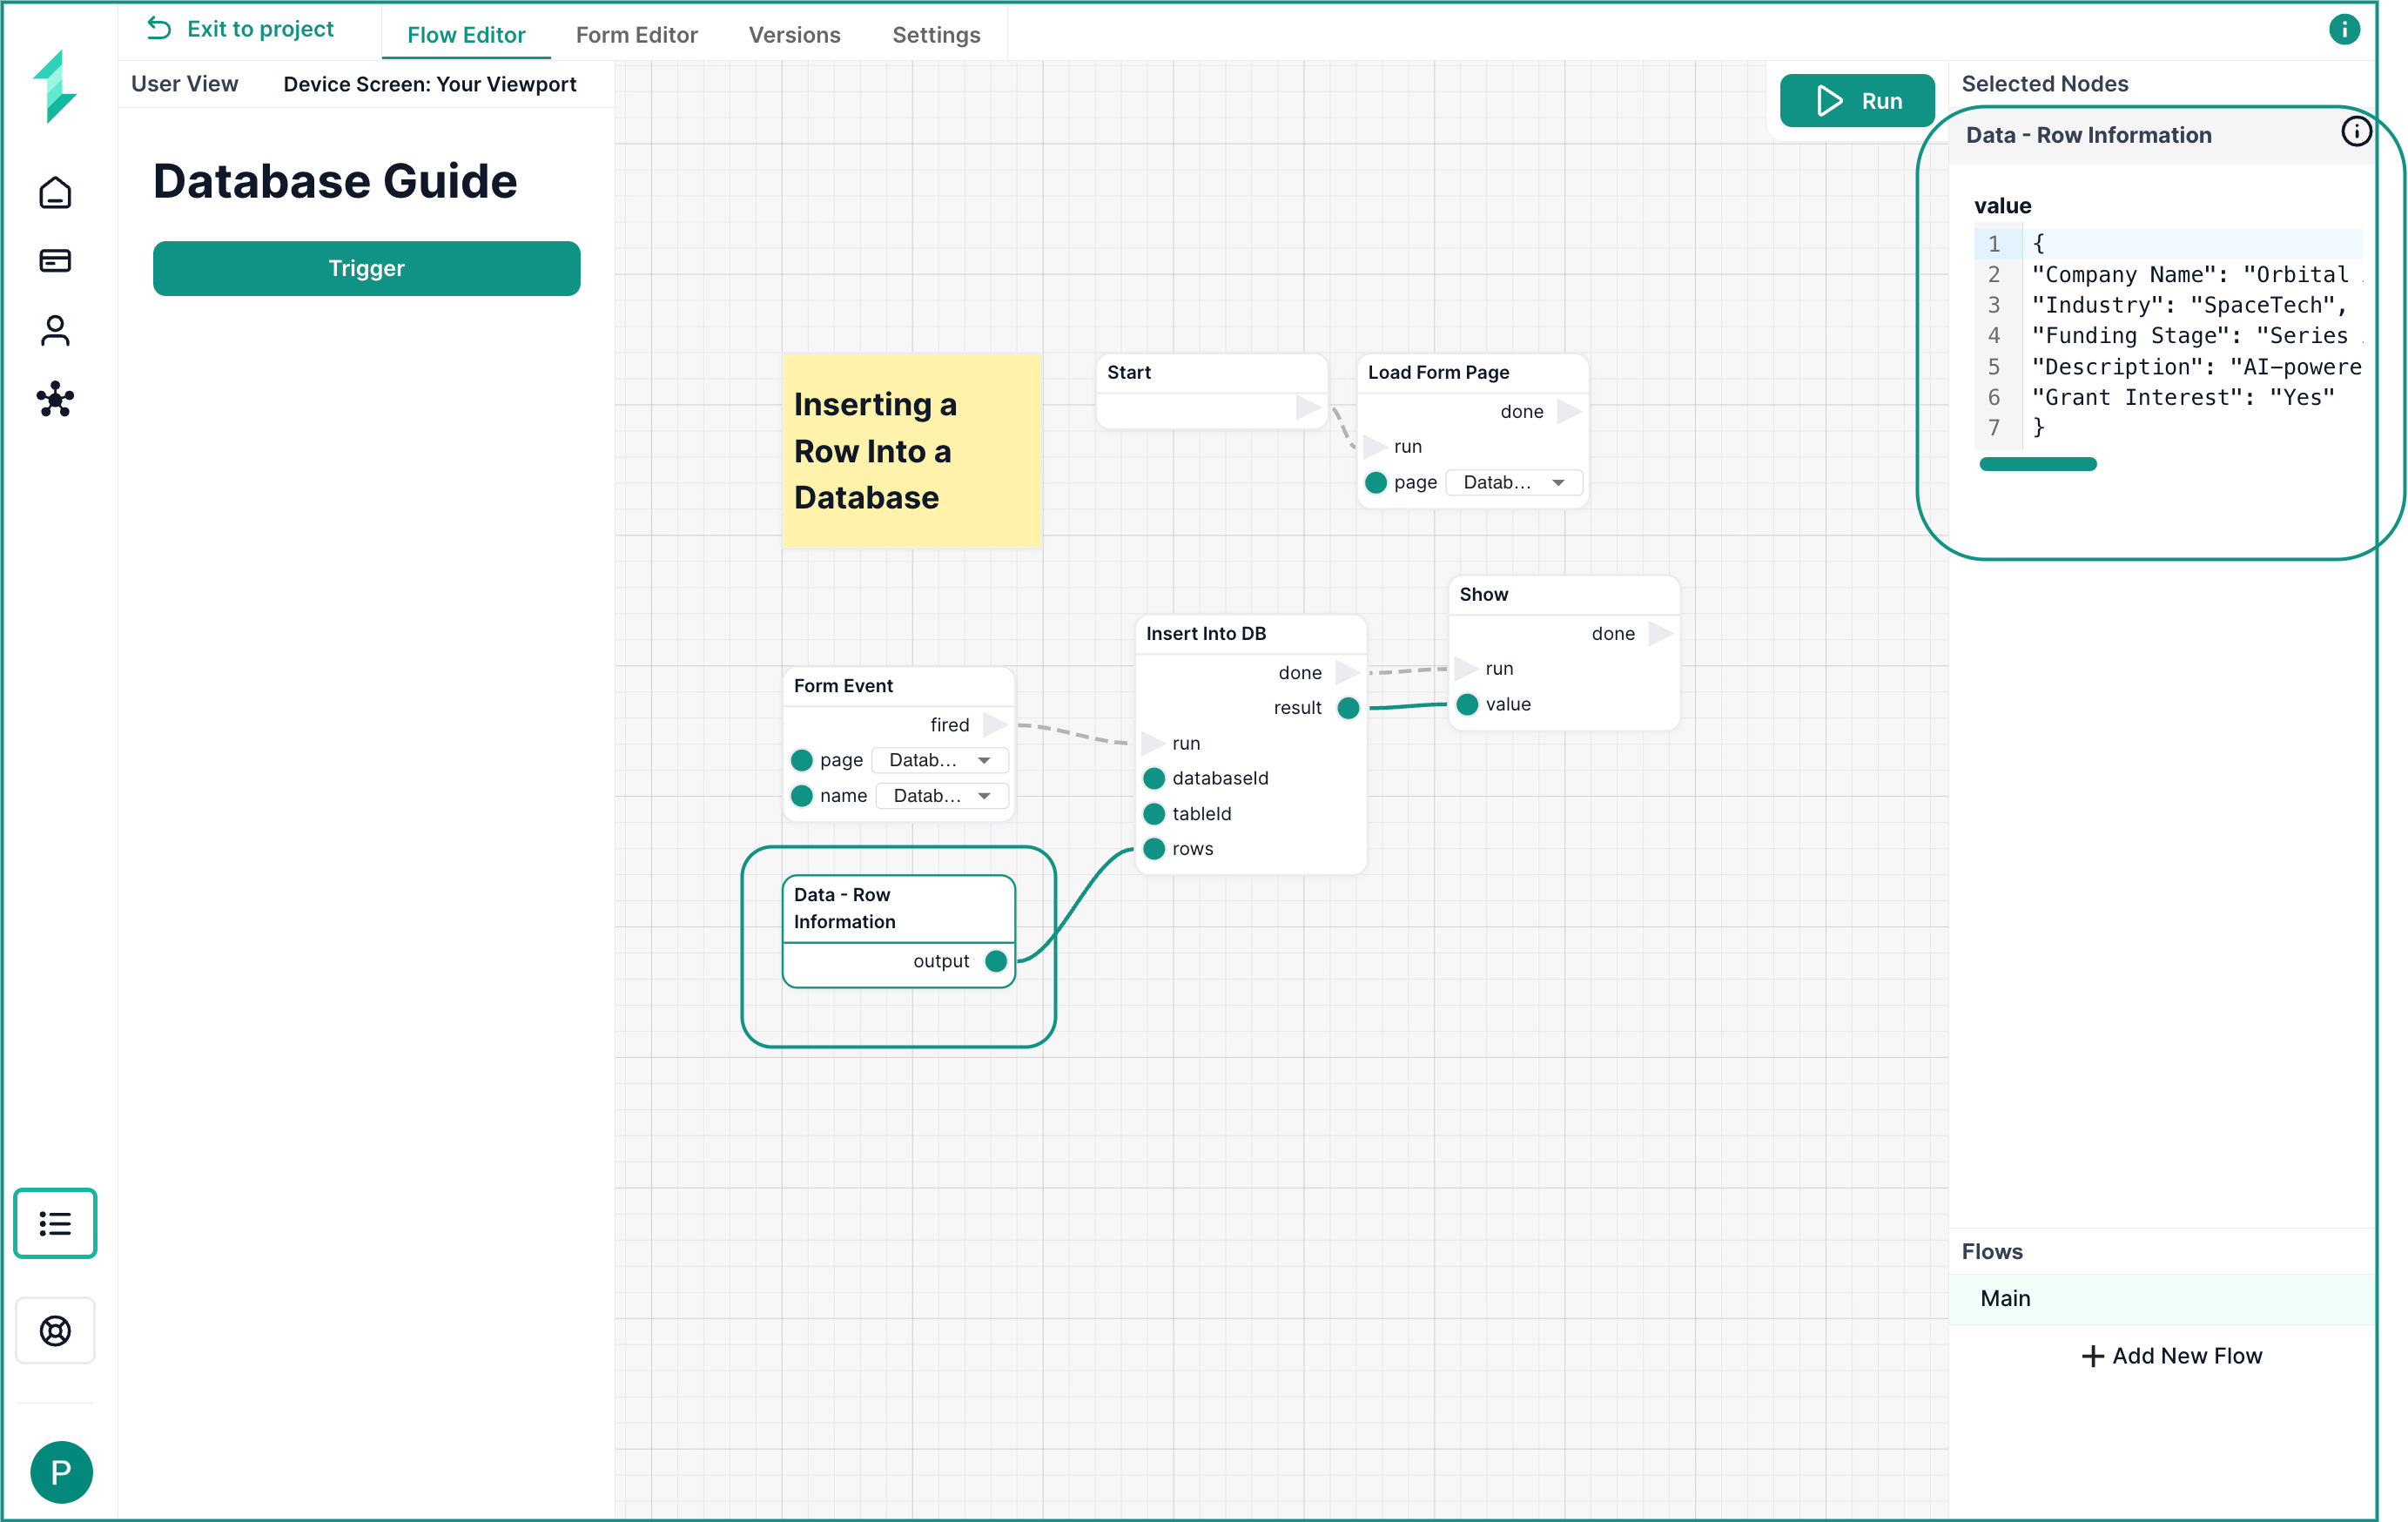
Insert Into DB Node
The Insert Into DB node allows you to insert a new row of structured data into a selected database table.
In this simple workflow, we add a static startup record to the Tech Startup (Test Data) table when a user clicks a trigger button.
When you insert a record through a workflow, Intellectible checks if the table exists. If not, it creates it automatically, with field types inferred from the input values.
What This Workflow Does
- Loads a form page called Database Guide
- Waits for a Trigger button to be pressed
- Uses a
Datanode to define the row of information - Inserts the row into the selected database table
- Displays a confirmation in a Show node
Step 1: Load the Page
Add a Load Form Page node and set it to load the form page where your button lives (e.g. "Database Guide").
Step 2: Wait for a Button Click
Add a Form Event node and configure it to trigger when the button is pressed.
Step 3: Define the Row Data
Use a Data node to define the row. This must be formatted as a JSON object where the keys exactly match the column names in your database table as below.
{
  "Company Name": "Orbital",
  "Industry": "SpaceTech",
  "Funding Stage": "Series B",
  "Description": "AI-powered satellite logistics",
  "Grant Interest": "Yes"
}
You don't need to include every field in your row. Any columns not specified will simply be left empty.
Step 4: Insert Into the Database
Add an Insert Into DB node:
- Select your database and table from the node settings side panel
- Connect the
Form Eventto theruninput - Connect the
Datanode output to therowsinput
Step 5: Show the Result
Use a Show node connected to the done output to confirm success.
Make sure your column names in the row match exactly (including case and spacing) with your database fields.
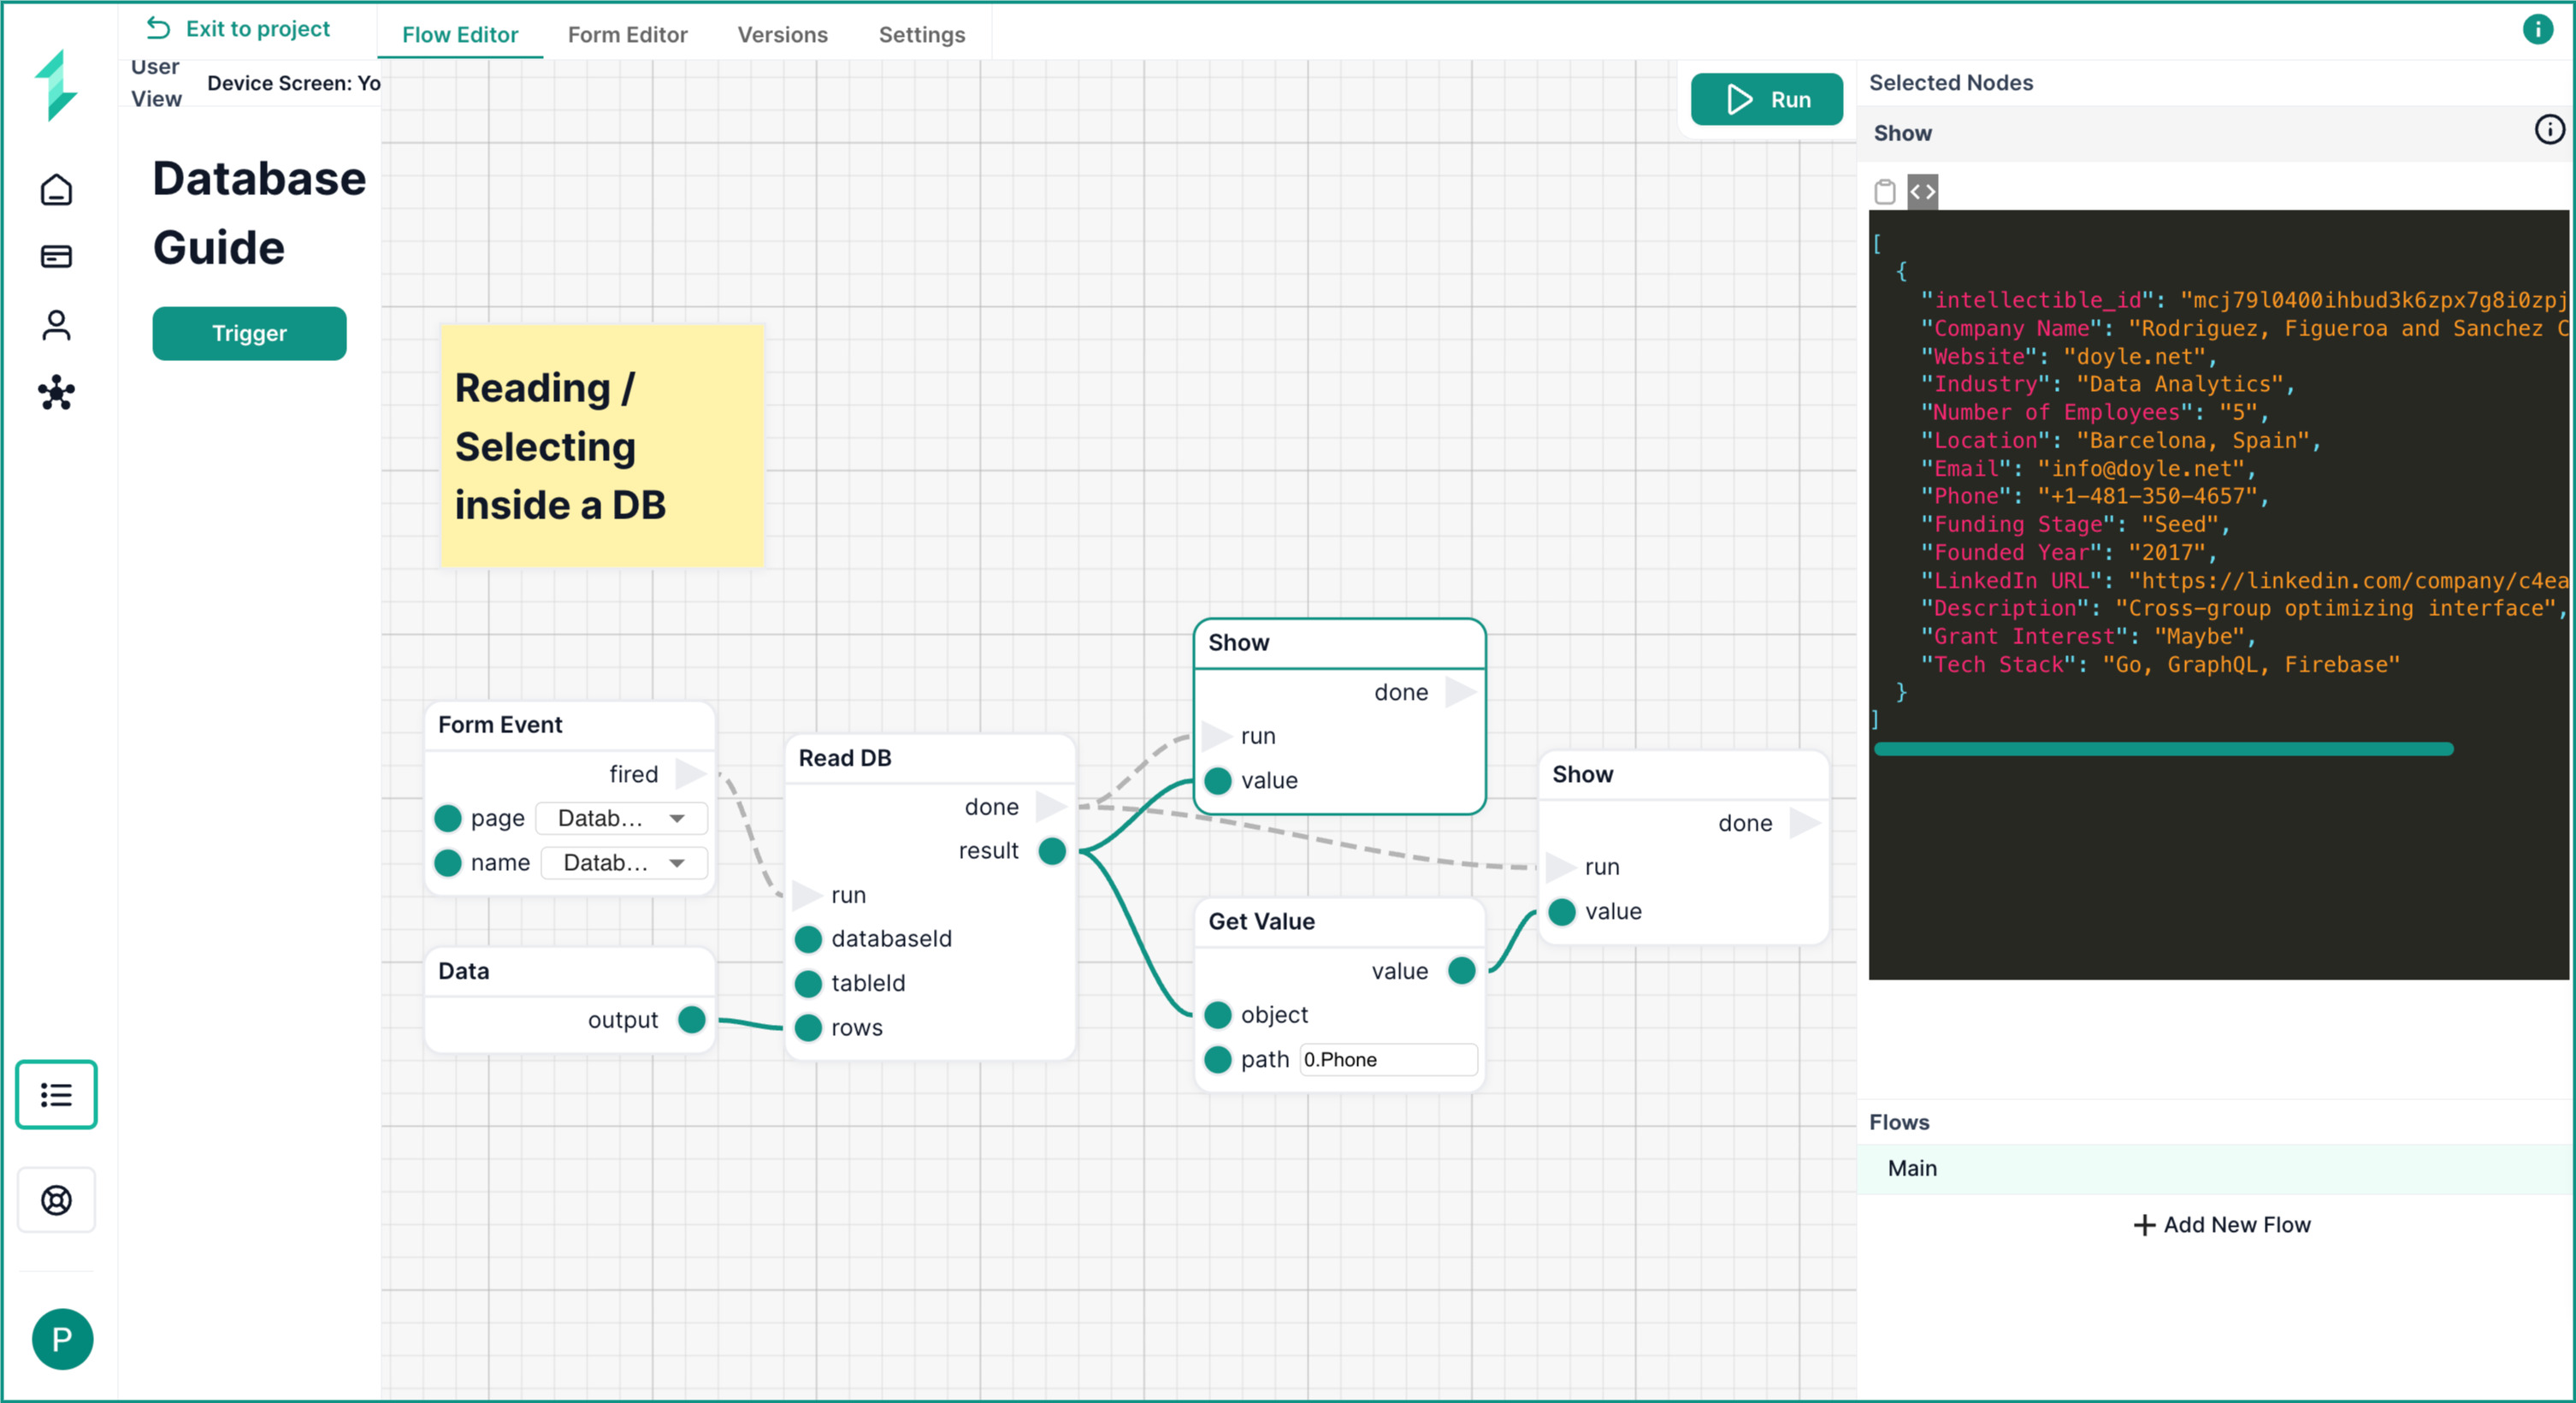
Read DB Node
The Read DB node allows you to select and return rows from a specified table in your project’s database. It executes a raw SQL query behind the scenes using the parameters you provide.
In this example, we retrieve a single startup record using a basic filter — and display either the full result or a specific column value.
What This Workflow Does
- Loads a form page with a Trigger button
- Waits for a user click via a
Form Event - Uses a
Datanode to define a basic row filter - Uses
Read DBto retrieve a matching record - Shows the entire object (all the fields relating to the matching record), and also pulls just one field using a
Get Valuenode
Step 1: Load and Trigger
Use a Load Form Page and Form Event node as before to wait for a user click.
Step 2: Add a Filter
Use a Data node to define the filter criteria. In this case, we match the Email column:
{
  "Email": "info@doyle.net"
}
Step 3: Read From the Database
Add a Read DB node:
- Choose your
databaseIdandtableId - Connect the
Form Eventtorun - Connect the
Datanode output torows
Step 4: Display or Extract the Result
You can show the full record using a Show node.
You can extract a specific field using the Get Value node and specifying the column you wish to return. In the example above, we have returned just the Phone column of the first record in the returned list using:
0.Phone
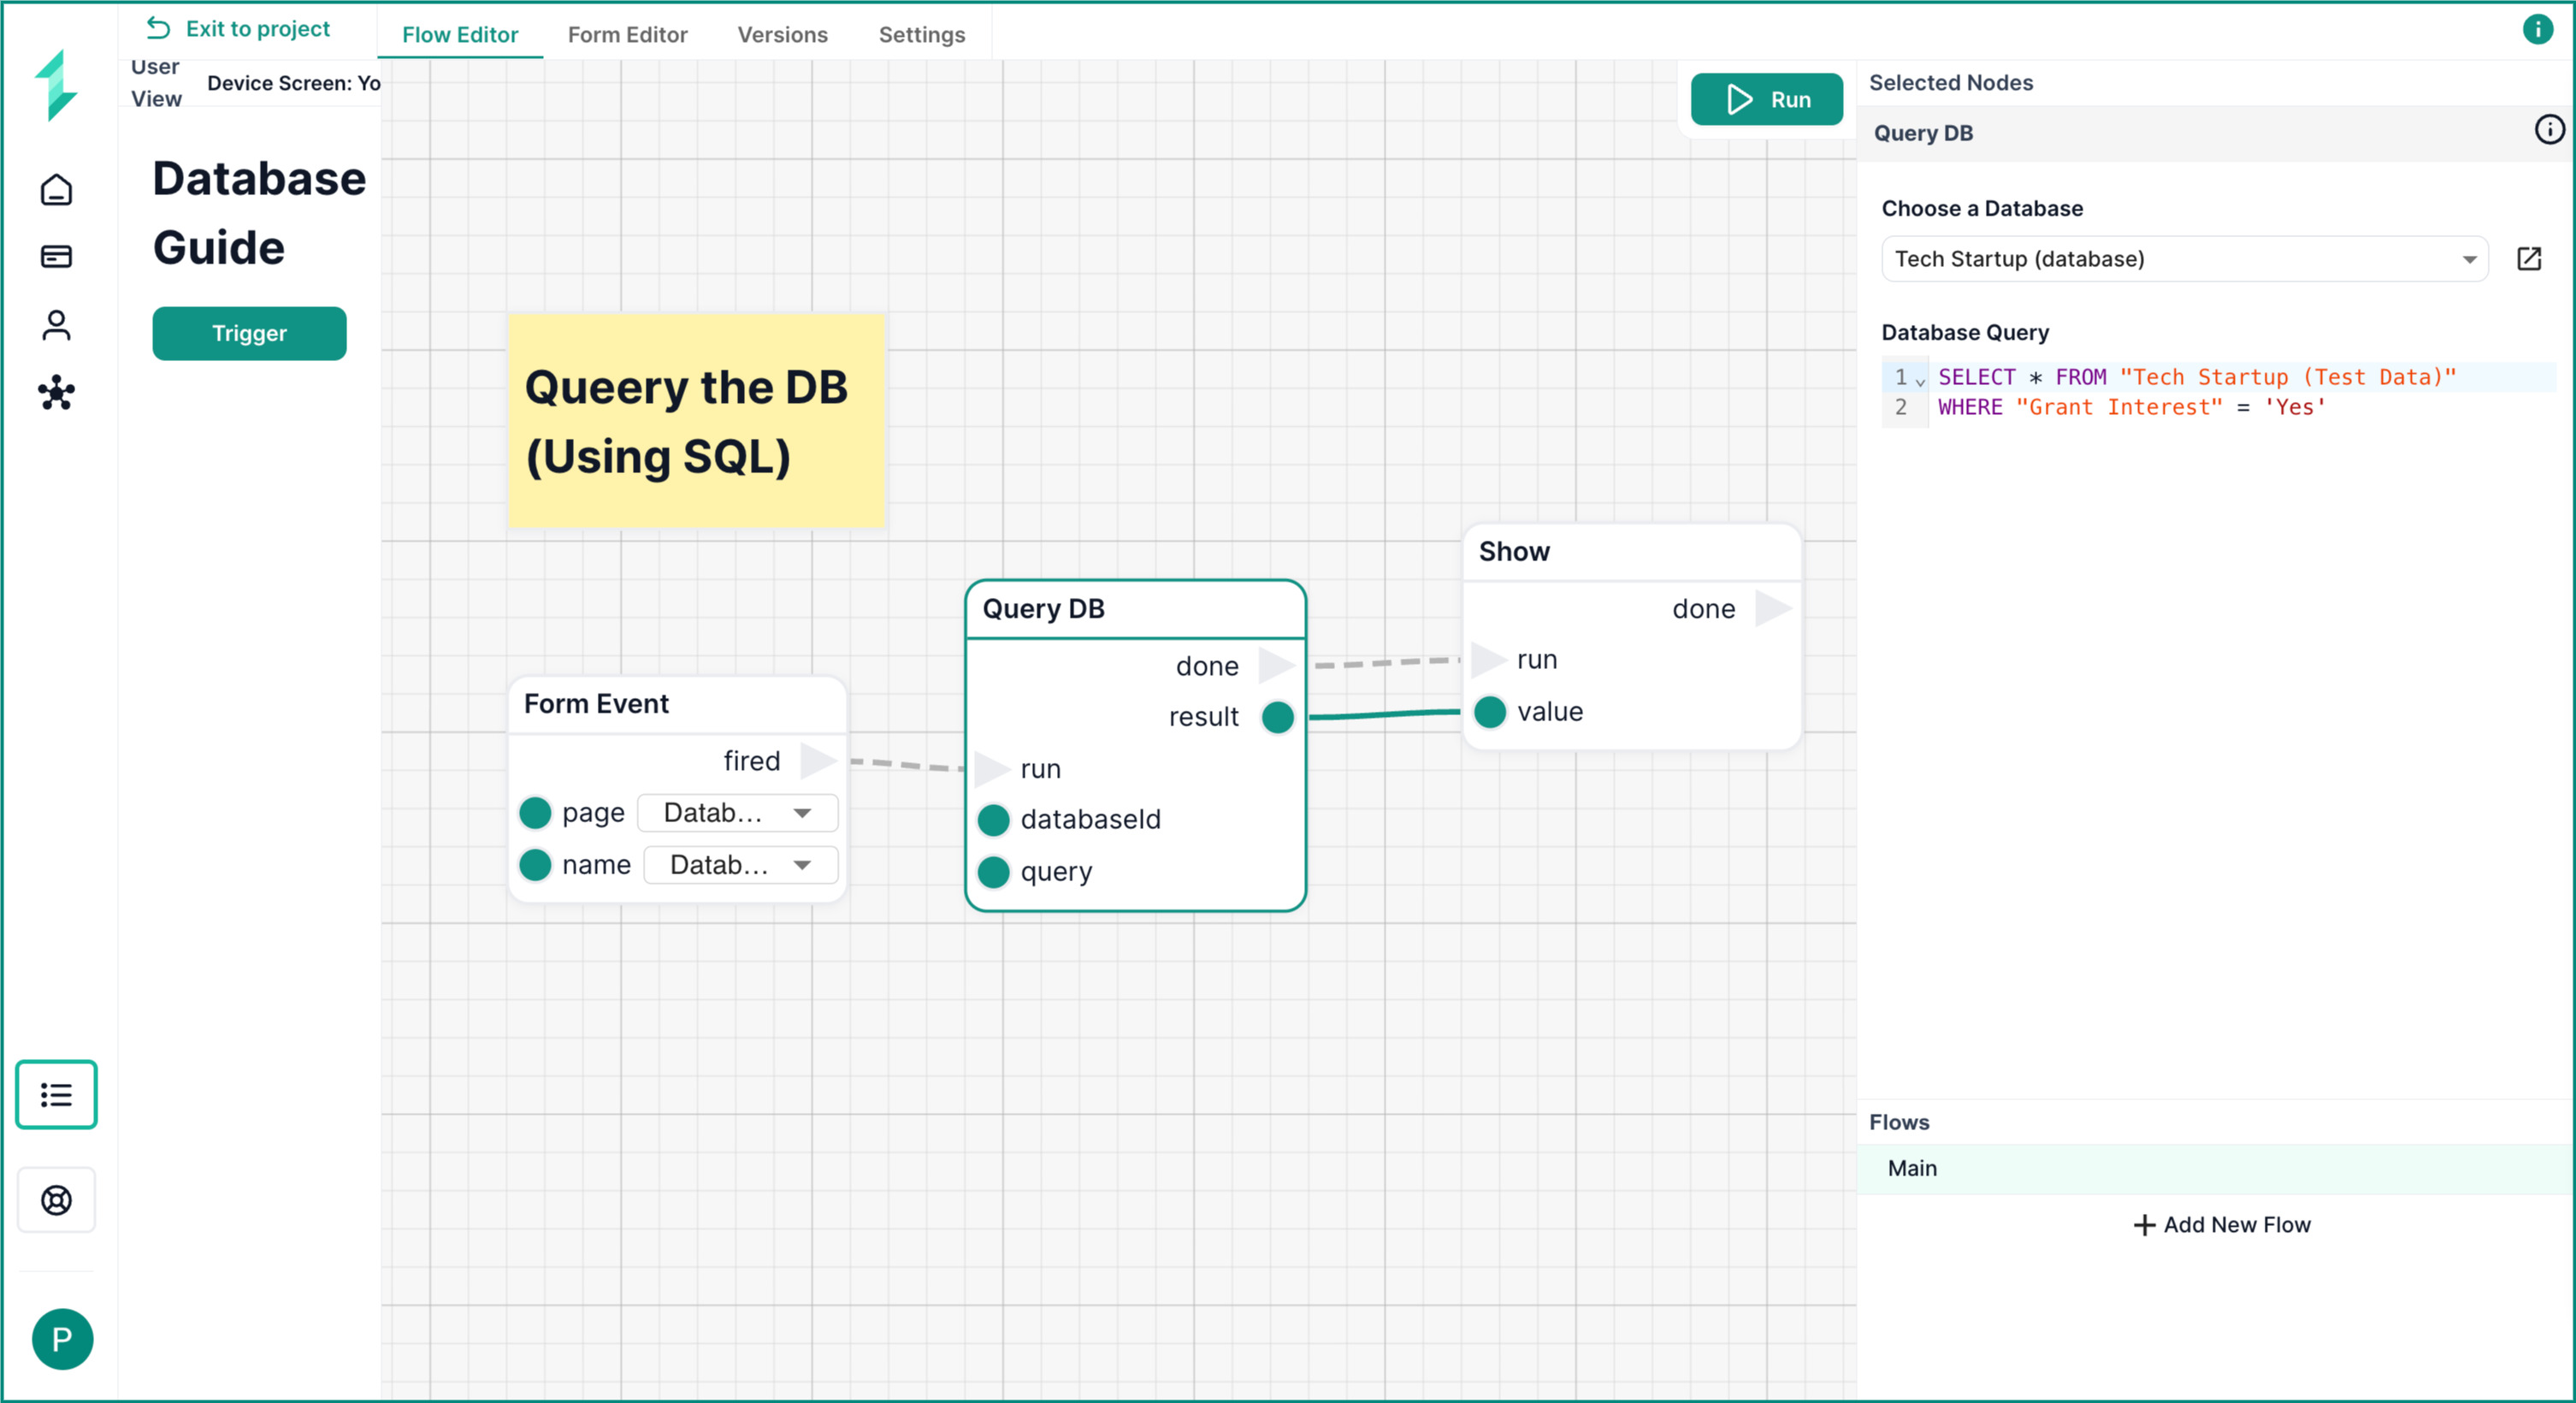
Query DB Node
The Query DB node allows you to run raw SQL queries directly on your Intellectible database, giving you full control over how you filter, sort, and structure your data.
In this workflow, we retrieve multiple records from our startup dataset by running a SQL query that filters startups where Grant Interest = 'Yes'.
What This Workflow Does
- Loads a form page with a Trigger button
- Waits for a user click via a
Form Event - Runs a SQL query using
Query DB - Displays the full set of results using a
Shownode
Step 1: Trigger the Flow
As before, we use Load Form Page and Form Event to start the flow when a user clicks the button.
Step 2: Add the Query DB Node
Add a Query DB node and configure it with:
- The
Databaseyou want to query - A valid SQL query in the
queryfield
SELECT * FROM "Tech Startup (Test Data)"
WHERE "Grant Interest" = 'Yes'
- Always wrap table and column names with spaces in double quotes (
" ") - Use single quotes (
' ') around string values
Step 3: Display the Result
Connect the output of the Query DB node to a Show node to return the result. This will output the full matching rows.
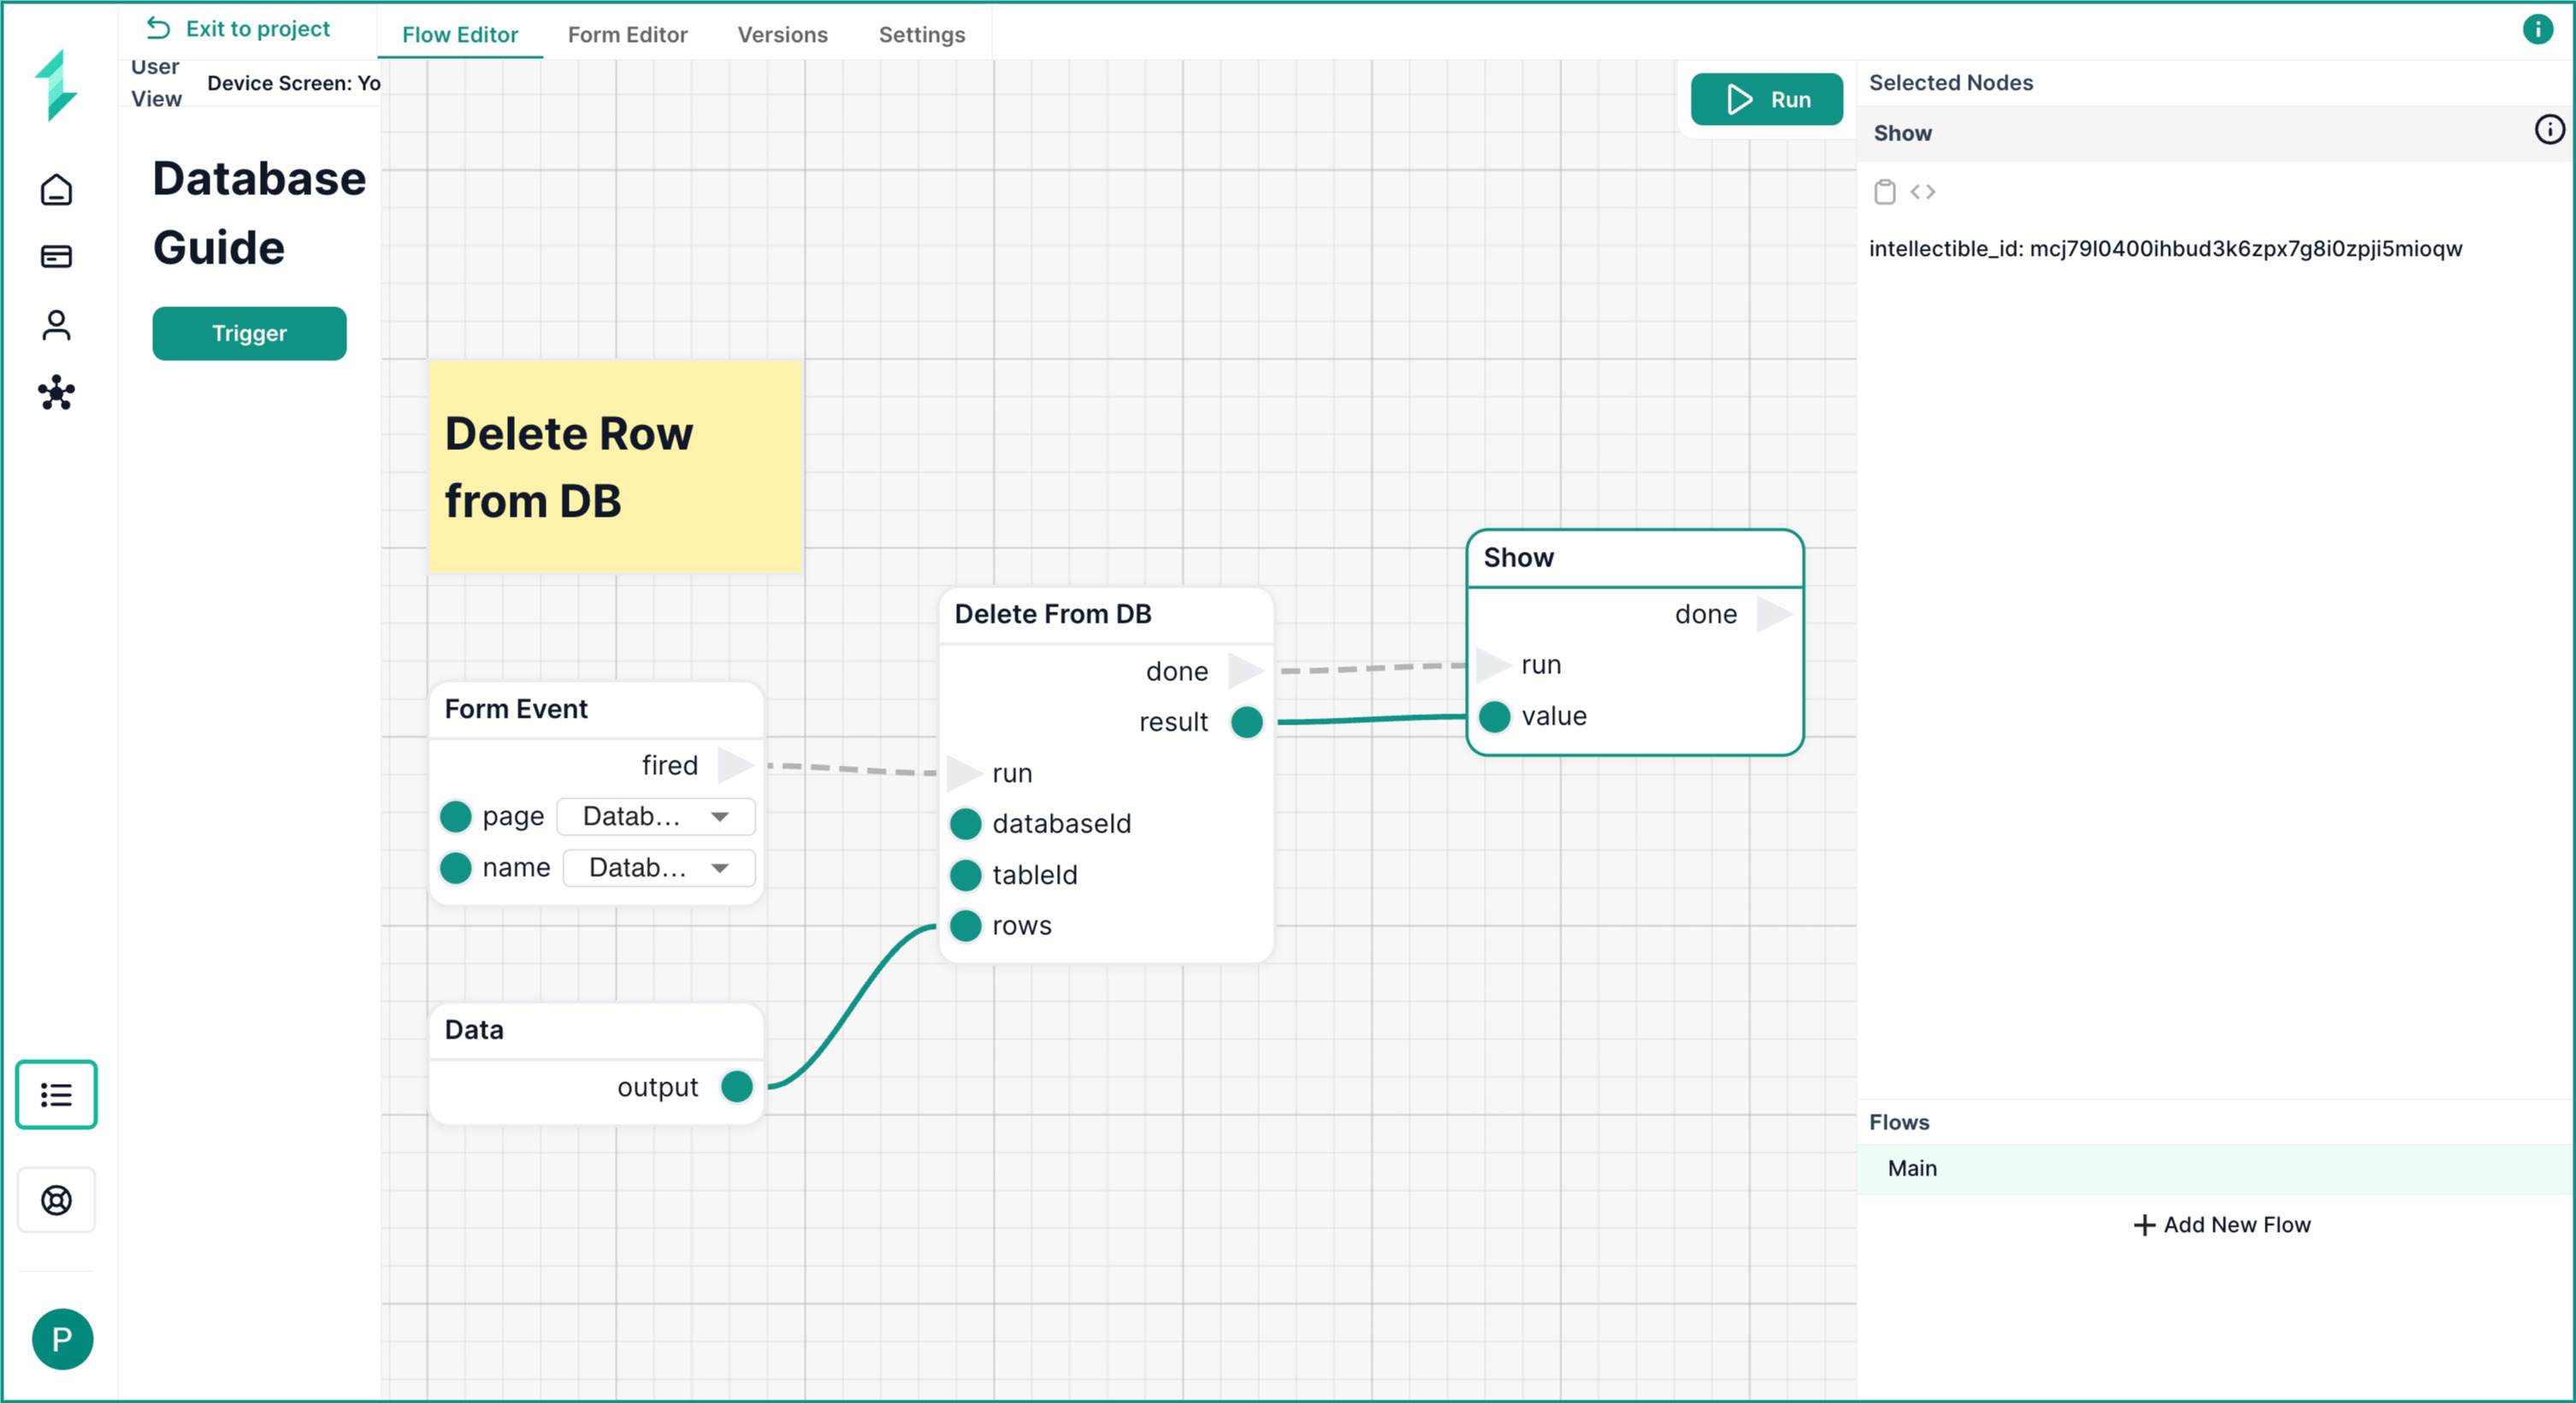
Delete From DB Node
The Delete From DB node allows you to remove one or more rows from your database table by specifying a matching condition.
In this workflow, we delete a single startup record from the Tech Startup (Test Data) table using the Email field to identify the row.
What This Workflow Does
- Loads a form page with a Trigger button
- Waits for a user click via a
Form Event - Uses a
Datanode to define the row to delete - Deletes the matching row using
Delete From DB - Displays a confirmation using a
Shownode
Step 1: Trigger the Flow
Use a Load Form Page and Form Event node to activate the workflow when the user clicks a button.
Step 2: Define the Row to Delete
Use a Data node to set the criteria for deletion. Here we used the Email field to target the row.
{
  "Email": "info@doyle.net"
}
Step 3: Delete From the Database
Add a Delete From DB node:
- Select your
databaseIdandtableId - Connect the
Form Eventtorun - Connect the
Datanode to therowsinput
Step 4: Confirm the Result
Use a Show node to display the deletion result — typically the Intellectible ID or metadata of the deleted row will be displayed such as in the screenshot.
Count Rows In DB
Vector Search DB Node
Example Use Cases for Databases
Startup Enrichment & Outreach
- Start with a CSV of company domains
- Use AI to scrape info from each website (e.g., “What does this company do?”)
- Insert company profiles into the database
- Use data to personalize cold emails at scale
Grant Radar & Trend Detection
- Scrape grants from government APIs (e.g., Sam.gov, EU portals)
- Store them in a structured database by date, region, category
- Use
Read Database+ AI nodes to summarize patterns and trends
Persistent Memory & History
- Store user Q&A sessions
- Build AI agents that recall past interactions
- Enable context-aware automation using historical data
Modular Assets
- Track reusable sections of proposals, bios, and templates
- Reuse high-performing elements in future AI workflows
Accessing Databases from Code Nodes
Code nodes can programmatically manage and query databases using the DatabaseClient SDK:
JavaScript:
const { DatabaseClient } = require('@intellectible/execution-sdk');

const database = new DatabaseClient();

// List databases
const databases = await database.listDatabases();

// Create a table
await database.createTable(dbId, 'companies');
await database.createColumn(dbId, 'companies', 'name', 'text');
await database.createColumn(dbId, 'companies', 'industry', 'text');

// Insert data
await database.insertRows(dbId, 'companies', [{
  name: 'Acme Corp',
  industry: 'Technology'
}]);

// Query data
const rows = await database.query(dbId, 'companies',
  'SELECT * FROM "companies" LIMIT 20'
);
Python:
from intellectible_execution import DatabaseClient

database = DatabaseClient()

# List databases
databases = database.list_databases()

# Create a table
database.create_table(db_id, 'companies')
database.create_column(db_id, 'companies', 'name', 'text')
database.create_column(db_id, 'companies', 'industry', 'text')

# Insert data
database.insert_rows(db_id, 'companies', [{
    'name': 'Acme Corp',
    'industry': 'Technology'
}])

# Query data
rows = database.query(db_id, 'companies',
    'SELECT * FROM "companies" LIMIT 20'
)
Use Cases for SDK:
- Dynamic schema creation - Create tables and columns based on workflow logic
- Execution logging - Track workflow runs, performance, and errors
- Data pipelines - Process and store results automatically
- Bulk operations - Import CSV files directly into tables
Learn more:
- 📖 Code Node Data Access Guide - Complete guide with patterns
- 📚 DatabaseClient SDK Reference - Full API documentation
See Also
- Code Nodes Guide - Run custom JavaScript and Python
- Library Guide - File storage and management
- Workflows Overview - Understanding workflows
Best Practices
- Name your databases clearly — e.g.,
startup_enrichment,grant_opportunities - Avoid mixing unrelated data into the same database
- Use variables to construct SQL queries dynamically
- Query only what you need — avoid large
SELECT *queries when performance matters - Design queries to filter on specific, indexed columns — such as
Email,Company Namefor faster performance
FAQ
Q: Can I edit the structure of a database after it's created?
A: You can add new columns at any time from the Database tab. However, the initial structure (field types and table name) is inferred from the first insert. We recommend inserting a full sample row early to define your intended schema.
Q: Are Intellectible databases real SQL databases?
A: Yes — they're fully SQL-compatible under the hood. You can run standard SQL queries, filter, sort, and even join data across tables using the Query DB node.
Q: Can I use database data in AI prompts?
A: Absolutely. You can pull records using Read DB or Query DB, format the output with a Text or Variable node, and pass it into AI Write or AI Write Data to generate summaries, insights, or dynamic content.
Q: Do I need to manage performance or indexing?
A: No. Intellectible automatically indexes commonly filtered columns to keep your queries fast — even as your datasets grow. For best results, design your filters around key fields like Email, Name, or Status.
Q: Can I store long content like documents or summaries?
A: Yes. Intellectible supports very large field sizes, so you can store AI outputs, summaries, or even full documents directly inside a single cell.