Get Started With Intellectible in 5 Minutes
Yes, you can build this yourself — and in just a few clicks.
No code. No waiting. Just results.
What Teams Are Doing Every Day with Intellectible
-
Turning 10+ hour tasks into 1-click workflows
Automated from start to finish — no follow-ups, no handoffs, no missed steps. -
Extracting insights from dense, 50+ page reports
Flag risks, summarize themes, and uncover key takeaways instantly. -
Creating digital twins of your best team members
Capture their thinking once, reuse it across your org. -
Deploying branded tools powered by AI workflows
Like intake forms, proposal builders, and triage assistants — white-labeled, public or private. -
Speeding up ops, legal, finance, and marketing workstreams by 5–10x
Eliminate handover delays and manual work. -
Replacing hours of writing with AI-generated proposals and reports
Instantly generate high-quality drafts in your tone and structure. -
Auto-indexing 1000s of documents into a live AI knowledge base
No tagging. No manual input. All searchable and usable in workflows. -
Launching complete automations in minutes with pre-built templates
Start fast. Customize only what’s unique to you. -
Building flows that combine internal data and live web sources
Pull from internal docs, crawl the web, and create rich outputs in a single process.
What You’ll Build in the Next 5 Minutes
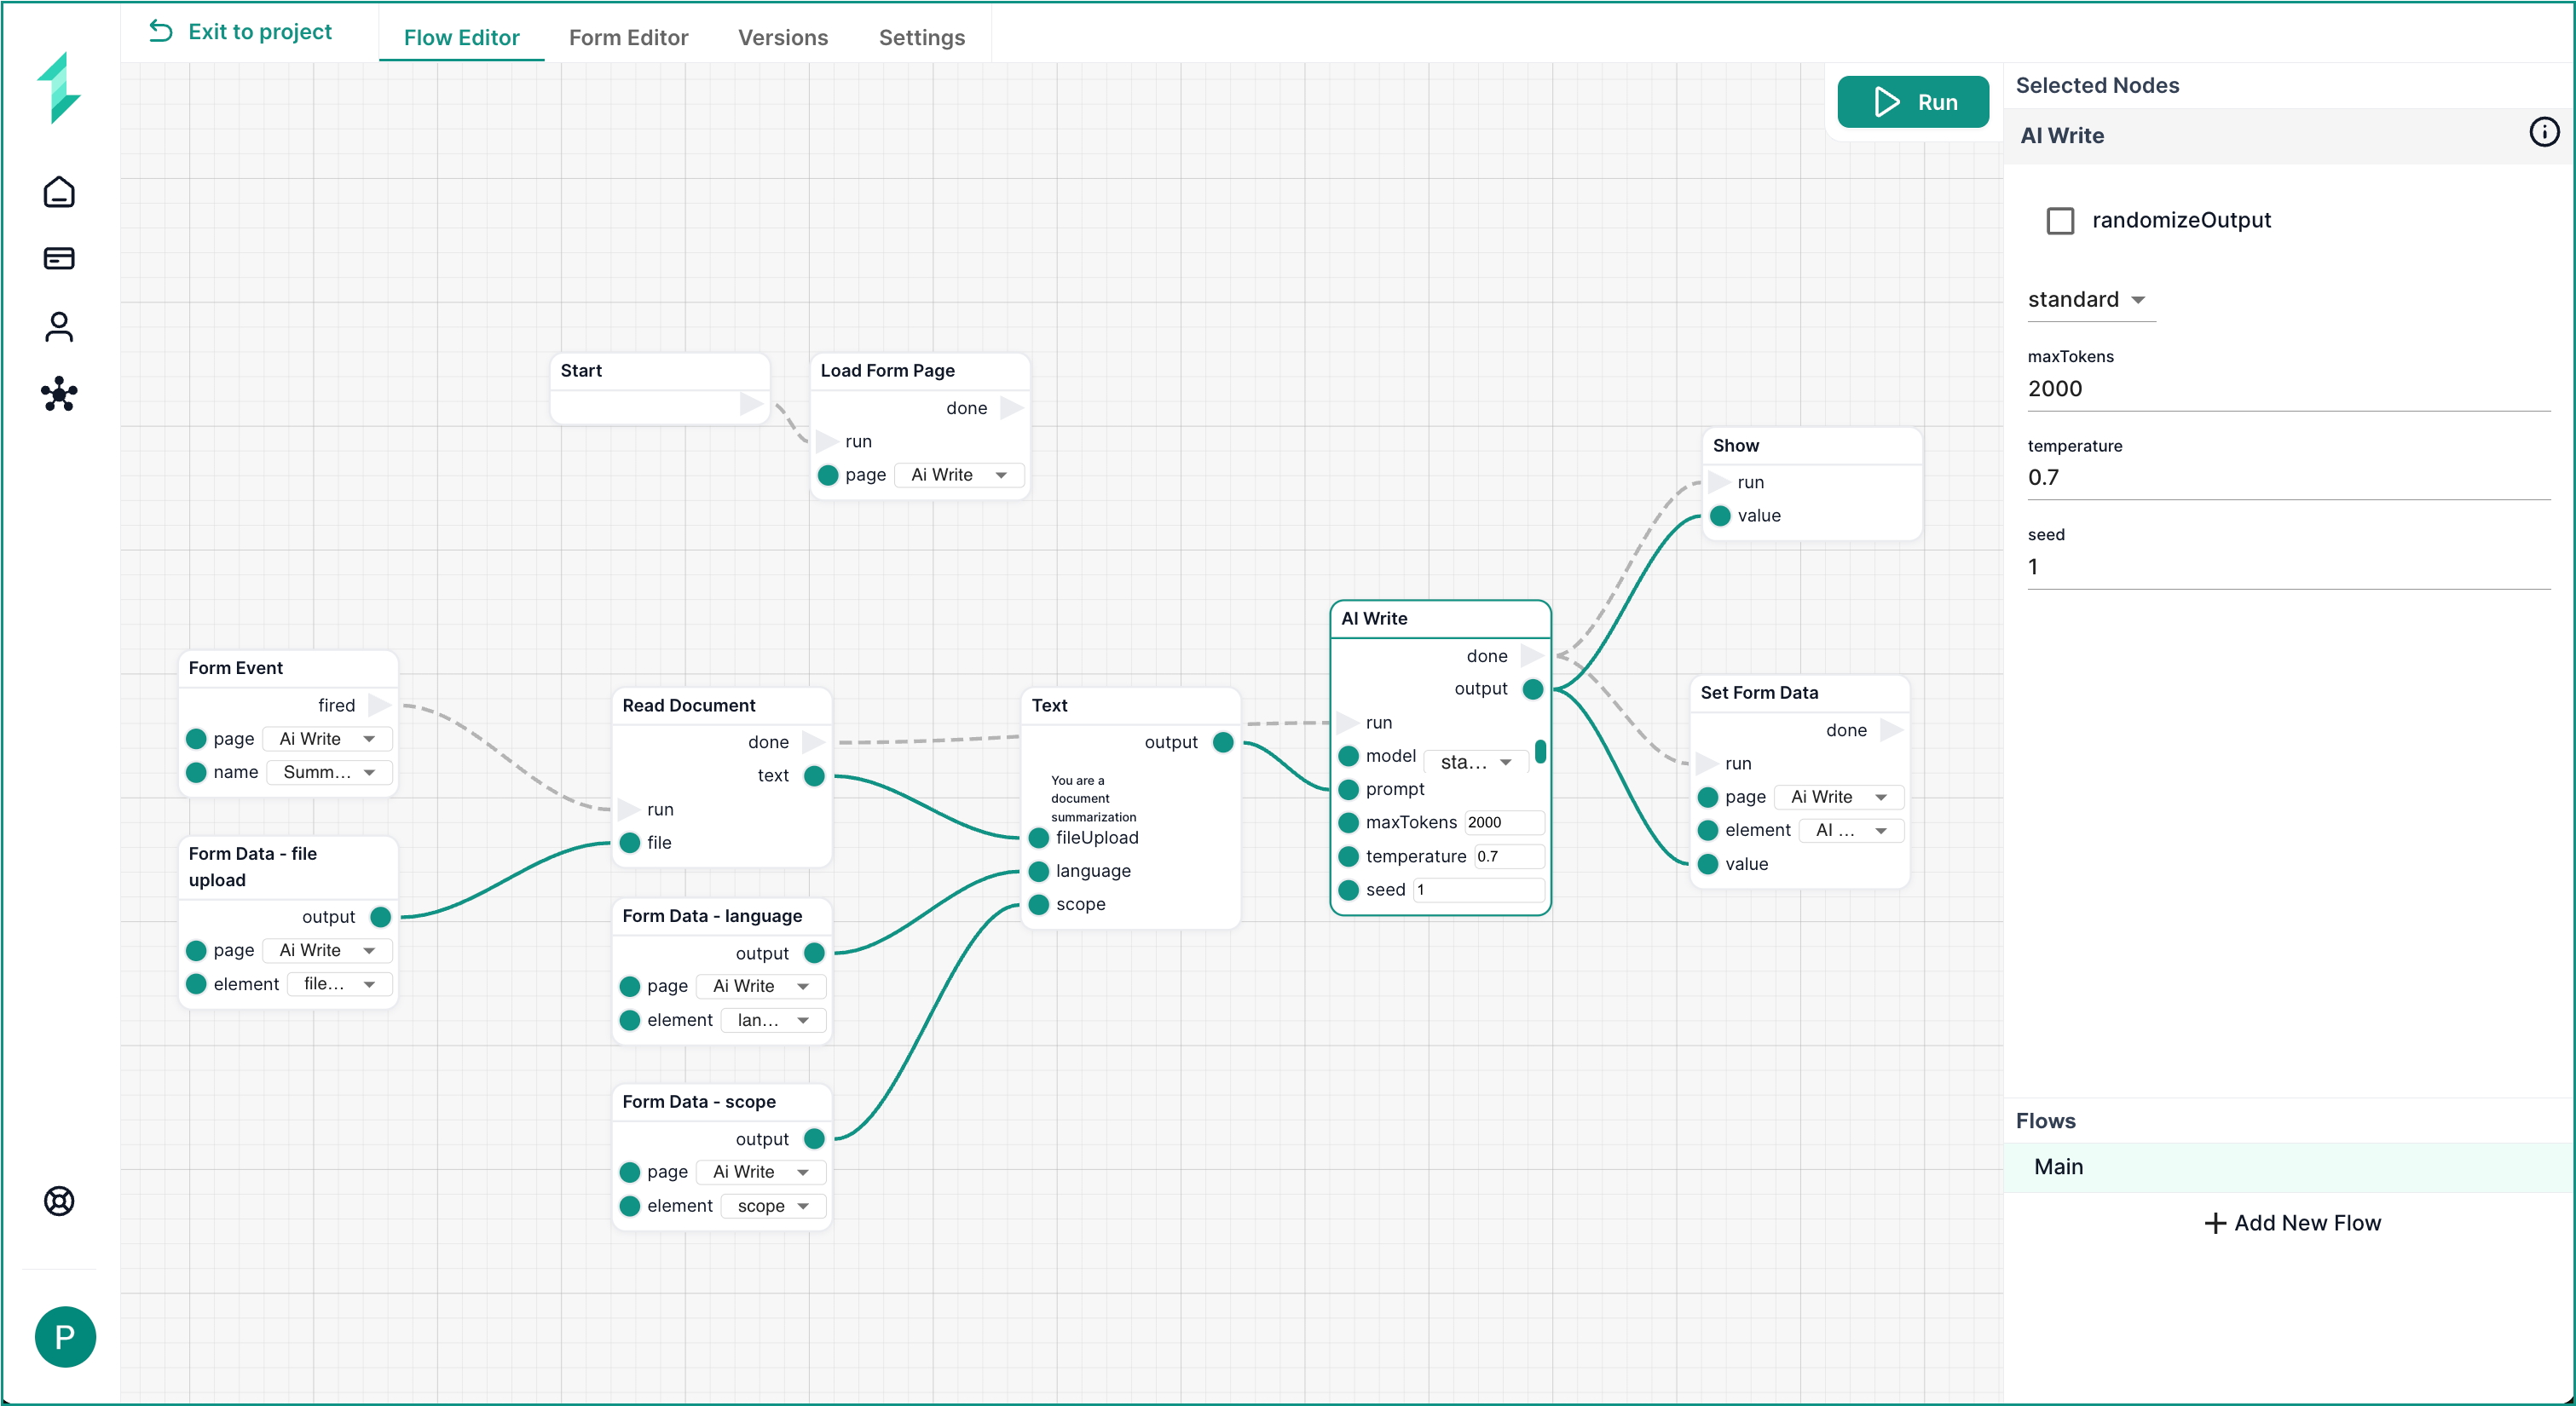
- A powerful AI-driven workflow that reads, processes, and summarizes any document
- A simple, beautiful form that triggers the workflow and displays results live
- A skill that future-proof you into the age of AI ⚡
🚀 LET’S GO!
Step-by-Step Instructions
Step 1: Create a New Project
Start by creating a dedicated project space for your automation. Each project acts as a workspace where your forms, workflows, and documents are organized. You can see the Intellectible Dashboard guide or the Intellectible Structure if you want a simple understanding of how intellectible is set up.
- Log into your Intellectible account
- Go to your Dashboard
- Click Create New Project
- Name it
Getting Started

Step 2: Create a Workflow from a Template
Templates are the fastest way to launch a functional build. In this case, we’ll use a prebuilt summarization logic and customize it later in the tutorial.
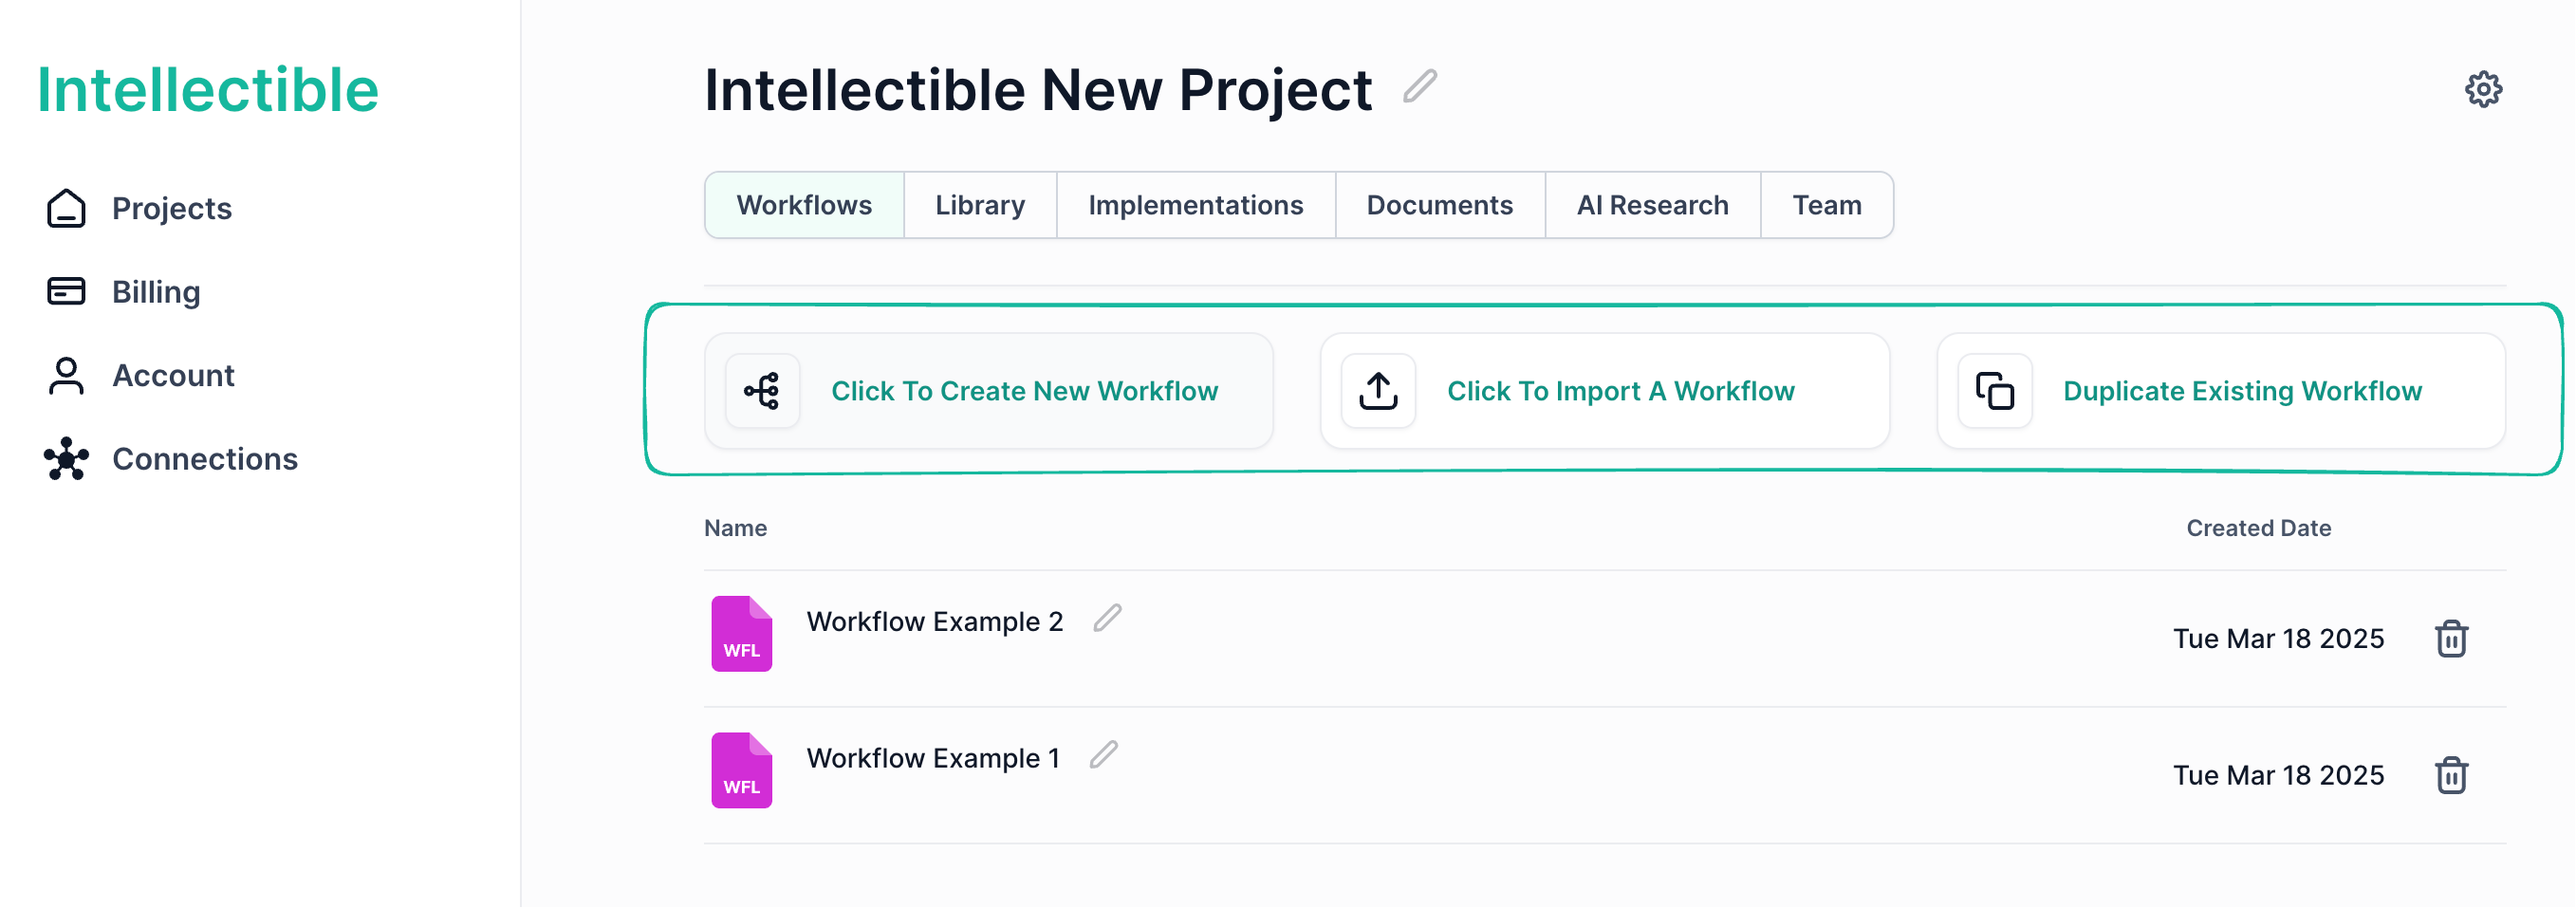
- Go to the Workflows tab
- Click Create New Workflow
- Choose the template: Summarize a Document
- Name it
Quick Summary - This will take you to the Intellectible Canvas - Flow editor

Welcome to the Intellectible Canvas — your control center for building automations at scale. Here, you’re not just linking steps. You’re building infrastructure - encoding expert logic, designing dynamic interfaces, and deploying systems your entire team can use.
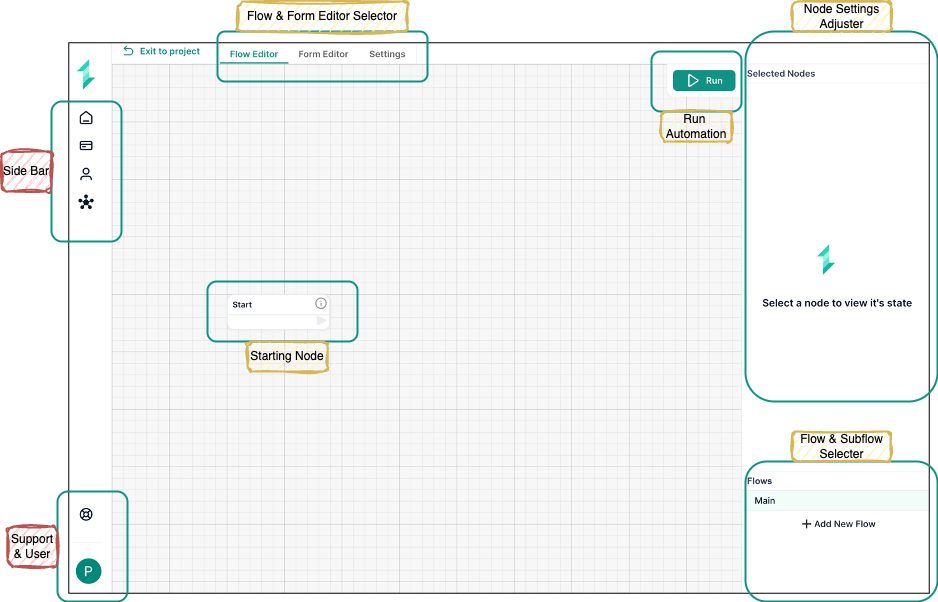
The Intellectible Canvas combines two powerful tools:
- 🧠 The Flow Editor — a visual logic engine that lets you build AI workflows with precision and speed. Think of it as your strategic brain, now executable.
- 📝 The Form Editor — your interface layer. It captures inputs, returns results, and powers internal tools, client forms, or entire apps.
Together, they form the engine of every scalable AI tool you'll create.
Step 3: Activate your workflow & Test the User-Facing Form
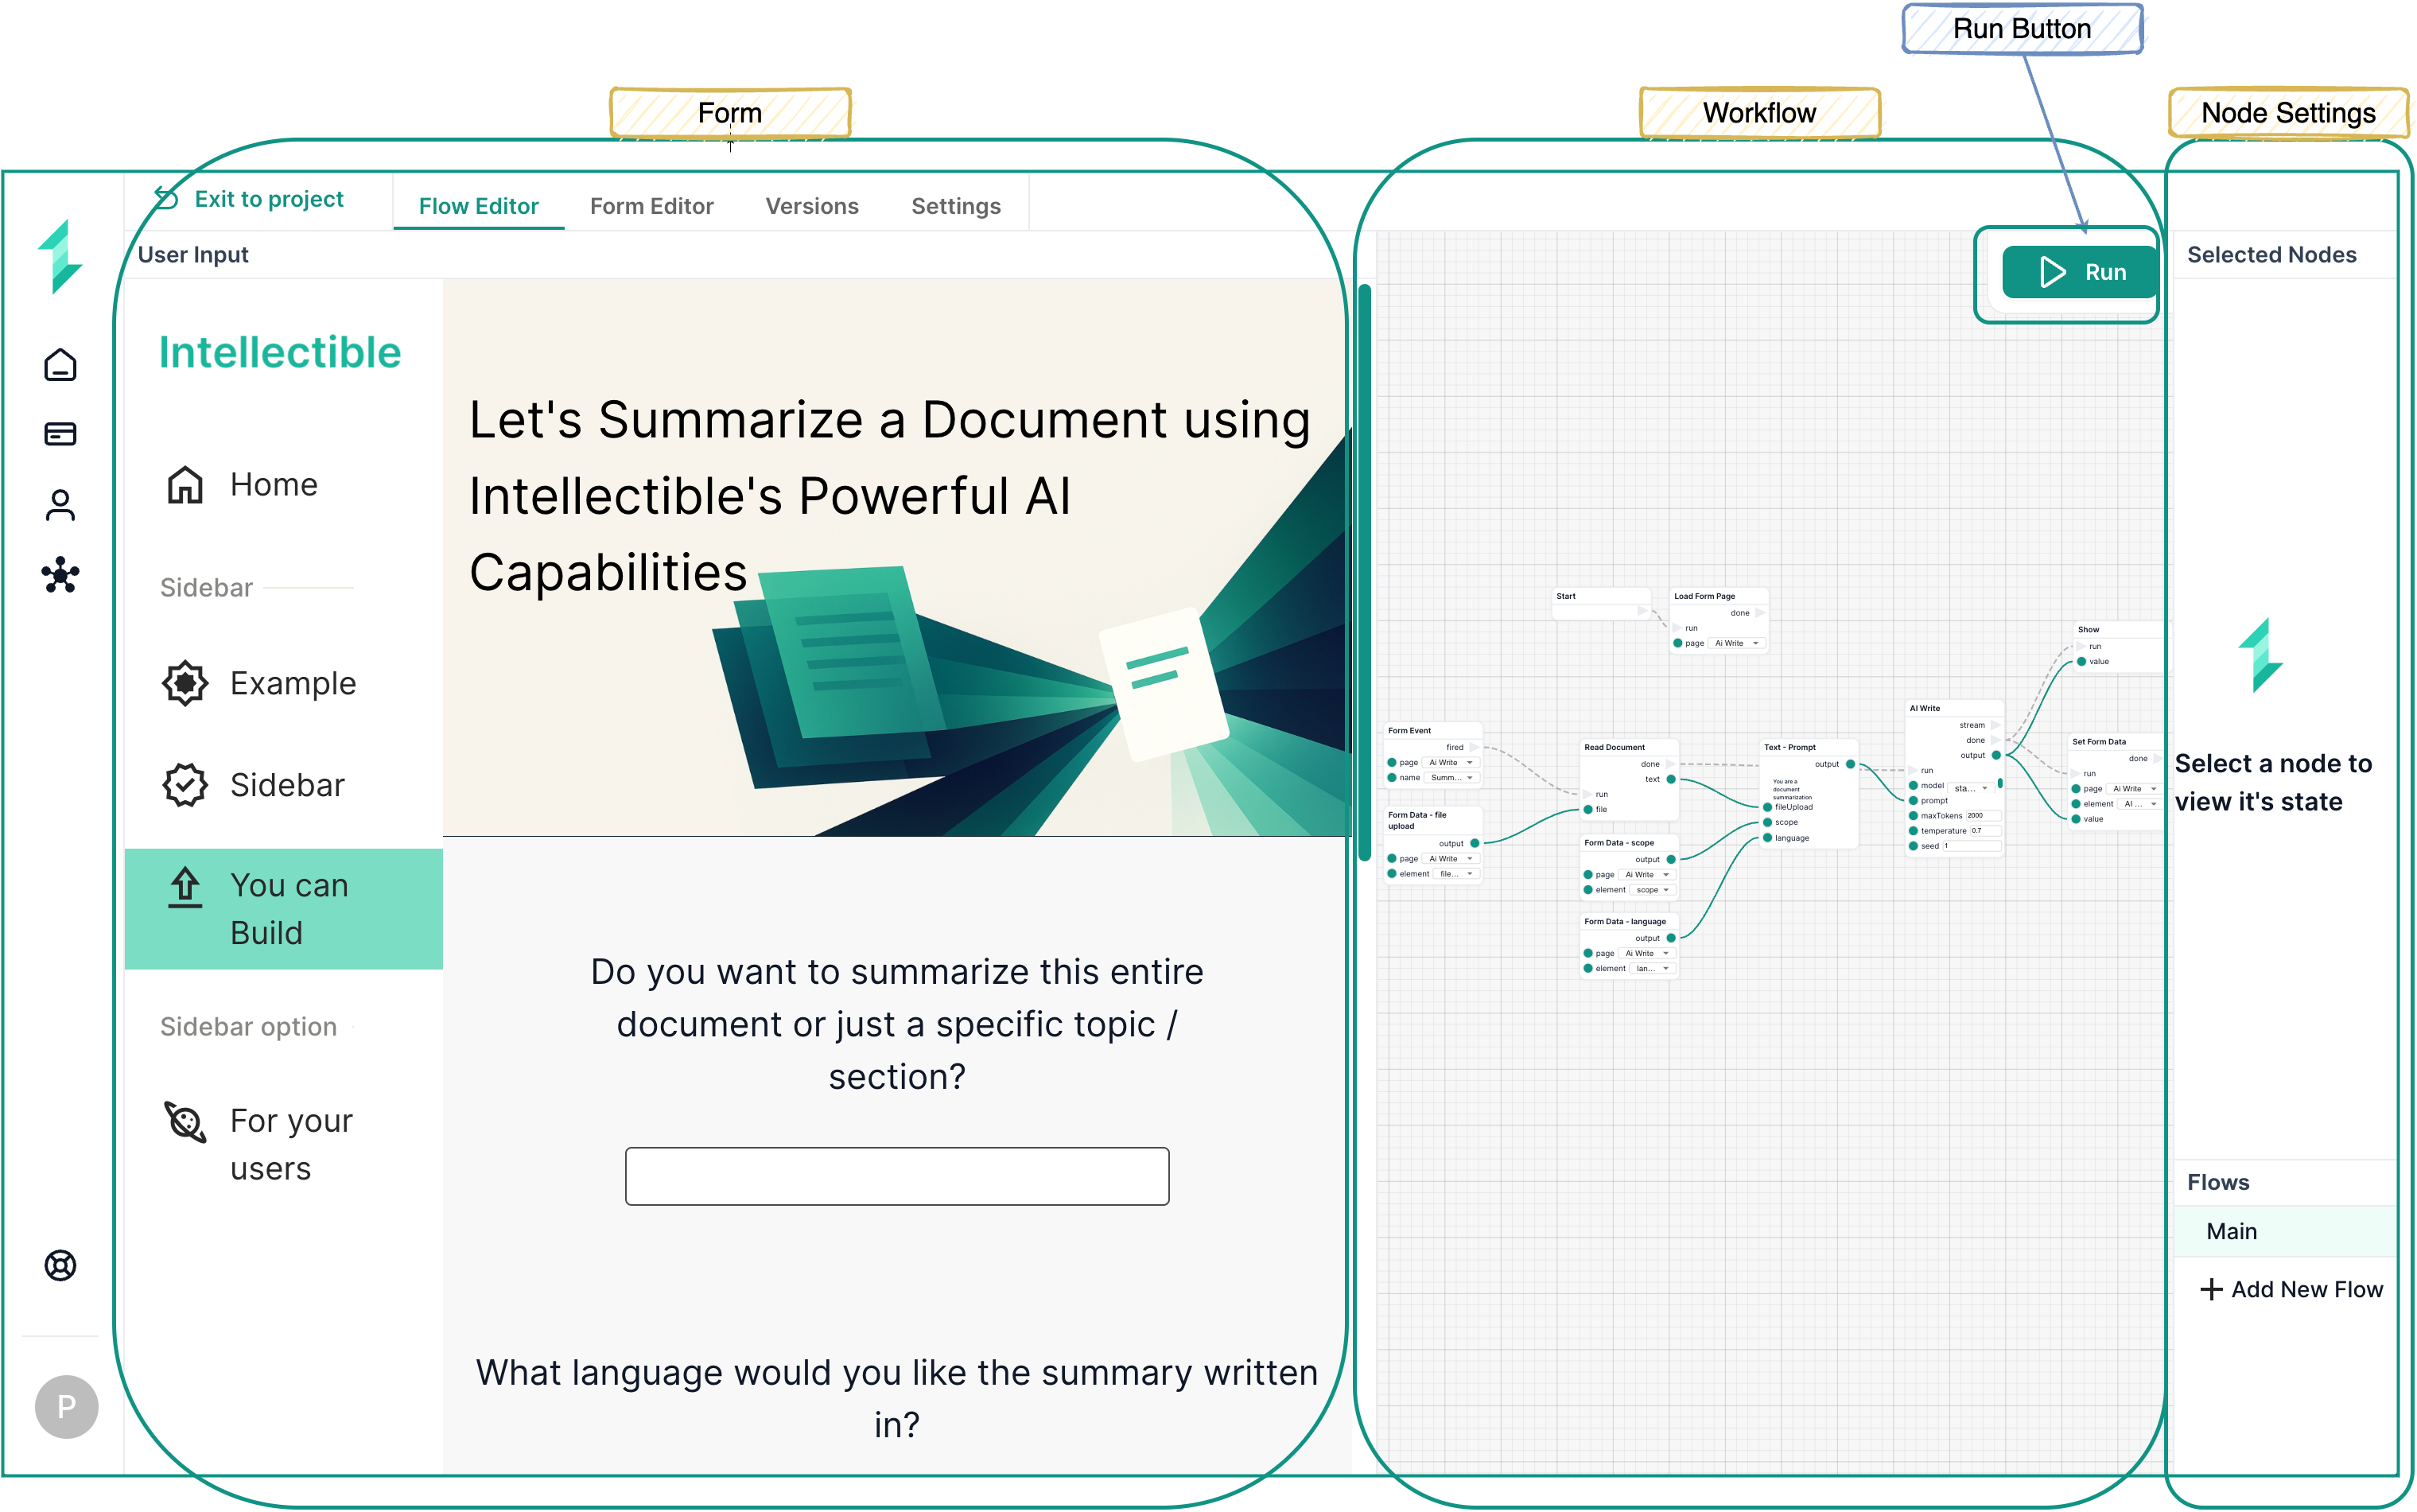
Running your workflow will initialize the linked form — making it interactive just like a real user would experience it.
While you design forms inside the Flow Editor, this is your chance to test how they behave in action. Once the workflow is run, you’ll see the form appear on the left side of the screen, ready for input.
- Open the workflow
- Click Run in the top-right corner
- Fill out the form:
- Choose what to summarize (e.g., full document,specific pages or topic)
- Select the output language
- Upload your document
- Click the Summarize with AI button
Step 4: Review the Output
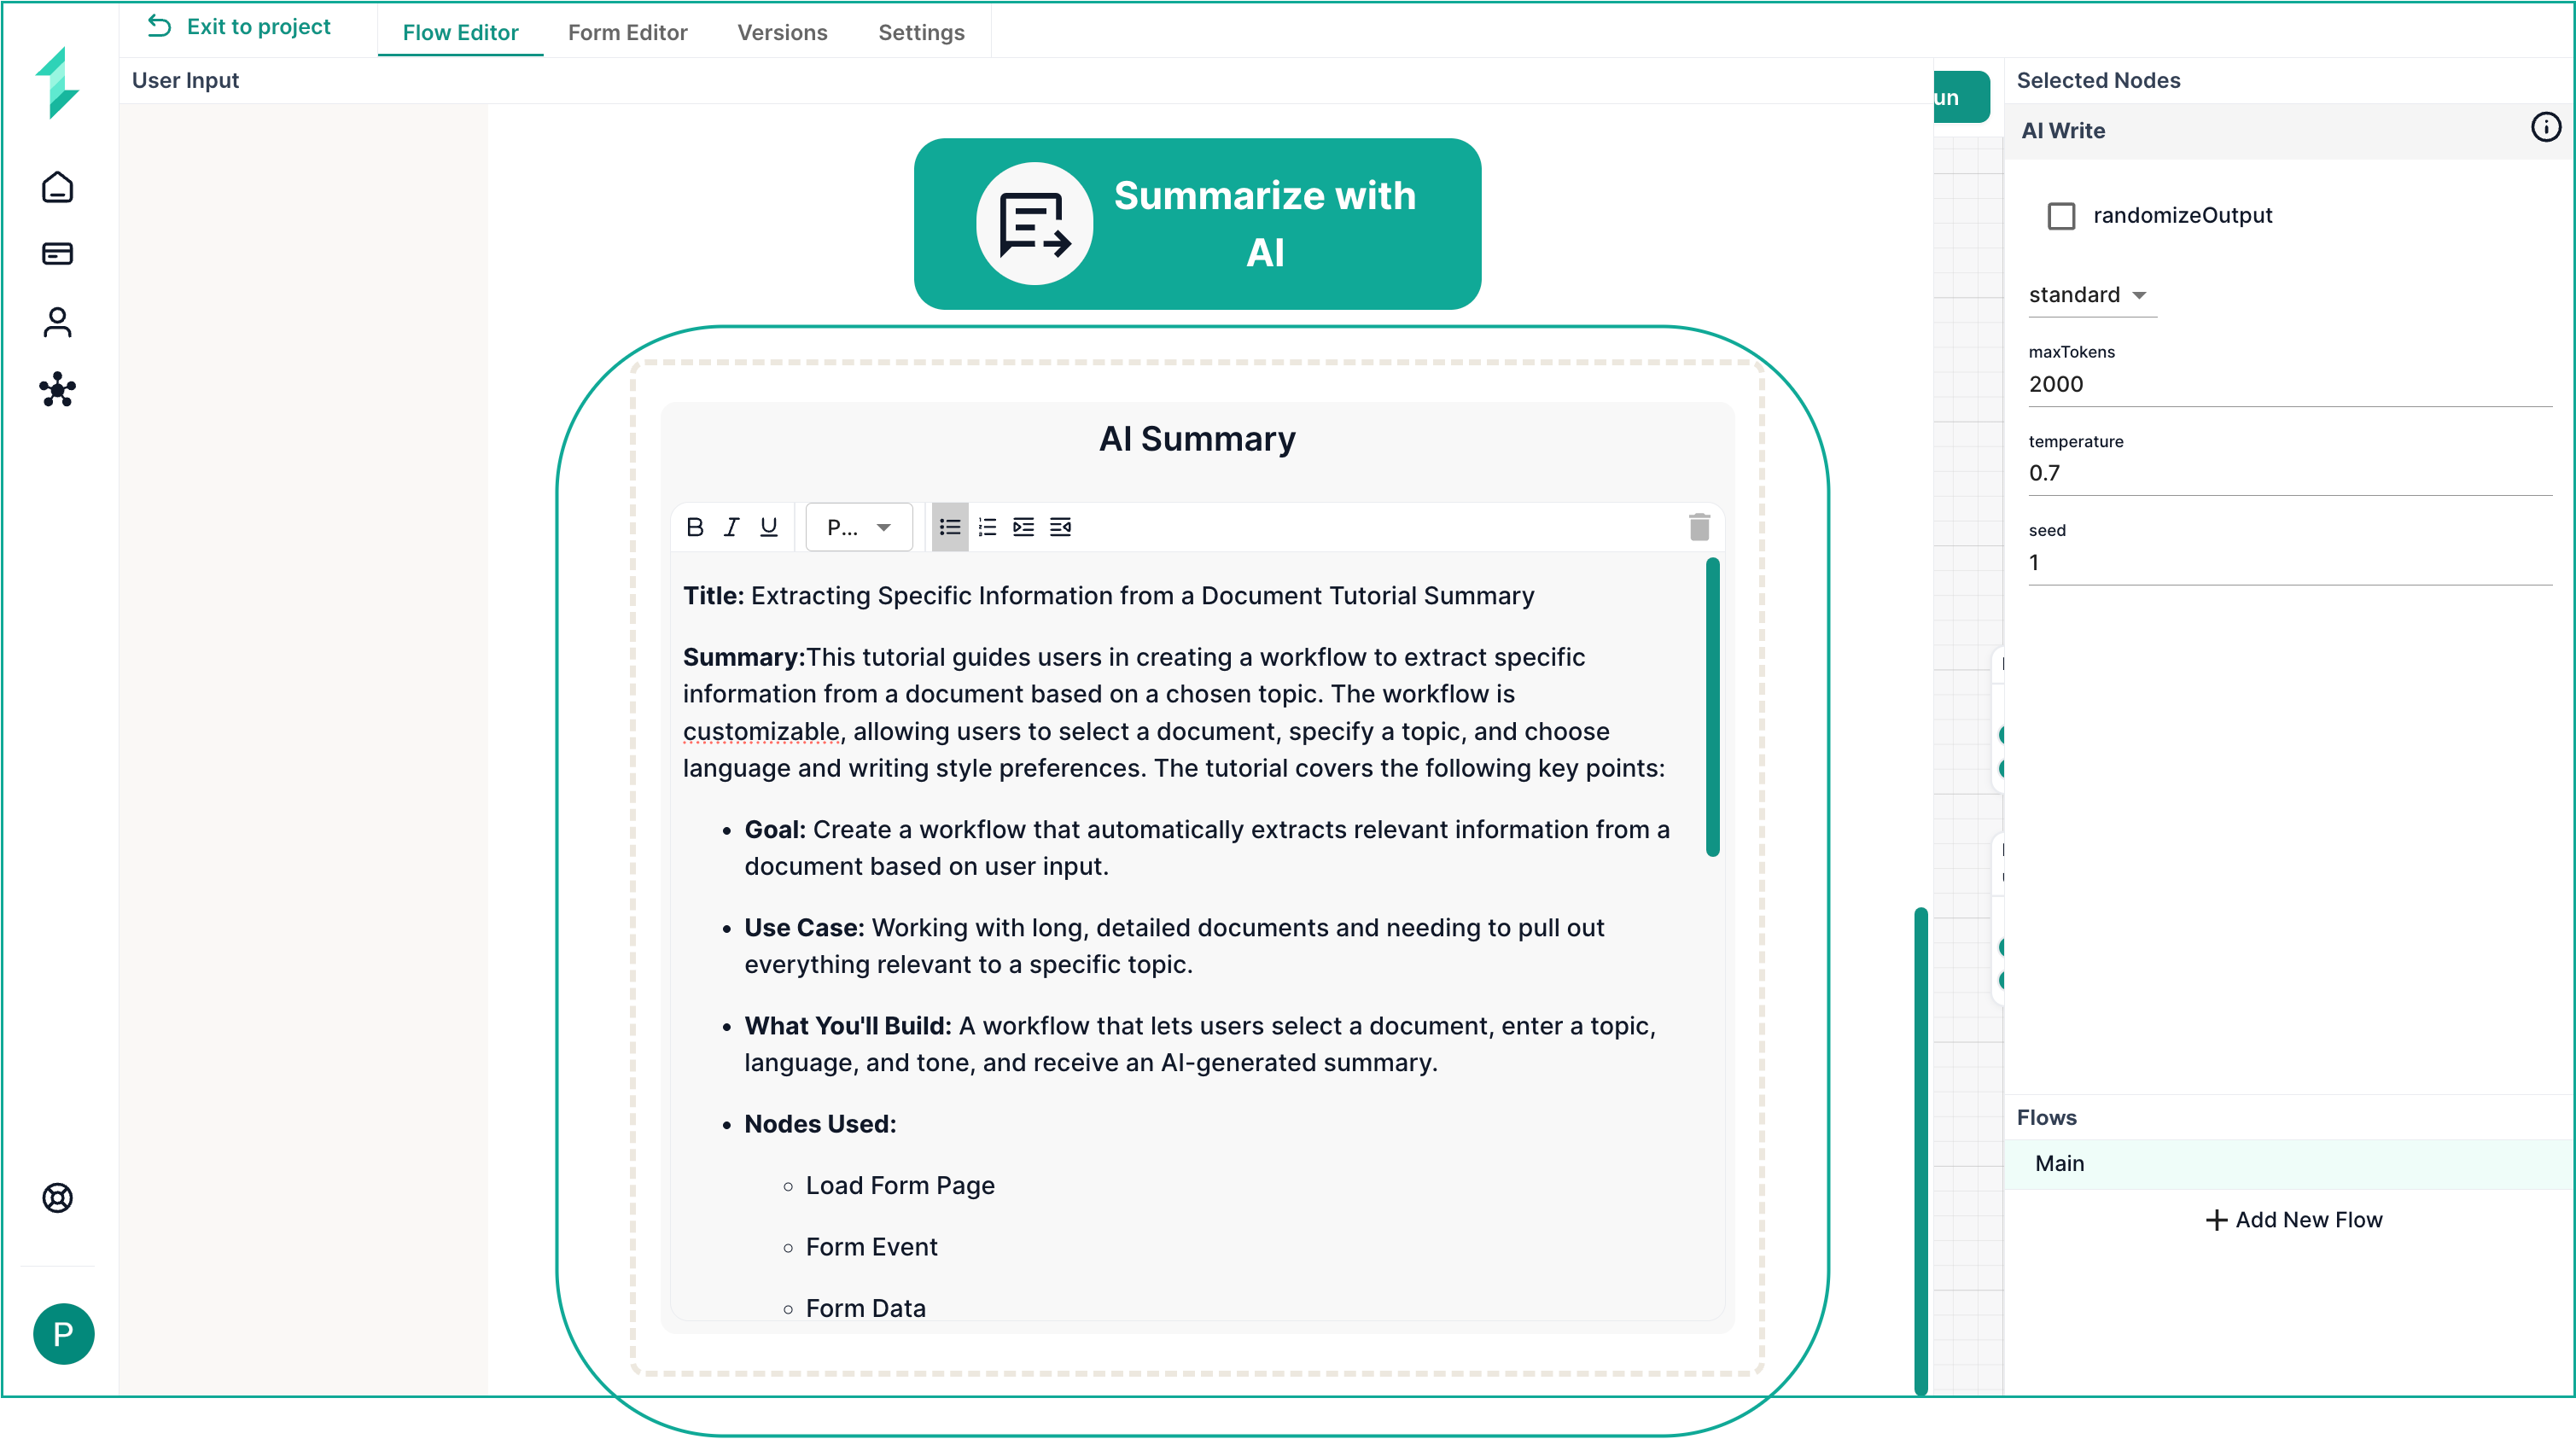
Once the form is submitted, the AI processes the document and returns a summary directly into the form output field.
- View the AI-generated summary
- Check that it reflects key points from your document
Try It Yourself: Add Dynamic Summary Length
Let’s enhance this workflow with a new option: letting the user choose how long they want the summary to be.
Step 1: Add a New Field to the Form
We’ll add an text input so users can select between any type of summary length they would like.
You can rearrange elements in your form at any time by clicking and dragging them into position. Moving a container will also move all nested elements inside — making layout adjustments fast and intuitive.
Alternatively, you can select any element directly from the Elements Hierarchy Panel and reposition it precisely within the form structure.
-
Open the Form Editor
-
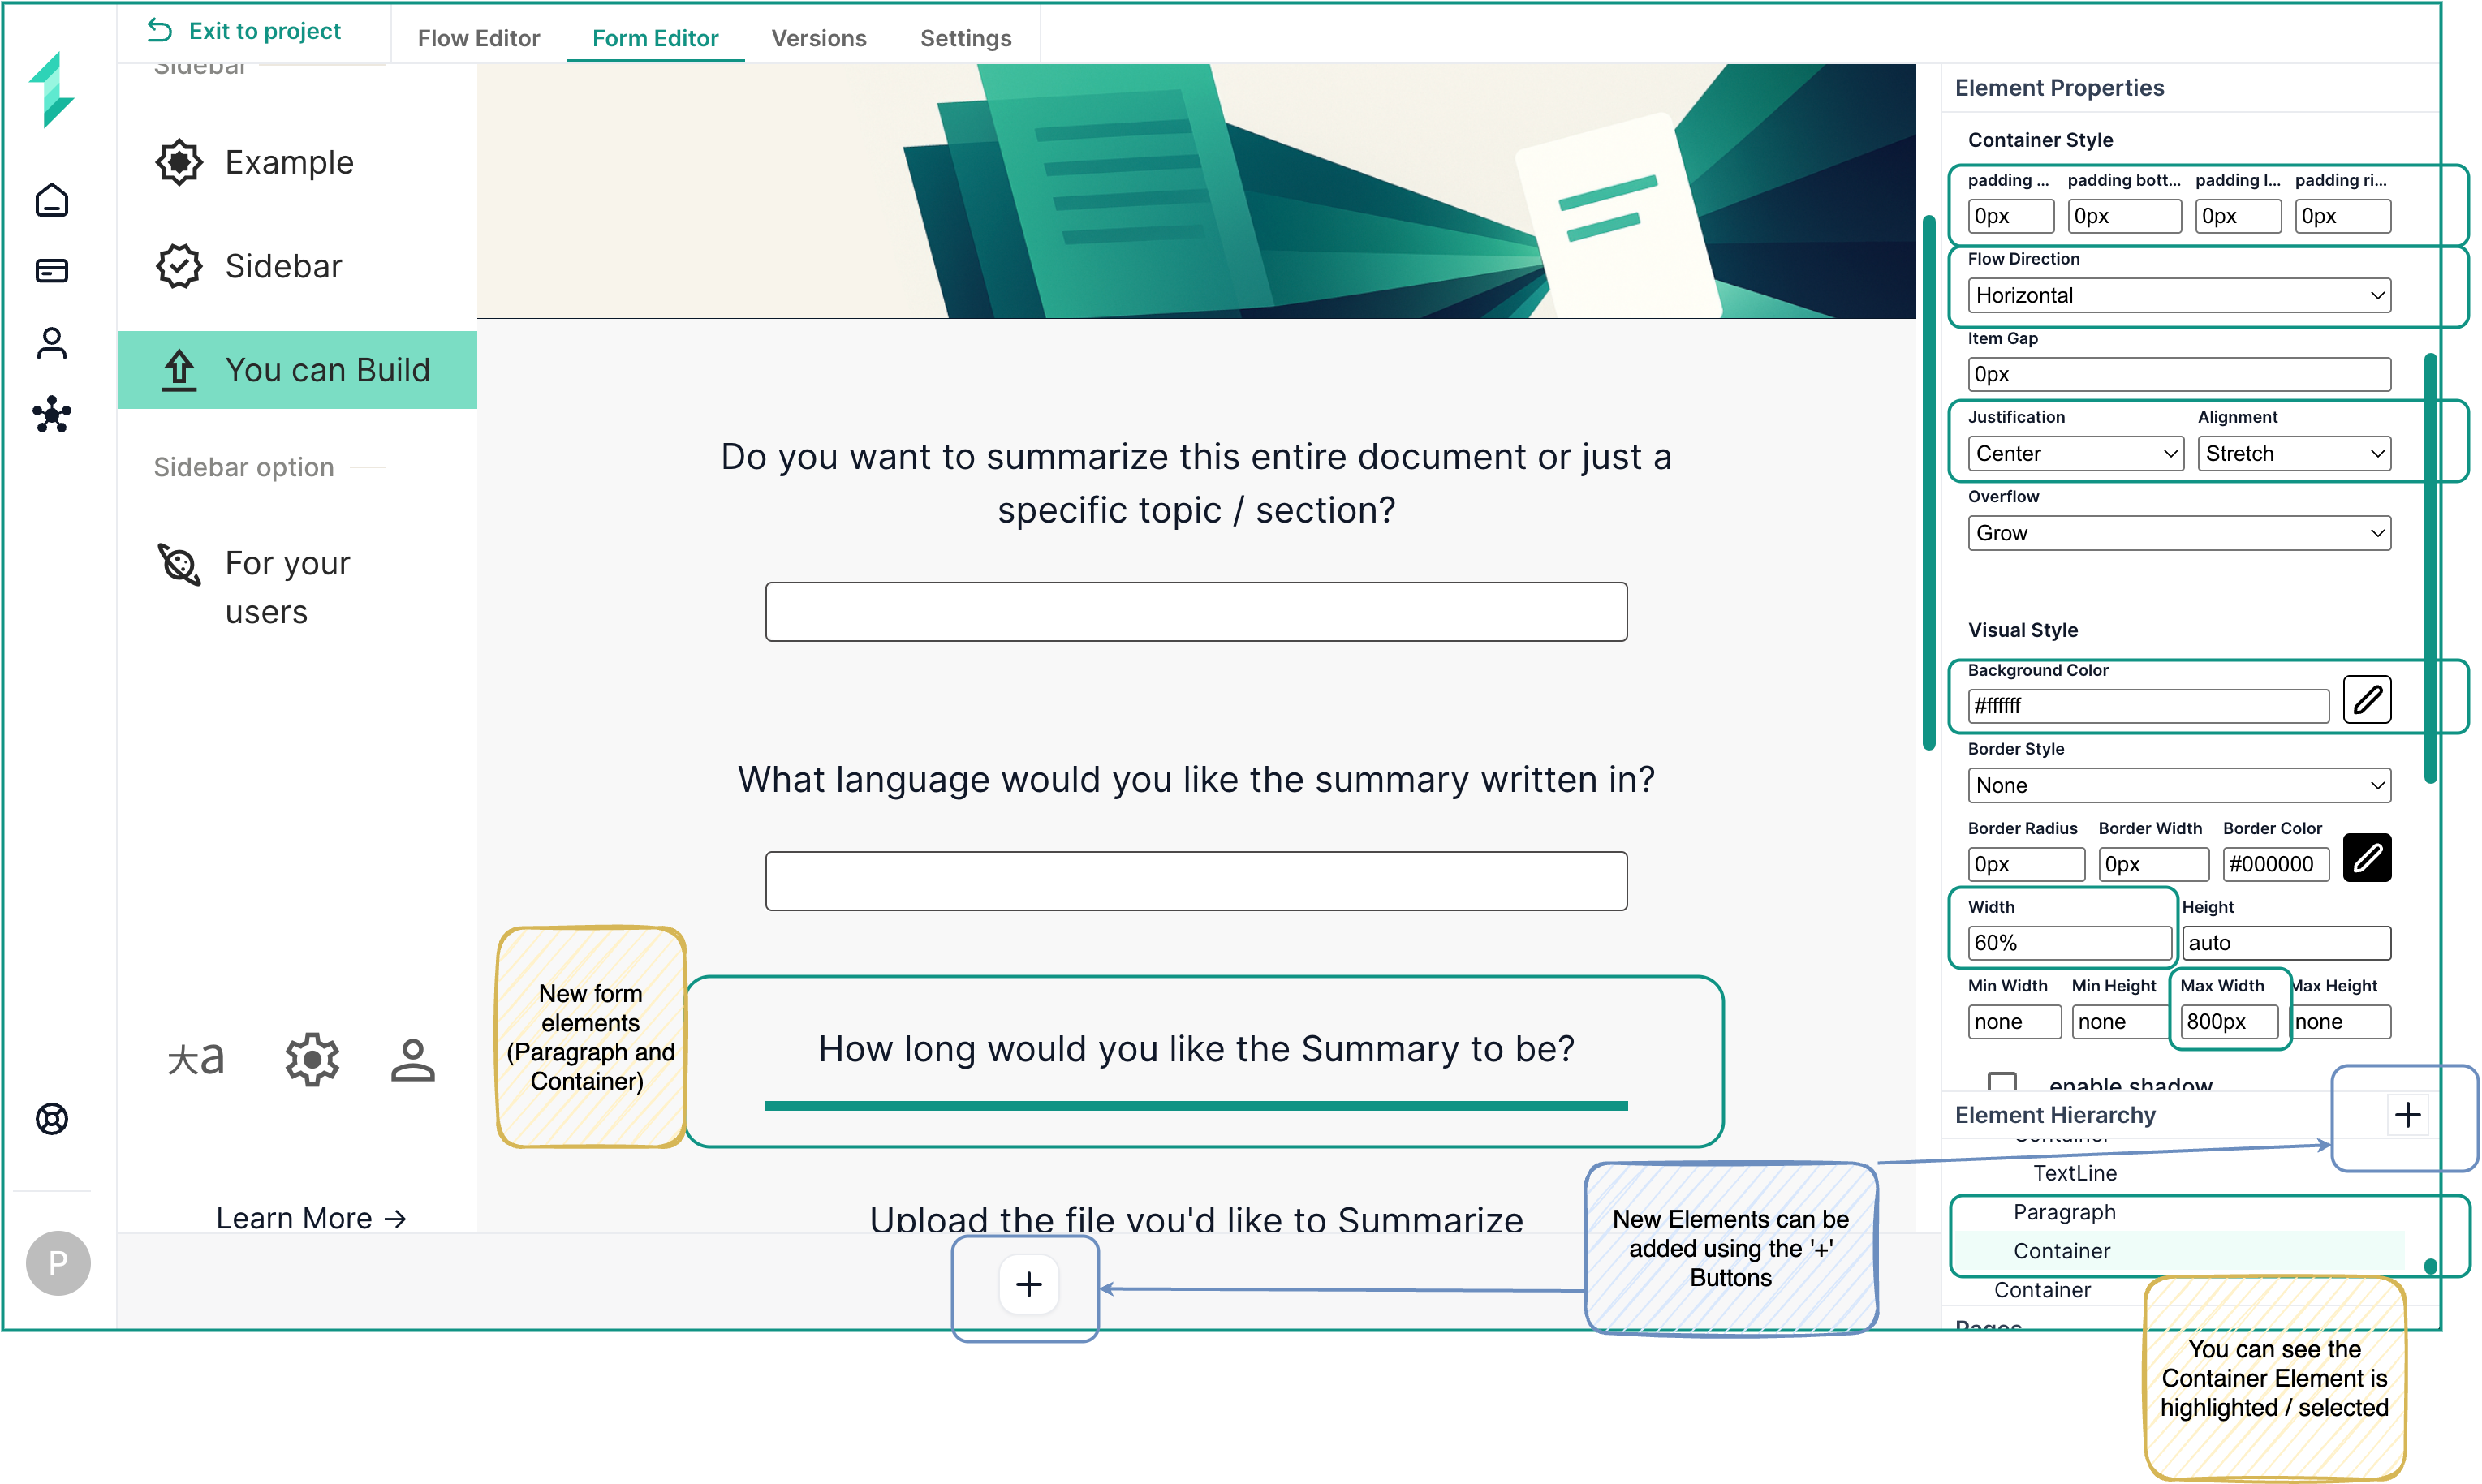
Find the Central Container you want to add a new elements to - the selected container will have a green border and can be seen highlighed in the Element Hierarchy.
-
Add a Paragraph element
- Text
How Long would you like the summary to be? - Font
22px - Font Weight
Regular(400) - Text Align
Center - Max Width
800px
- Text
-
Create a Container element, which will hold the text
- Padding
0pxfor all - Flow Direction
Horizontal - Justification
Center - Alignment
Stretch - Background Colour
#ffffff- or use the colour picker to select colour - Width
60% - Max Width
800px - Self Align
Center
- Padding
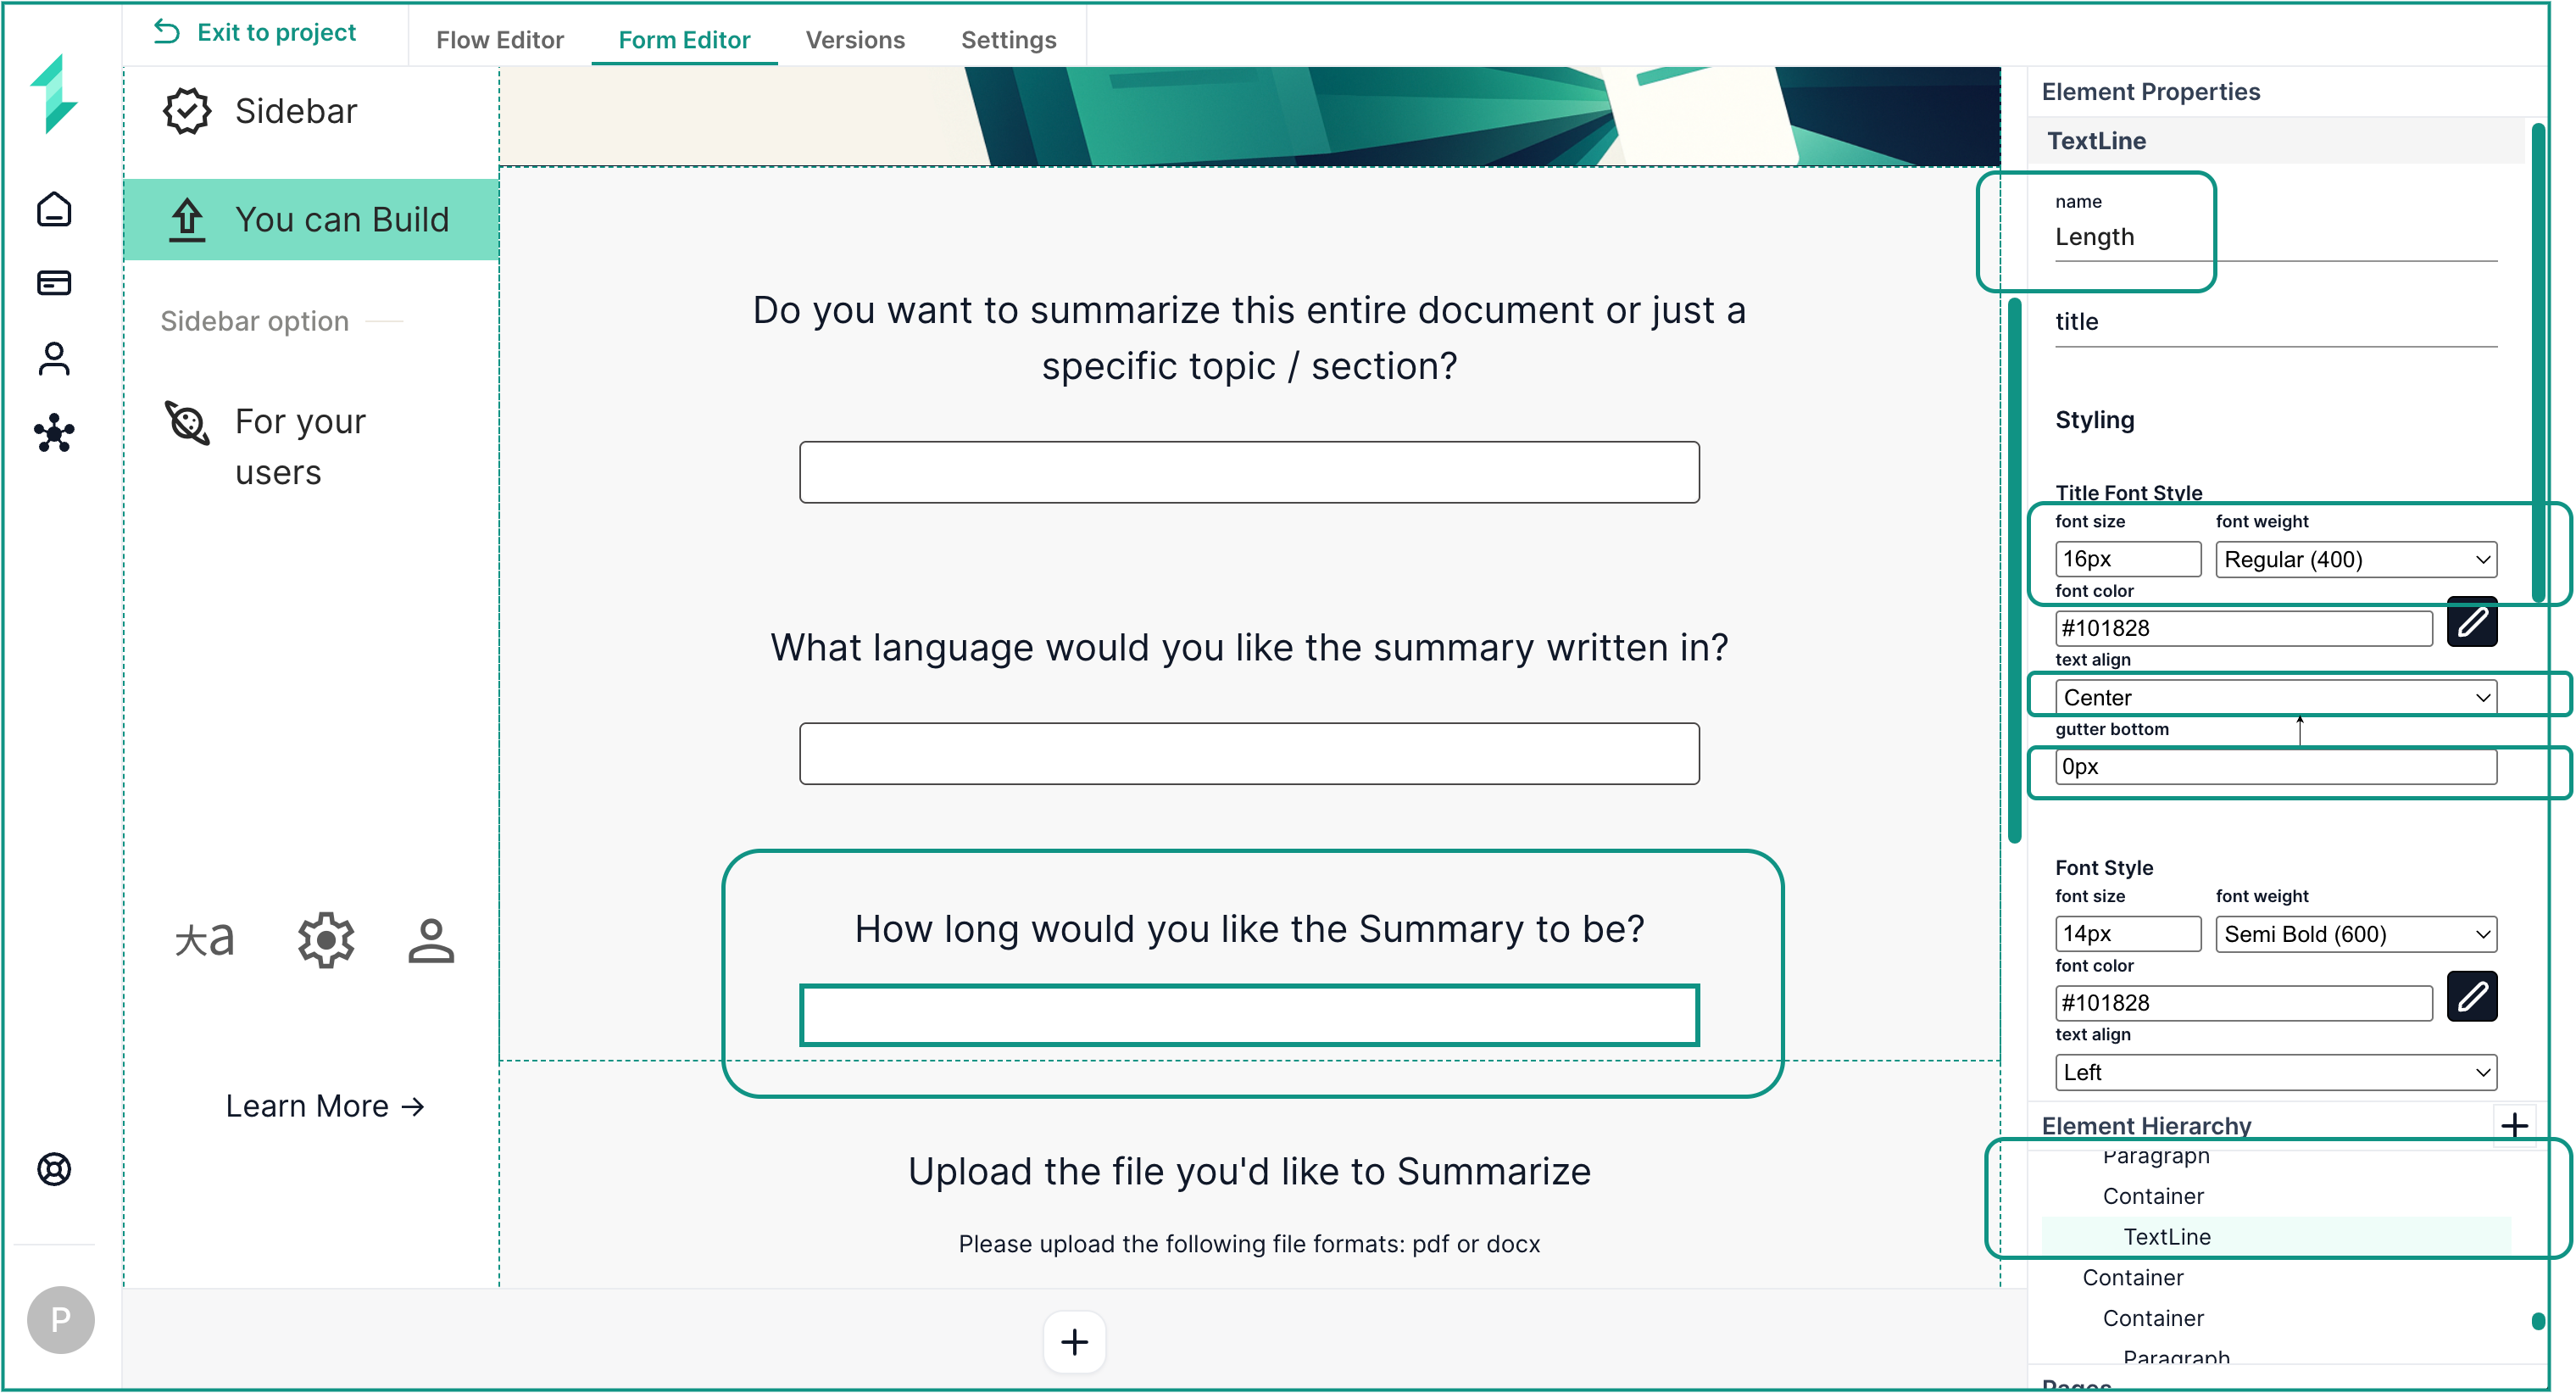
- Add a TextLine element
- Name
length - Font
18px,Rugular (400) - Text Align
Center - Gutter Bottom `5px``
- Background Colour
#ffffff- white - Border Radius `10px``
- Border Colour `#4c4949
- Name
Step 2: Modify the Workflow to Use the new Input
Now that the form captures the preferred length, let’s use that input inside the workflow.
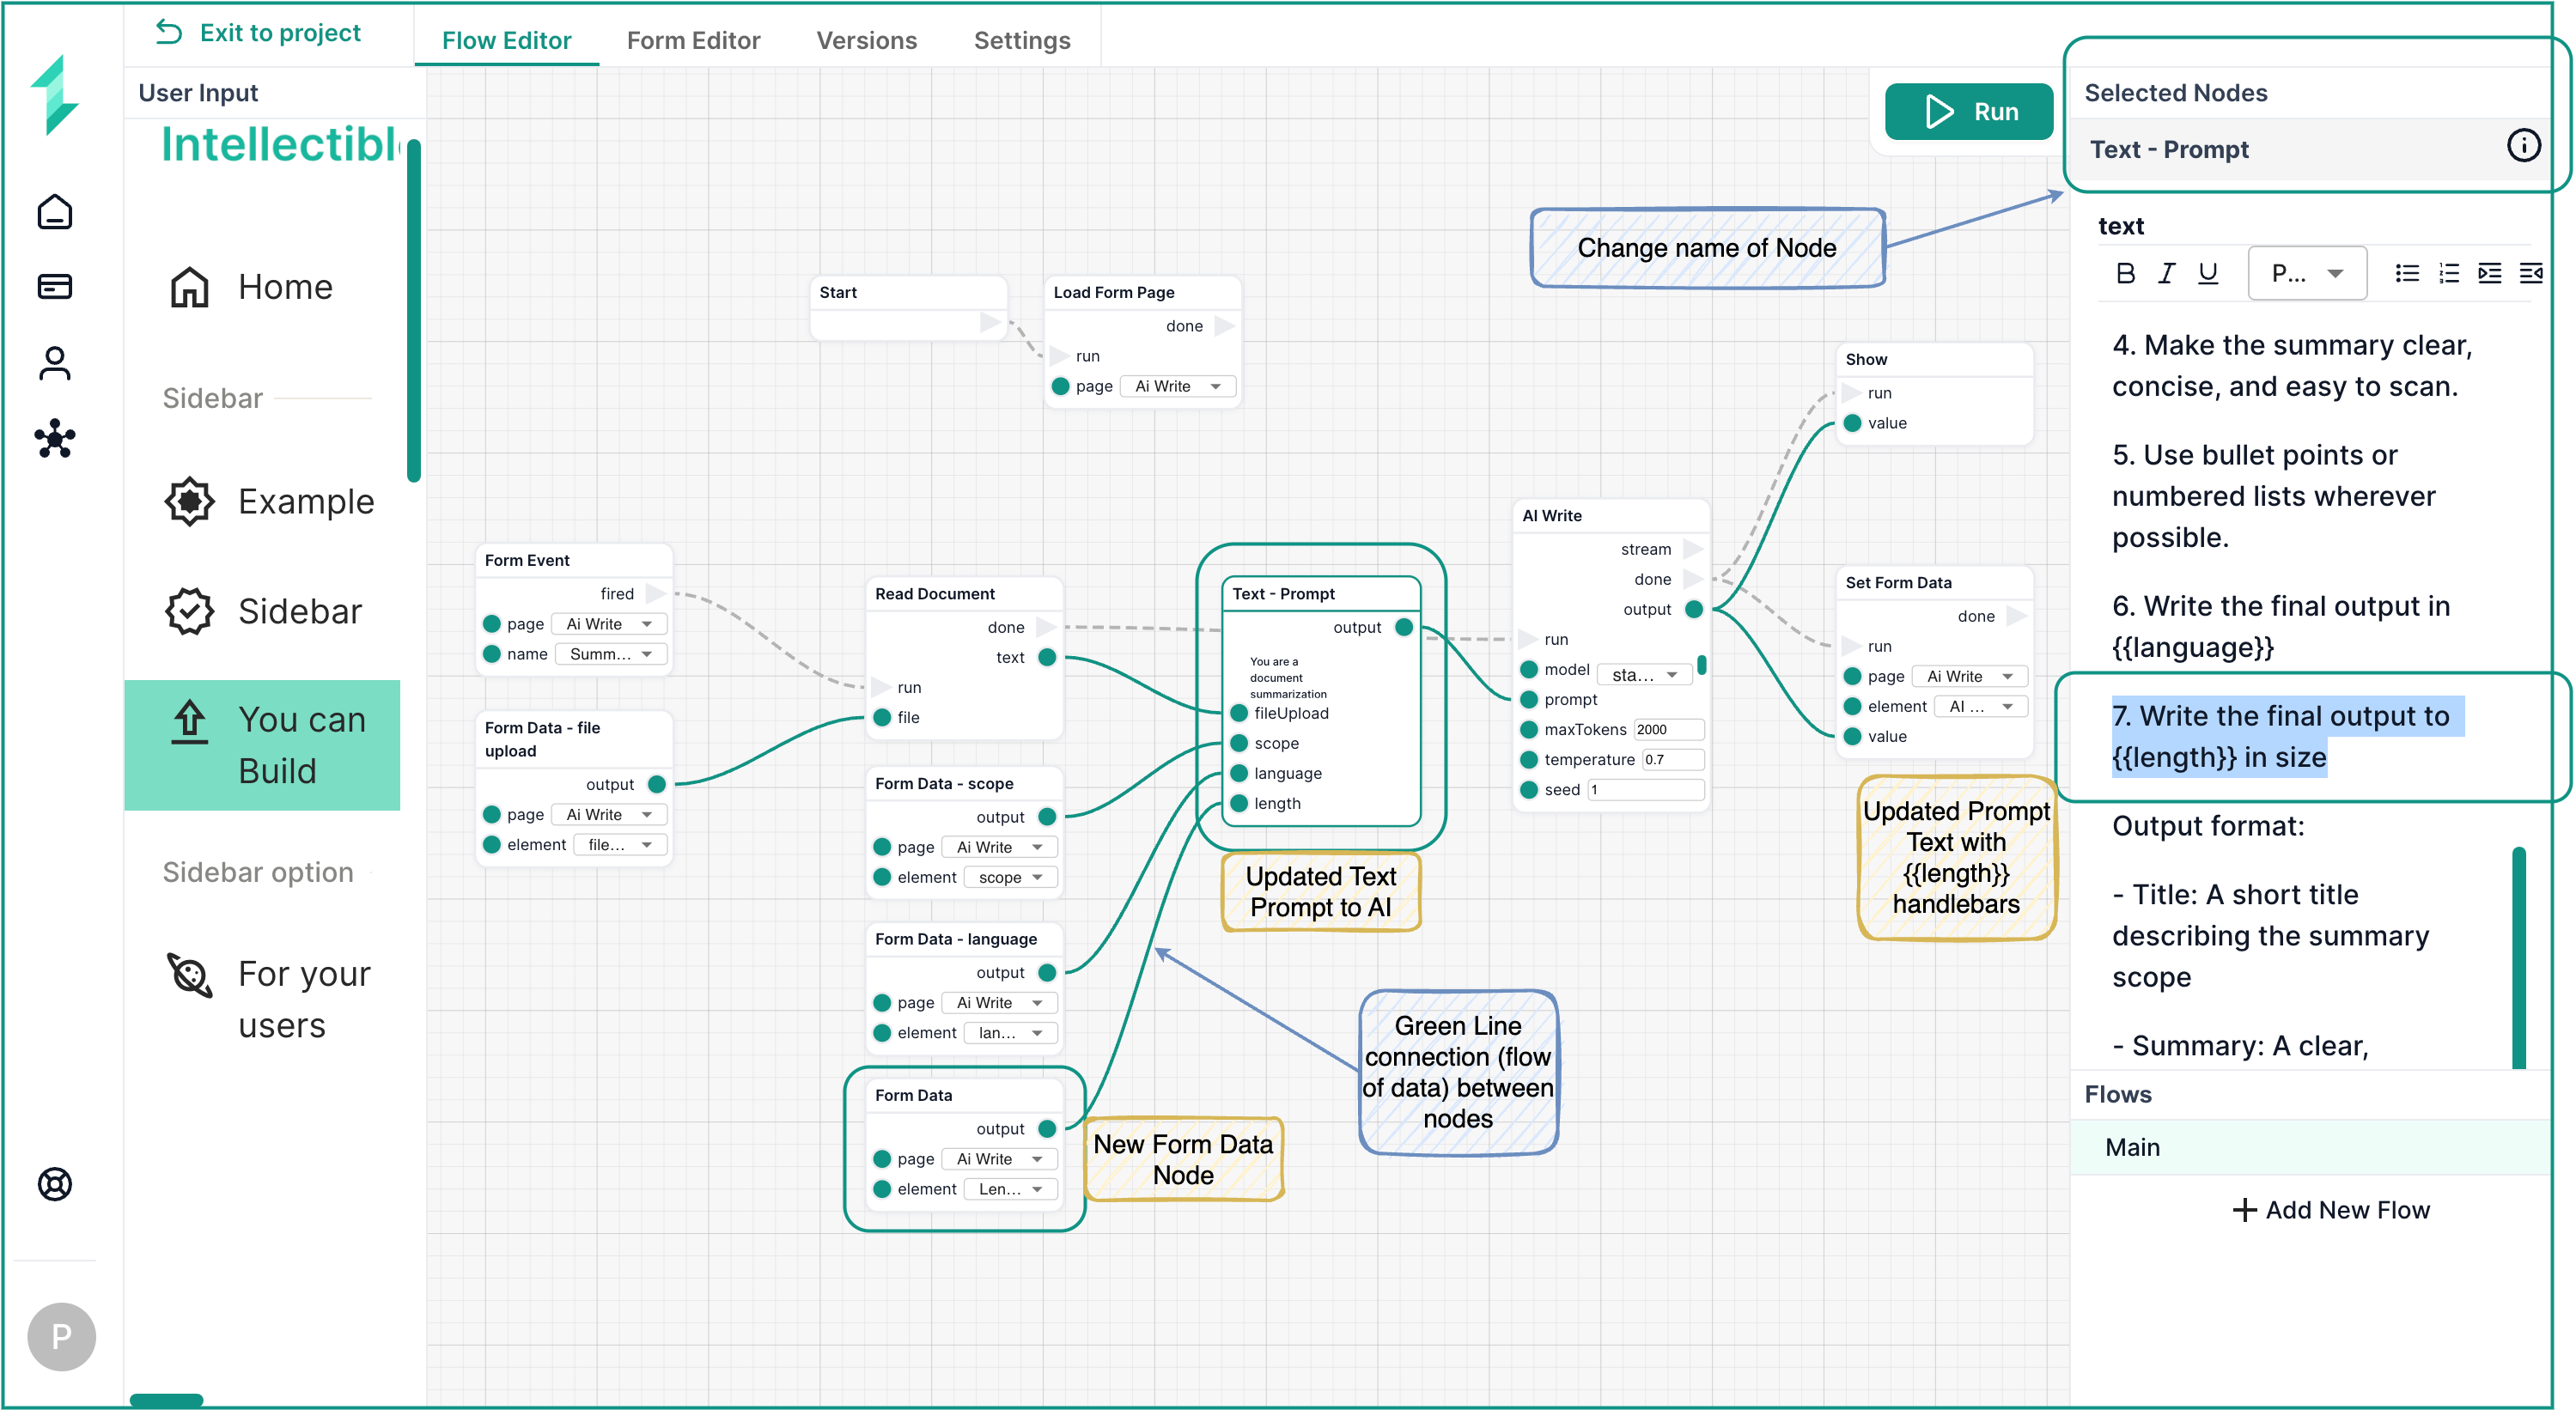
- In the Flow Editor, add a Form Data node
- Set the Form Data
- Page
AI Write - Element
length
- Page
- Adjust the text node (prompt) to include the new field as below:
- 7. Write the final output to
{{length}}in size. Learn more about Handlebars
- 7. Write the final output to
- Connect the new Form Data node to the Text - prompt node
Step 3: Test the Enhanced Flow
Use the live form to test how the new dropdown input affects the AI output.
- Click Run
- Fill the form with a topic, language, the new preferred summary length, and a file
- Click Summarize with AI
- Observe how the summary changes based on your selection

What You’ve Learned
- How to create and run a workflow from a template
- How to create new inputs on a form
- How to add new workflow Nodes to an Automation
- How to connect a form to workflow logic
- How to build and modify AI prompts in the Intellectible Canvas