Tutorial 4: Web Search - Deep Research
Goal
Tired of bouncing between tabs and skimming through article after article just to get the information you need? In this tutorial, you’ll build your own AI-powered research assistant inside Intellectible. By the end, you'll have a workflow that can search the web, crawl live websites, and deliver a clear, focused summary — all from a single input form.
Use Case
You’re a consultant researching funding opportunities for startups. Instead of manually reviewing articles and listings across multiple websites, you want a system that automates the search and summarization process — giving you a clear, up-to-date view on any topic you enter.
What You’ll Build
A workflow that:
- Uses AI to generate a focused Google-style search phrase
- Searches the web for top 5 results using that phrase
- Reads and summarizes the content of each web page
- Appends each summary into a growing summary variable
- Consolidates all summaries into a final, clear AI output
- Displays the final result in the form
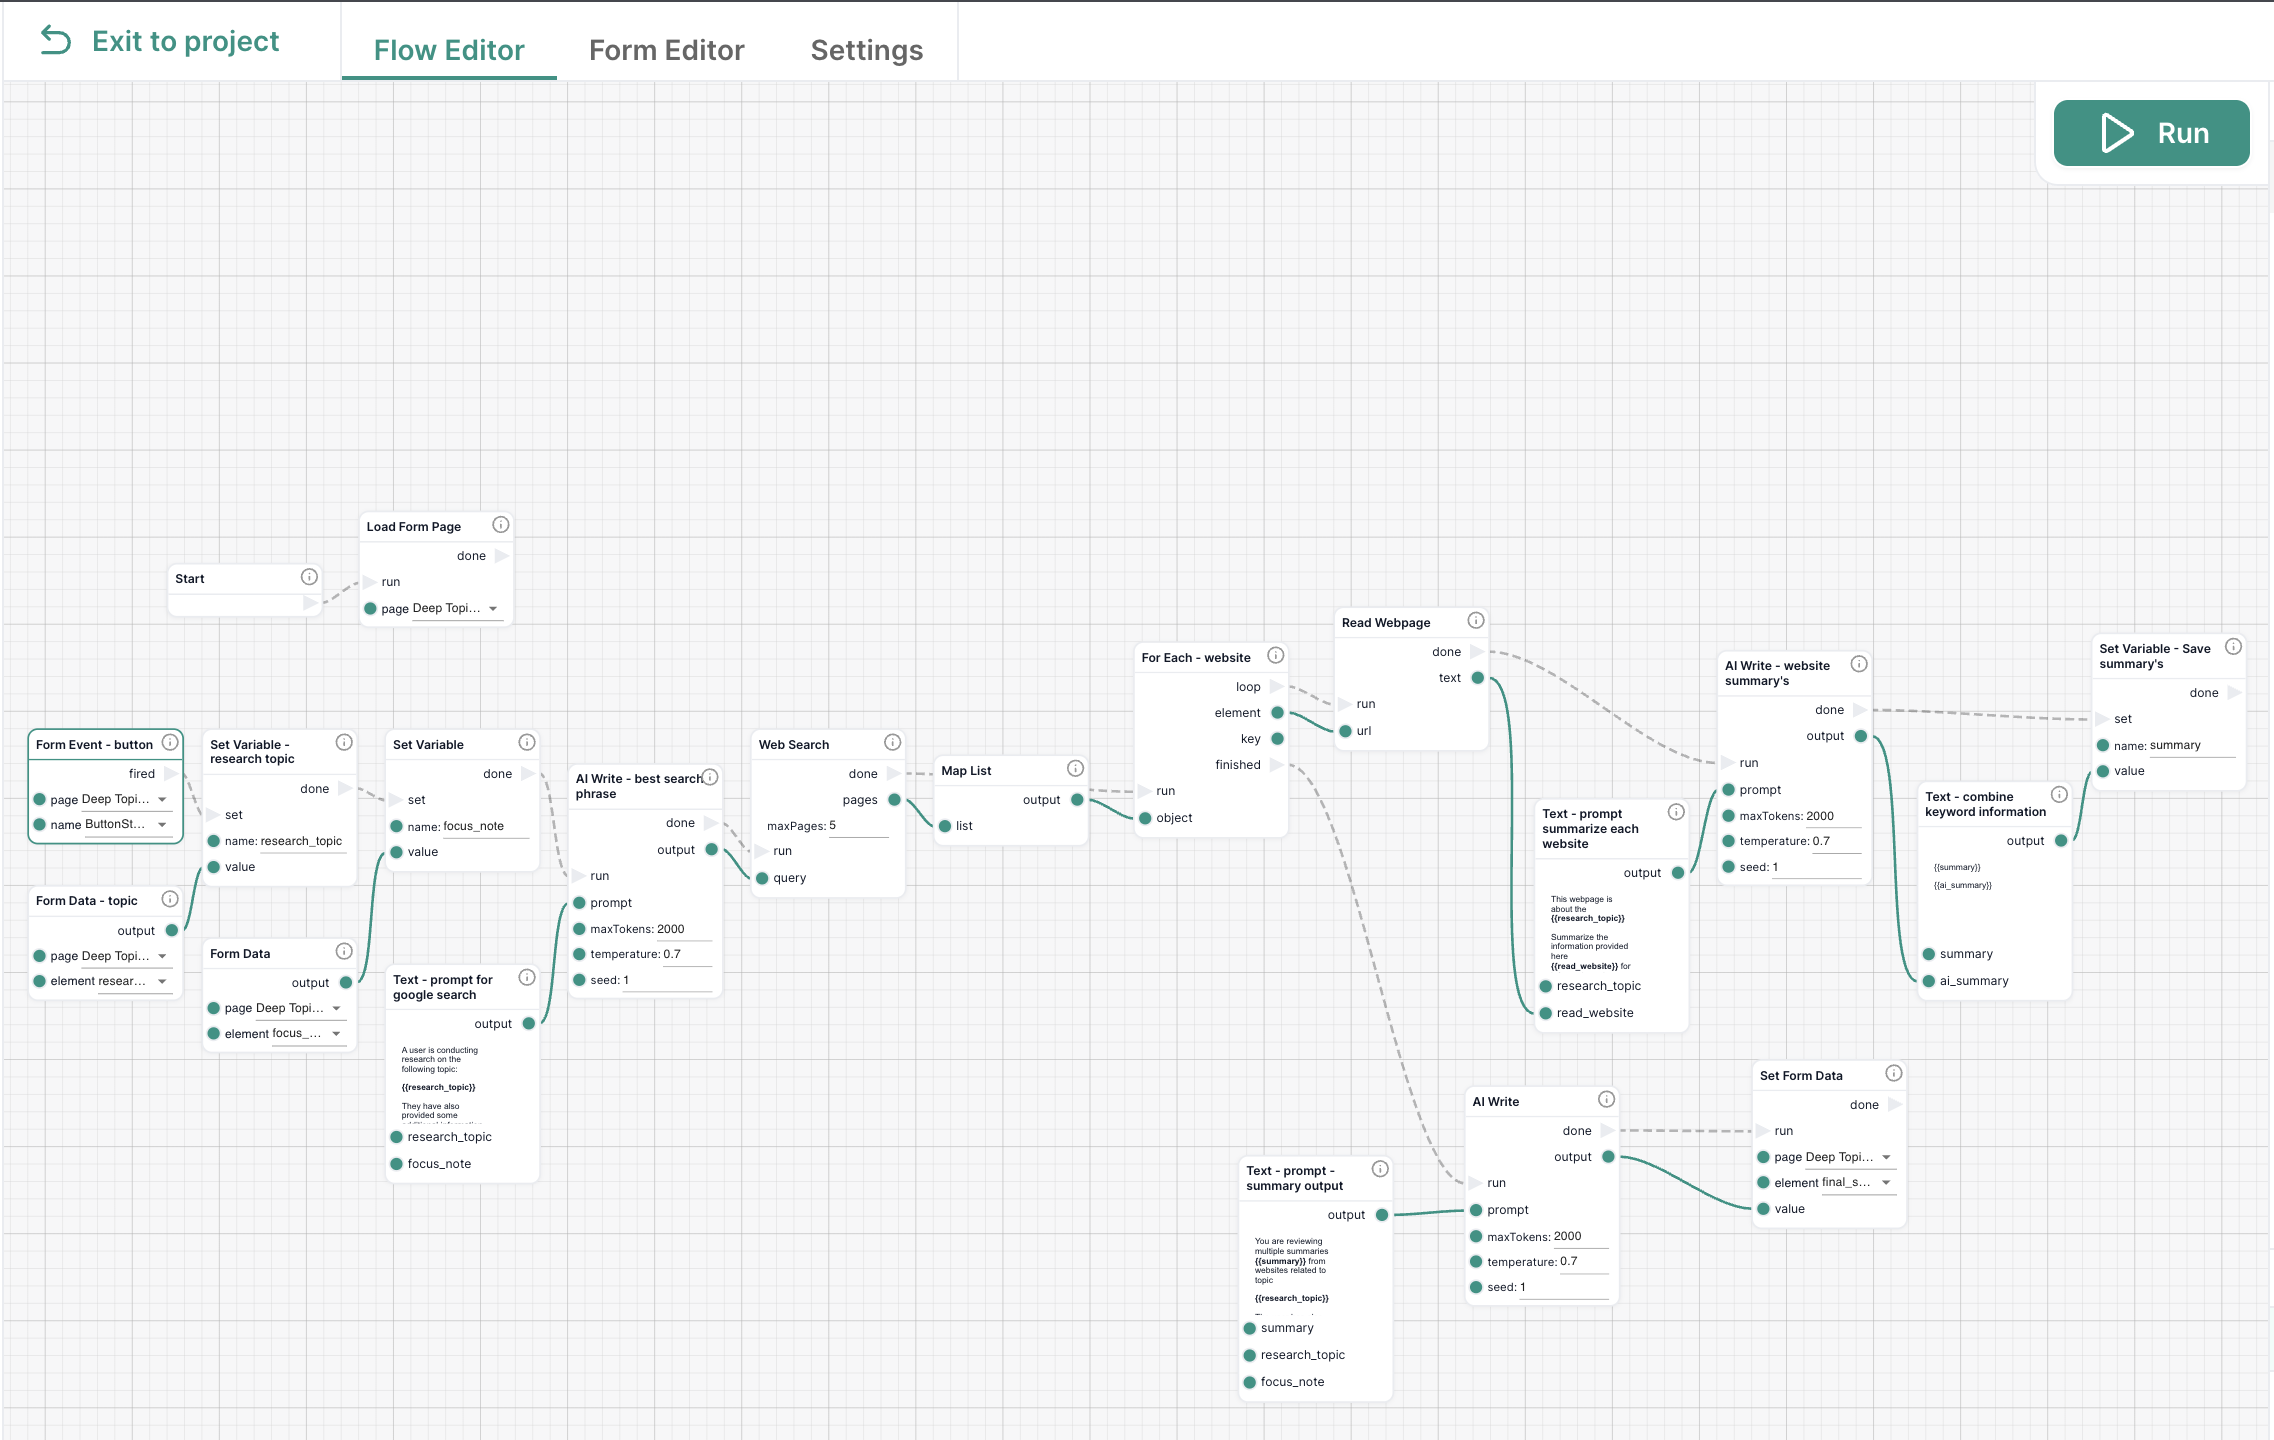
Nodes Used
| Node Name | Purpose & Usage |
|---|---|
| Load Form Page | Initializes the form |
| Form Event | Triggers the workflow on button click |
| Form Data | Captures user input: research topic and focus note |
| Set Variable | Stores inputs and combines AI outputs step-by-step |
| Text | Builds prompts for search generation, per-page summary, final |
| AI Write | Used for search phrase, page summaries, and final output |
| Web Search | Searches the web for pages matching the AI-generated phrase |
| Map List | Converts the results list into a loopable array |
| For Each | Loops through each search result |
| Read Webpage | Extracts content from each page |
| Set Form Data | Displays the final AI summary in the form |
Understanding the Website Search Functions
Intellectible provides three key nodes for researching and extracting content from the web.
In this tutorial, we used Web Search with Read Webpage for speed and efficiency. You can swap in Crawl Website for deeper site exploration, but note it may consume more tokens.
Compare the Web Research Nodes
Web Search
Performs a live Google search for a phrase and returns a list of links. Use this to identify relevant pages for your topic.
- Best for: Finding the top pages for any public topic.
- Output: A list of links or page data (when
objectResultis checked). - Use with: A
For Eachloop to crawl each result.
Read Webpage
Extracts content from a single, specific URL.
- Best for: Quickly pulling text from a known web page.
- Output: The visible text on the page.
- Use with: Direct URL input (manual or from form)
Crawl Website
Extracts content from a page and optionally follows internal links.
- Best for: Deeply scanning a website and all its key subpages.
- Output: Combined text from the main page (or additional pages if enabled)
Crawl Website Settings
| Setting | What It Means | Recommended |
|---|---|---|
maxPages | Number of total pages to crawl | 1 |
maxDepth | How many levels of internal links to follow (0 = just the page itself) | 0 |
maxPathDepth | How deep into the site's folder structure it can go (e.g., /a/b/c = depth 3) | 2 |
Use these settings to keep your crawl fast and focused. We’re just reading the top-level pages returned from search, not doing deep exploration.
Step-by-Step Instructions
Step 1: Create the Research Form
You’ll begin in the Form Editor to create a simple input form. Users enter a topic and optional focus, and see the summary on-screen.
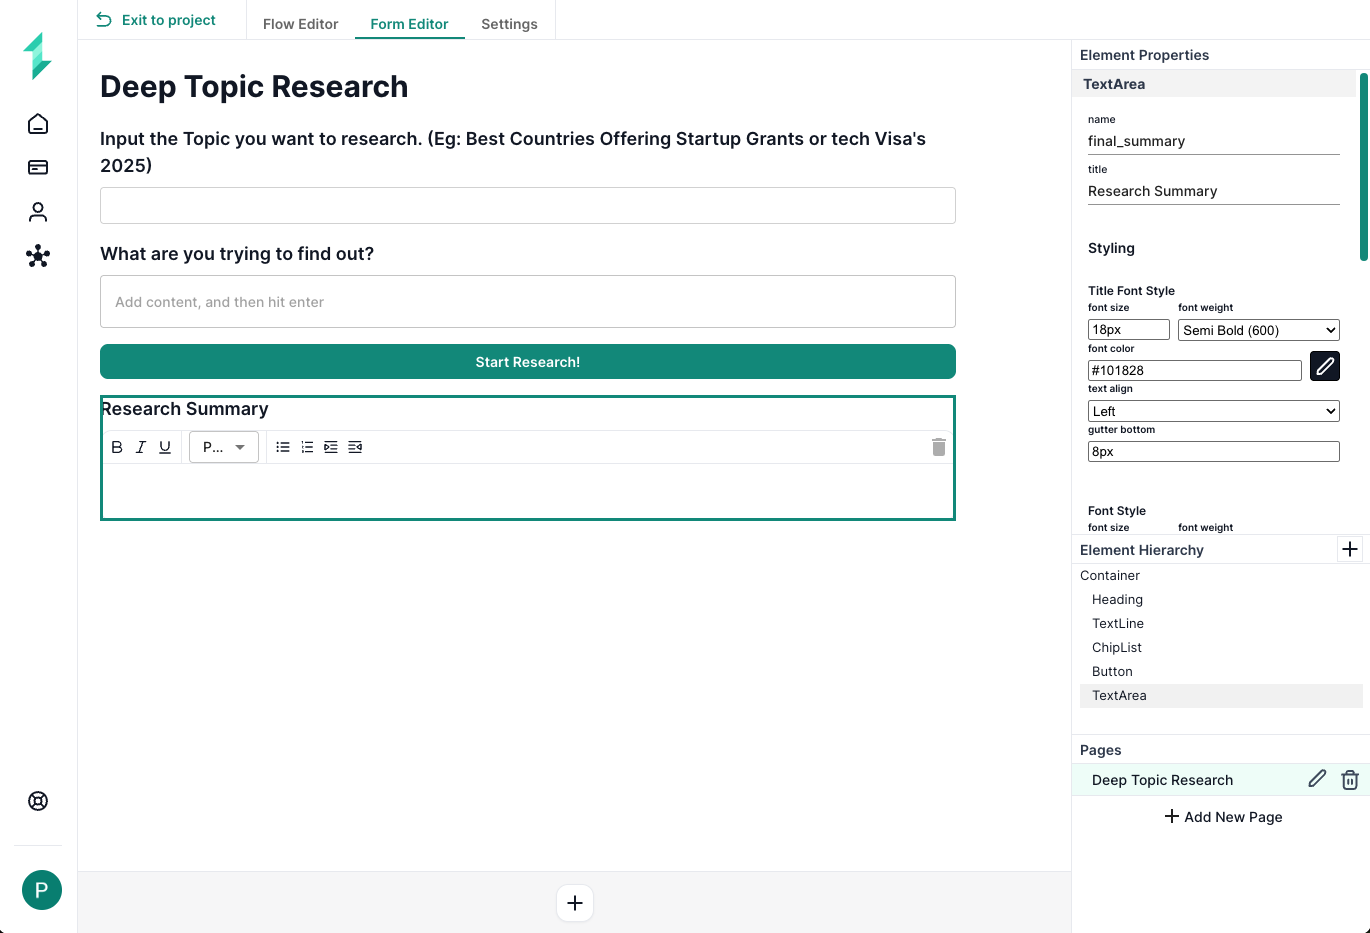
Add the following fields to your form:
-
Text Line Input
- Name:
research_topic - Title: "What do you want to research?"
- Name:
-
Text Line Input (optional)
- Name:
focus_note - Title: "What are you trying to find out?"
- Name:
-
Button
- Name:
StartResearchButton - Title: "Start Research"
- Name:
-
Text Area Output
- Name:
summary_output - Title: "Summary of Research"
- Name:
Step 2: Build the Workflow Logic
You’ll now switch to the Workflow Editor and build logic that reacts when a user clicks the Start Research button.

2.1 Load the Form
This step ensures the correct form page is loaded when the workflow starts. It connects the workflow to the user-facing form interface.
- Add a
Load Form Pagenode - Connect it to the
Startnode - Select the correct page from the dropdown (e.g., Deep Topic Research)
2.2 Trigger the Workflow
We trigger the workflow when the user clicks the Start Research button. This begins the automated process in response to form interaction.
- Add a
Form Eventnode- Page: your form page
- Name:
StartResearchButton
2.3 Get Form Inputs
Here we capture the topic and optional focus the user submitted via the form. We'll store these values in variables so they can be reused in prompts later.
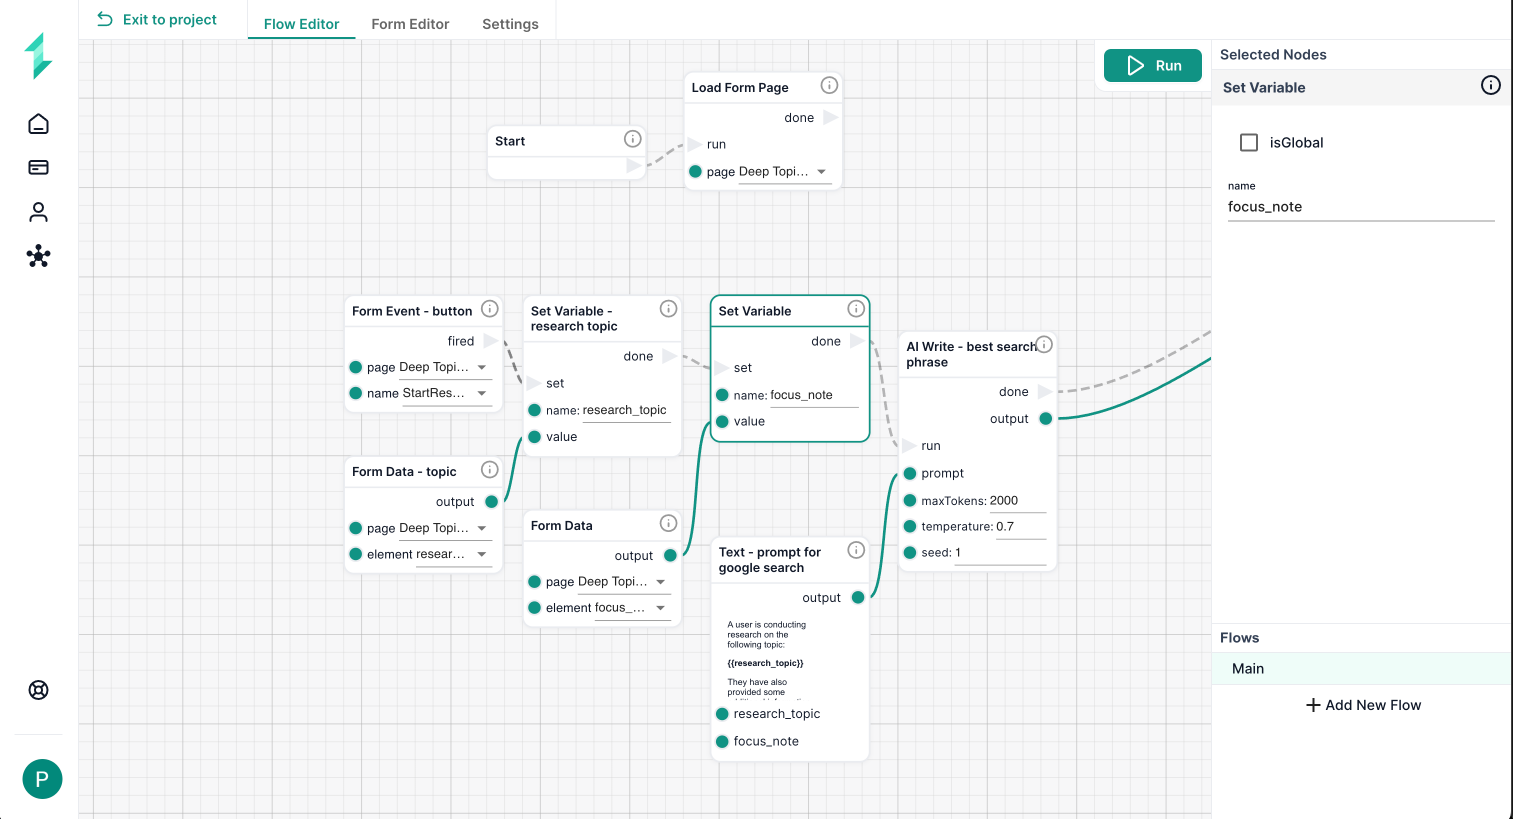
-
Add two
Form Datanodes:- One for
research_topic - One for
focus_note
- One for
-
Then add a
Set Variablenode:- Name:
focus_note— value:Form Data: focus_note
- Name:
2.4 Generate the Search Phrase
We use AI to take the topic + focus and generate a Google-style search phrase which will get better search results
- Add a
Textnode - Add the prompt as below
- Connect it to an
AI Writenode (maxTokens: 2000, temperature: 0.7) - (Optional) Add a
Shownode to preview the result
A user is conducting research on the following topic:

{{research_topic}}

They have also provided some additional information to focus on

{{focus_note}}

Your job is to create a single search phrase that would return the most useful, up-to-date information related to both the topic and focus.

Return only the query.
2.5 Search Google for Pages
Now we use the AI-generated search phrase to run a live web search. We then reformat the results using a Map List so we can loop through each link.
-
Add a
Web Searchnode:- Input: AI Write output
- maxPages: 5
- Under
returnOptions, check only:url - Enable
objectResult✅
-
(Optional) Add a
Shownode after Web Search to inspect the list of results -
Add a
Map Listnode- Input: the output of
Web Search - This reformats the data into a proper list for looping
- Input: the output of
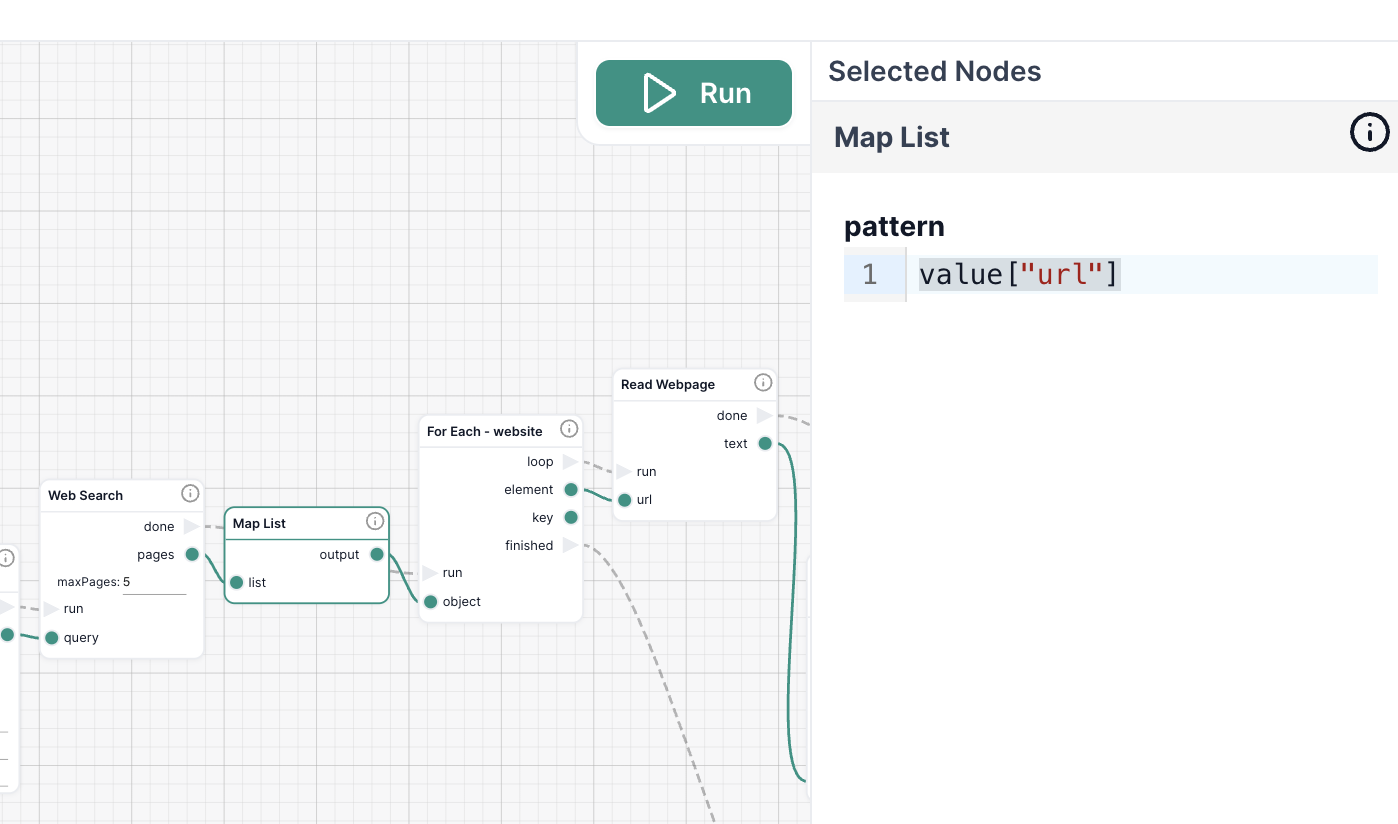
2.6 Loop Through Each Search Result
Now that the Web Search node has given us a list of URLs, we want to loop through each one and extract its content. We’ll use a For Each node, which repeats a set of steps for every item in a list.
In this case, for each link:
- We'll Read the Webpage to pull out its content
- Then, we’ll summarize the content using AI
- Finally, we’ll append the result to a growing summary
This whole process will happen inside the For Each loop.
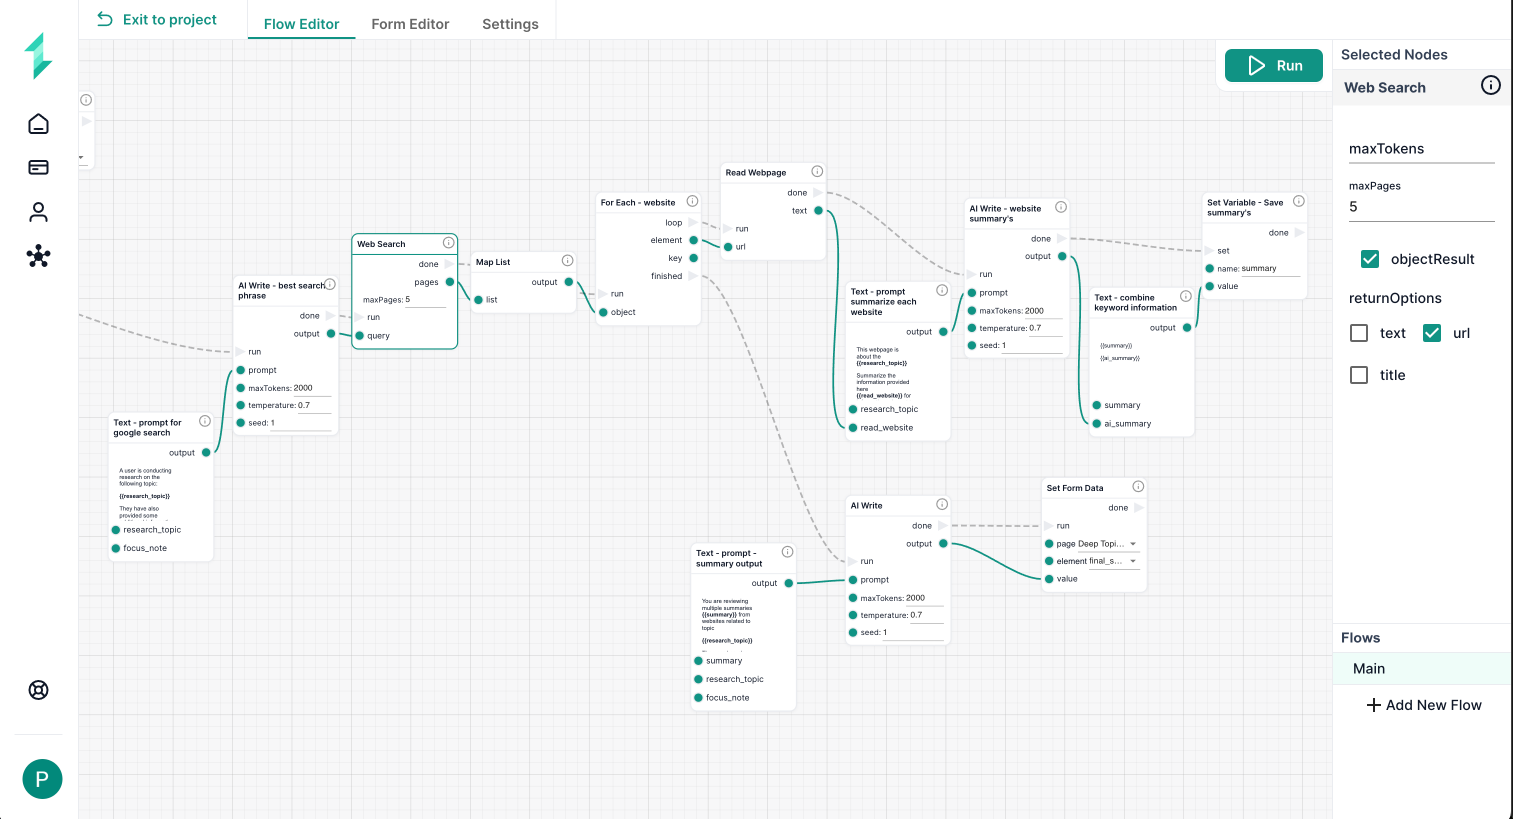
Add a For Each node:
- Set the Output of the Map List to the Object of the
For Eachnode - The Element inside the loop will be refer to each URL in the list
Inside the Loop
You’ll now build the internal logic for the loop. Everything described here will run once for each link found in the web search.
Read the Webpage
Use the Read Webpage node to extract the full text from each link.
- Add a
Read Webpagenode- Connect the
For Eachelement to the Input (url) - Also connect the loop and run dotted lines between these nodes
- Connect the
Generate a Page Summary
Use AI to summarize the content from the read page in relation to the topic and optional focus note.
- Add a
Textnode - Add a prompt as below
- Connect to an
AI Writenode- maxTokens: 2000
- temperature: 0.7
This website contains information about {{research_topic}}.

Summarize the following webpage content:

{{read_website}}

Only extract details related to the research topic and focus.

Use short paragraphs or line breaks between key points. Start with the topic as a title.
Store the Result
We now append this summary to a growing list of results by creating a variable summary which is added to each time the loop is run.
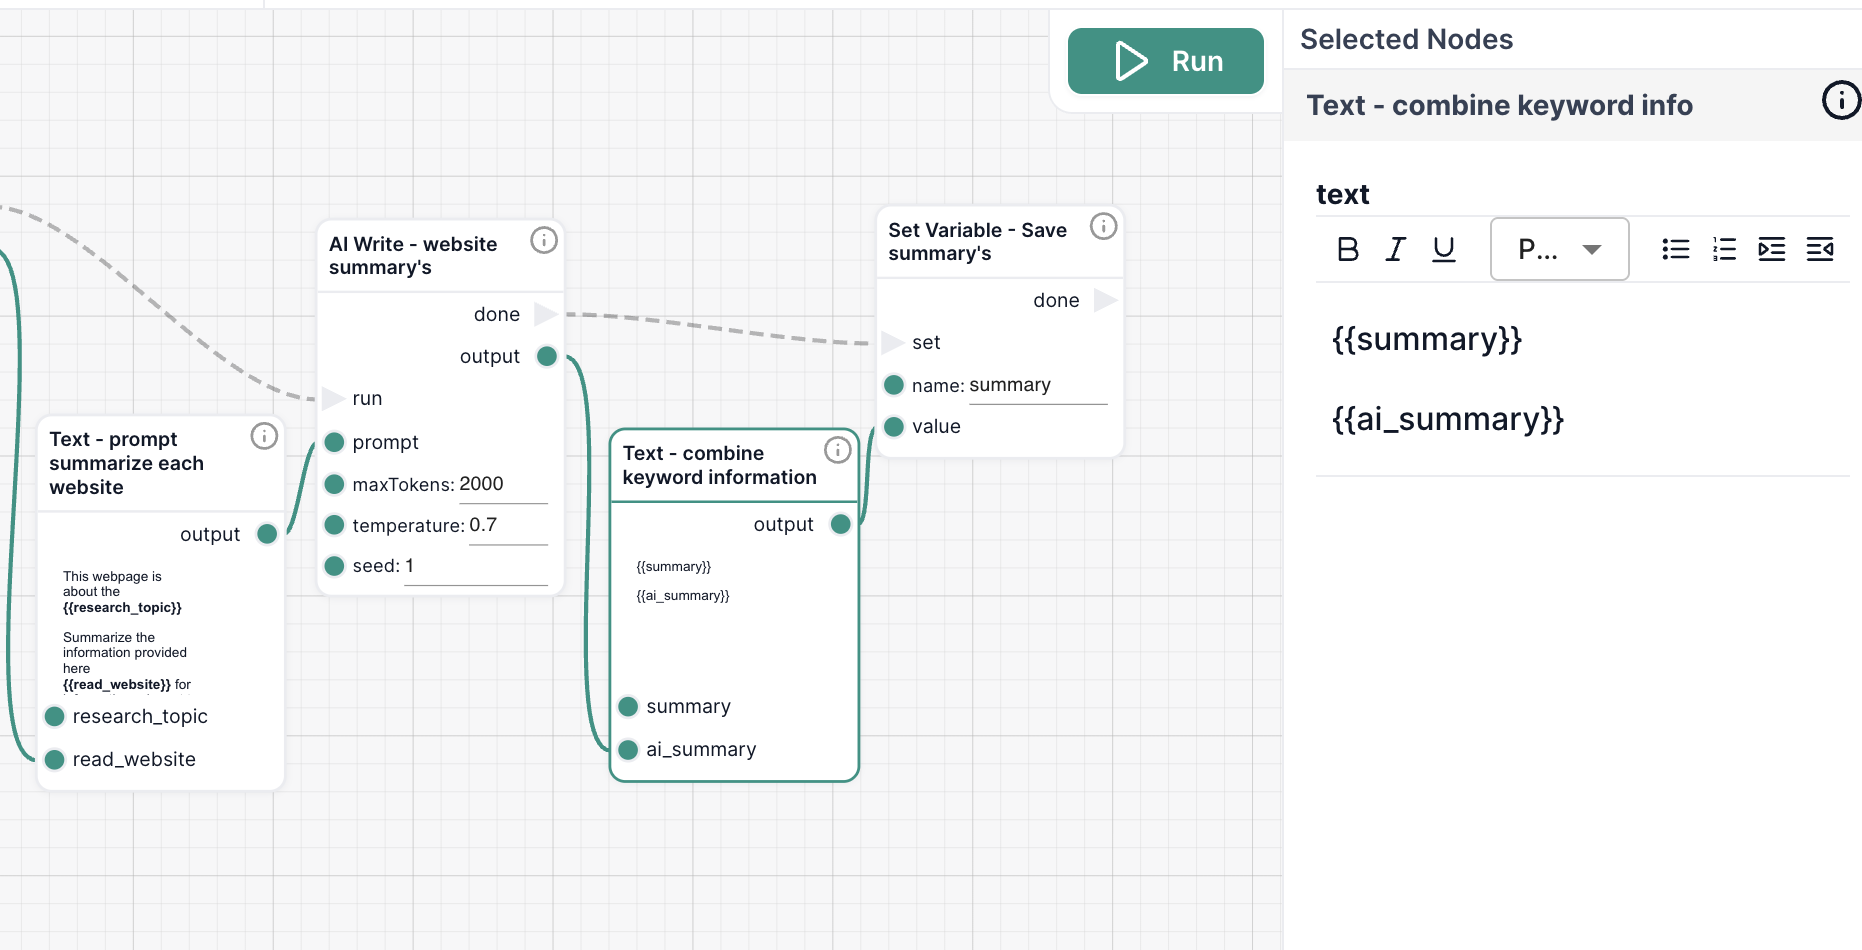
- Add a
Set Variablenode- Name:
summary - Value: Output from the combining Text node
- Name:
- Add a
Textnode before it that combines:- The existing variable:
{{summary}} - The new AI output
{{ai_summary}}
- The existing variable:
2.7 Final Summary with AI
After gathering summaries from each page, we now ask AI to combine them into one clear, insightful summary tailored to the research topic and focus.
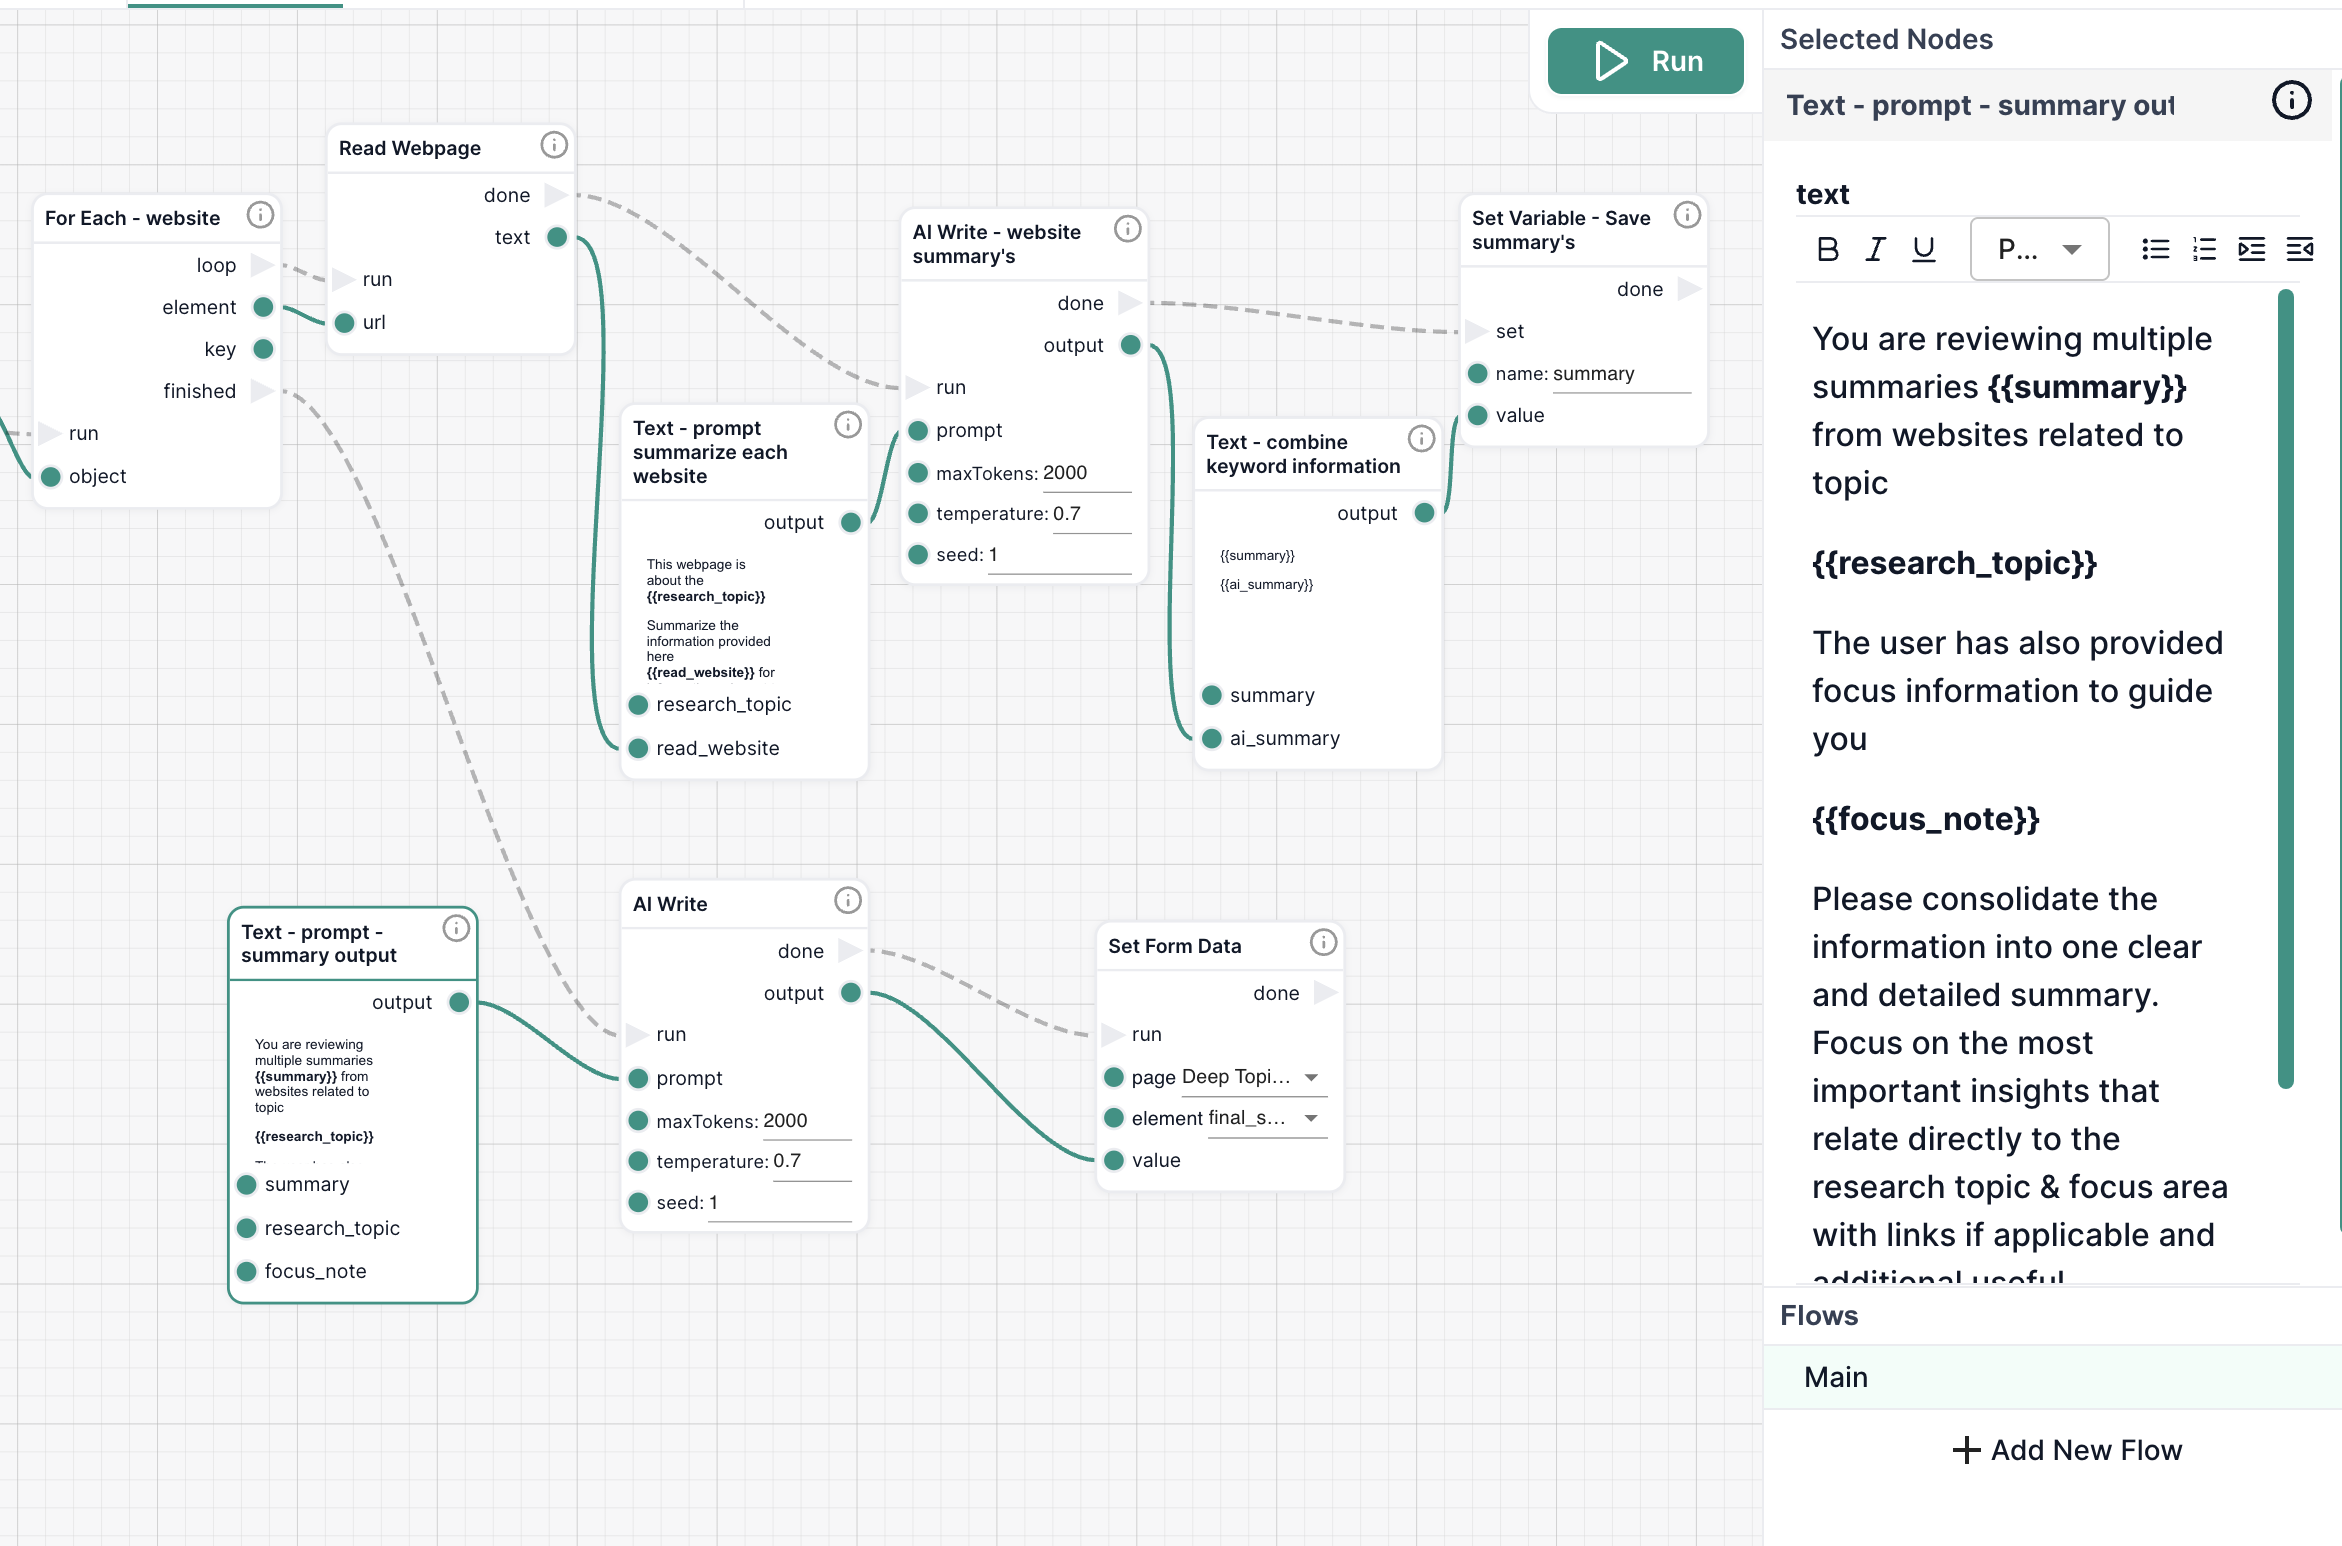
- Add a
Textnode - Add the prompt as below
- Connect it to a final
AI Writenode- maxTokens: 2000
- temperature: 0.7
- seed: 1
- Now connect the finished output from the
For Eachloop to the AI Write run input
You are reviewing multiple AI-generated summaries from web pages related to:

{{research_topic}}

The user also provided this focus:

{{focus_note}}

Please consolidate the information into a single, clear summary. Focus on insights directly related to the topic and focus. Avoid repetition but preserve detail.
2.8 Display the Final Output
Finally, we show the completed summary directly in the form. This allows users to get a clean, consolidated result without ever leaving the page.
- Add a
Set Form Datanode:- Page: your form
- Field:
summary_output - Value: Final AI Write result
Step 3: Run & Test
- Click Run in the top-right of the Workflow Editor
- Type a research topic like: Best countries for startup grants and visas
- Optionally add a focus like: Which countries offer funding AND a tech visa?
- Click Start Research and review the summary
Try It Yourself
Once your workflow is built, it's time to put it to the test. Use realistic topics and focus areas to see how well your system performs.
Try prompts like:
-
Topic: Best countries for startup visas 2025
Focus: Which countries offer both funding and an easy visa process? -
Topic: Grants for AI companies in the US
Focus: Compare national and state-level programs -
Topic: Top startup hubs for clean tech in Europe
Focus: Look for early-stage support and investor landscape
As you test:
- Does the AI generate useful summaries?
- Are the websites relevant and diverse?
- Would you trust this for client research?
What You’ve Learned
- How to accept user input
- How to generate and refine a search phrase using AI
- How to perform a Google search and extract data from websites
- How to summarize multiple sources into one response
- How to build a real-time research assistant inside Intellectible