Tutorial 1: Extract Specific Information from a Document
Goal
Learn how to create a workflow that lets users choose a document from the Library, specify a topic to extract, and receive an AI-generated summary — with optional language and writing style customization.
Use Case
You're working with a long, detailed document and need to pull out everything relevant to a specific topic. It’s slow, overwhelming, and easy to miss things. Using the power of AI, this workflow handles that for you — automatically extracting the key information, so you can focus on insights, not scanning pages.
What You’ll Build
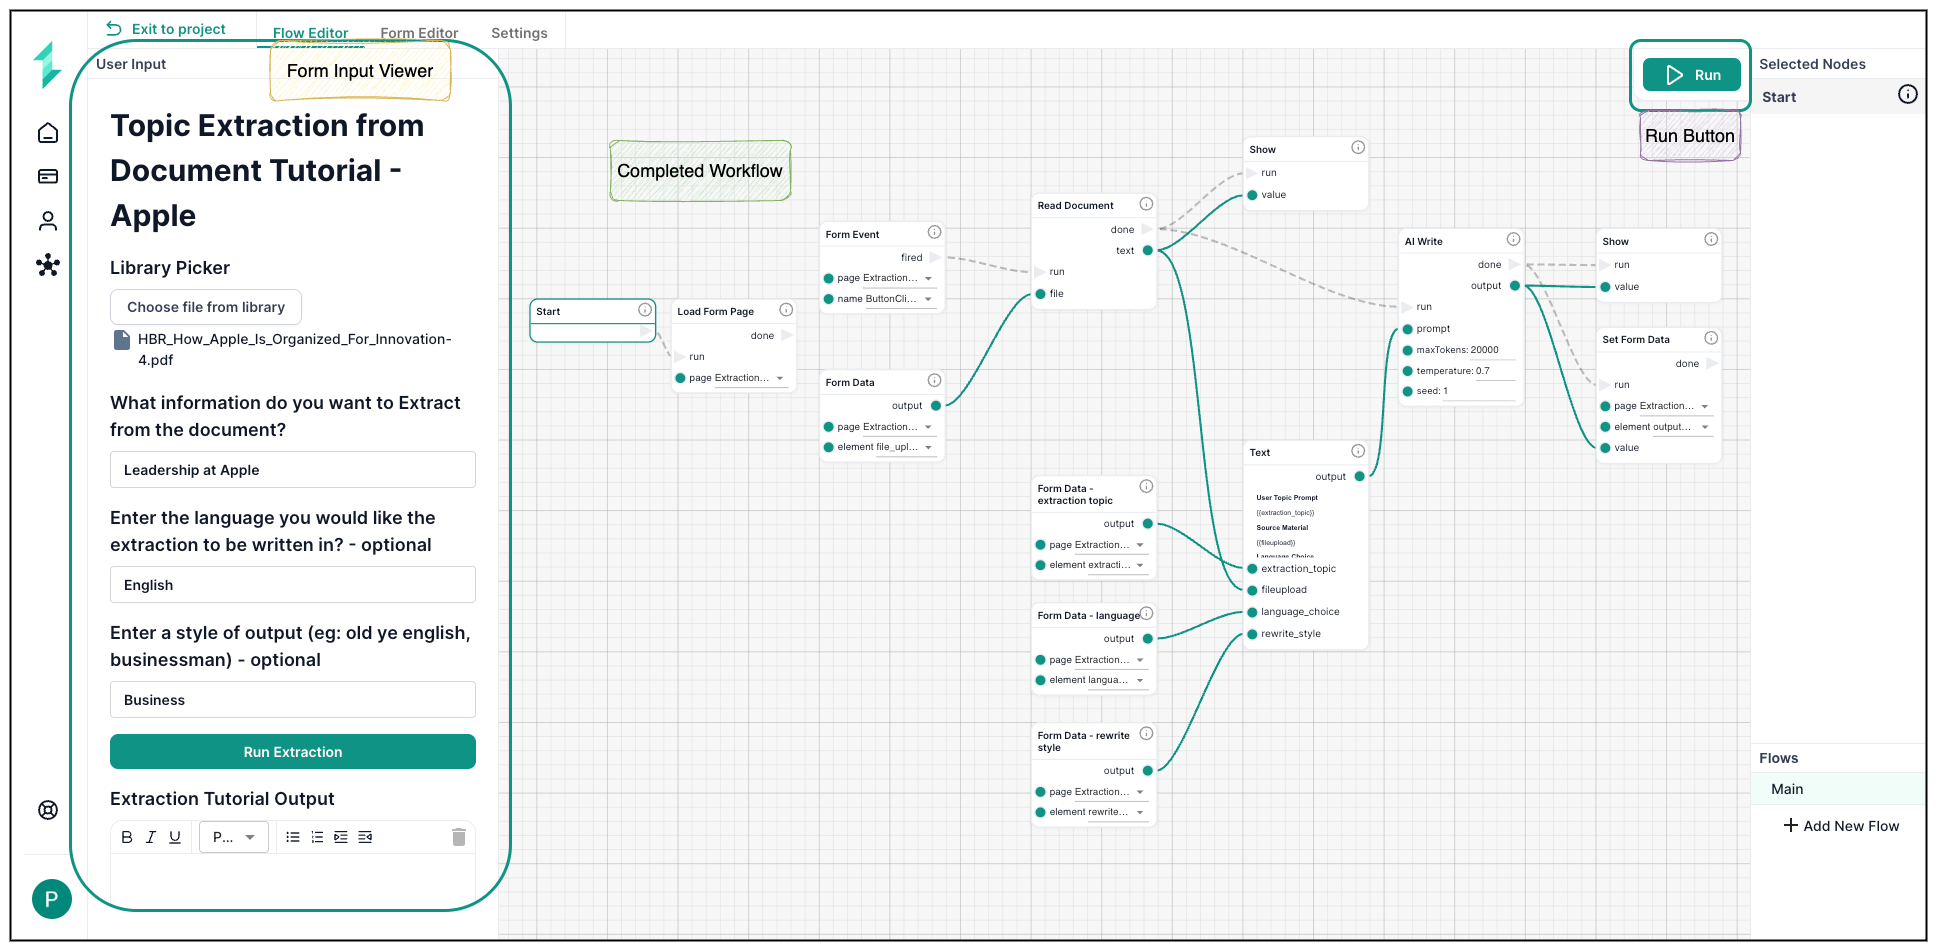
You’ll build a workflow that automatically pulls out the most relevant information from a document — based on a topic the user provides. It will:
- Let users select a document and enter a topic, language, and tone
- Generate a tailored AI prompt behind the scenes
- Extract topic-specific content from the document
- Display a clear, formatted summary right in the form
Nodes Used
| Node Name | Purpose & Usage |
|---|---|
| Load Form Page | Initializes the form when the user opens the page. Ensures the workflow is ready to receive inputs. |
| Form Event | Triggers the workflow when the user clicks the “Run Extraction” button in the form. |
| Form Data | Retrieves user inputs from the form: topic, language, style, and selected document. |
| Read Document | Loads the full content of the selected document from the Library. |
| Text | Builds a dynamic AI prompt using the user’s inputs and the document content. |
| AI Write | Sends the prompt to the AI model and generates a topic-specific response. |
| Set Form Data | Pushes the AI’s response back into the form so the user can see the result. |
| Show (optional) | Reveals hidden elements in the form to display the result or provide feedback. |
Step-by-Step Instructions
Step 1: Create the User Input Form
You’ll begin in the Form Editor to create the user input form. To learn how to use the form editor see Form Editor - Where Users Build & Connect Forms. We are now creating a form which is the front end UI of which users will enter their inputs, and then view the AI-generated results from the workflow.
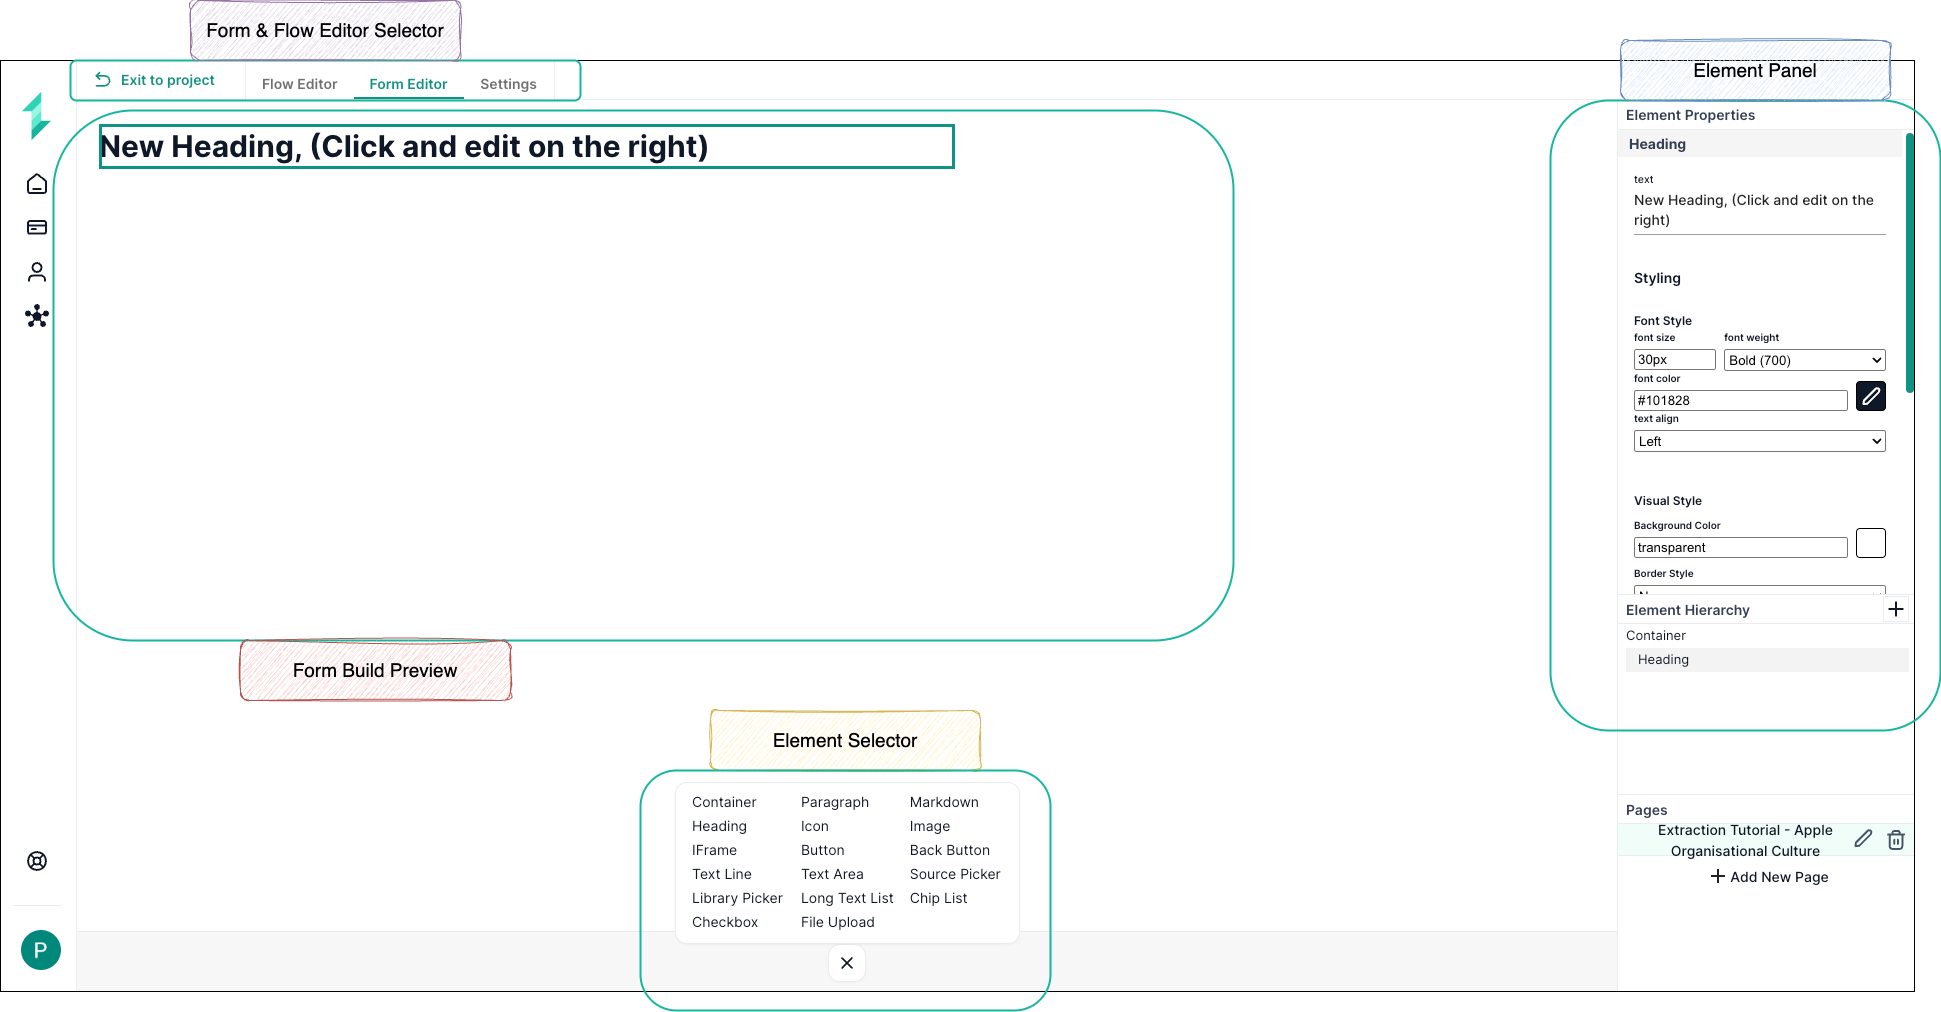
Add the following fields to your form using the Element Selector:
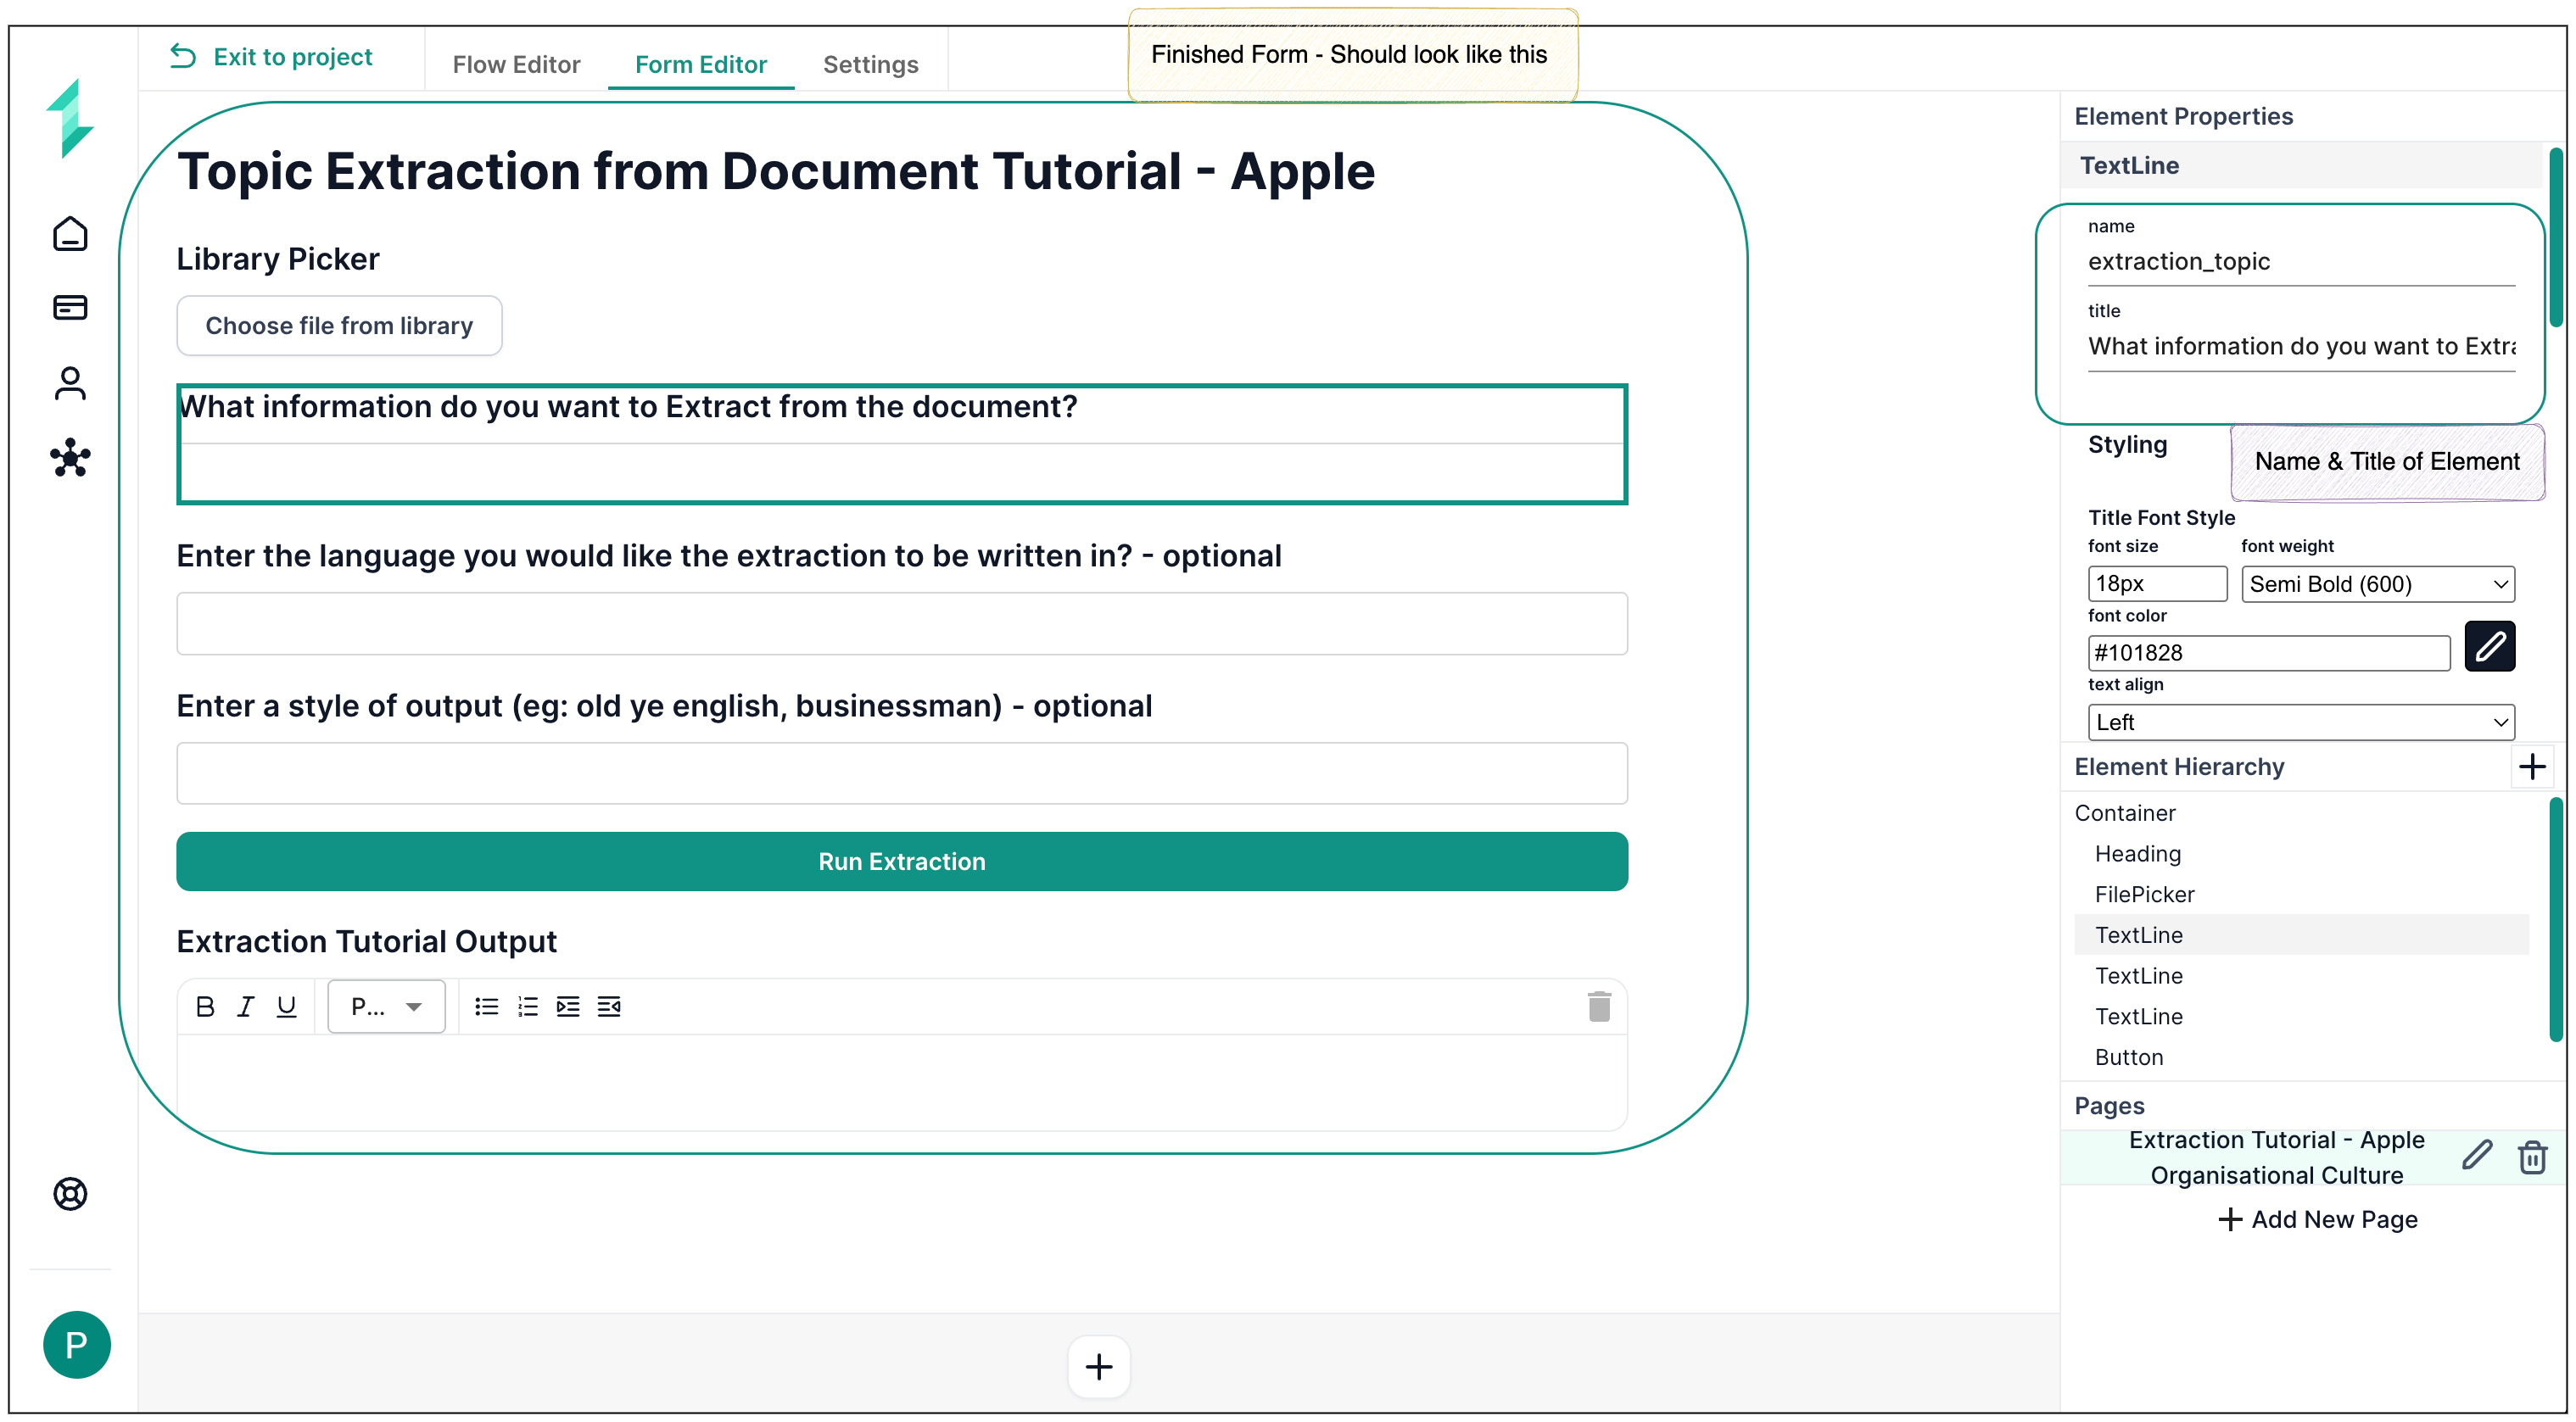
- Library Picker
- Text input for topic
- Optional text input for language
- Optional text input for rewrite style
- Button labeled “Run Extraction”
- Text output to display the AI result
The final form should look similar to the picture below. Notice the element "Name" as well as the element "Title". This will be used later in the tutorial as you build your workflow.
Step 2: Build the Workflow Logic
Now switch to the Workflow Editor to start building the logic behind the form. This workflow runs when the user clicks the button element inside the Form Editor.
You can see below the final workflow we are building with all nodes connected together. Now let's build it together!

2.1 Load the Form
Ensure the workflow initializes when the form opens.
Add a Load Form Page node to initialize the form, then connect the start node
2.2 Wait for the Button Click
We want the workflow to trigger to run, when the user submits the Run Extraction button on the form.
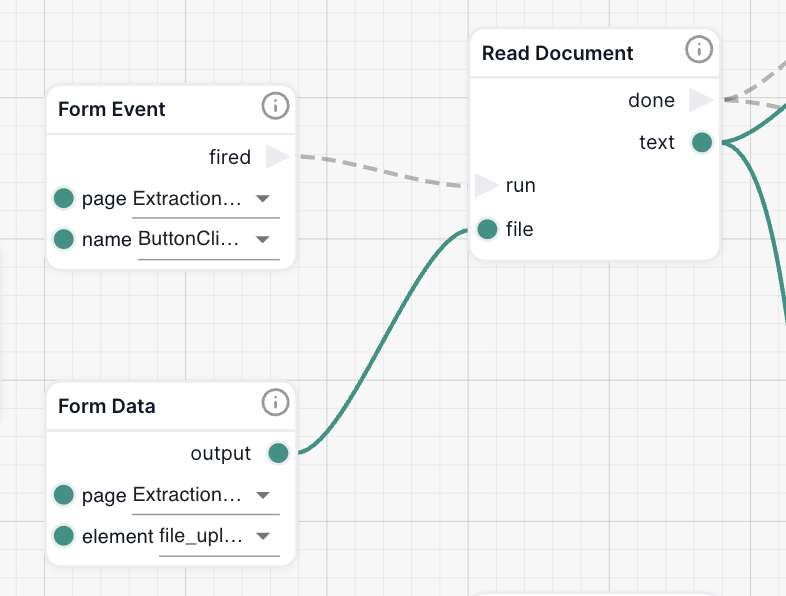
Add a Form Event node triggered by the “Run Extraction” button.
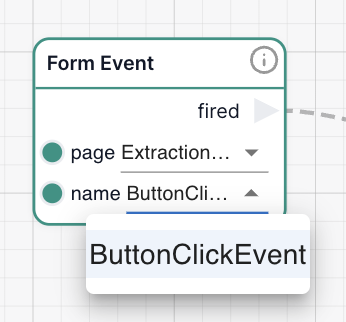
Notice that the "event name" in the form flow settings for this button is named "ButtonClickEvent", so we are connecting the form element to the workflow.
2.3 Find & Read the Document
Before the document can be used in the AI prompt, you need to retrieve the file selected by the user and extract its full text.
This involves two steps:
- Retrieving the uploaded file from the form
- Reading and parsing the file so the content can be passed to the AI
If you haven’t uploaded a file to the Library yet, follow this guide:
Learn how to upload Documents to the Library
-
Retrieve the file
Add a Form Data node to fetch the file selected in the Library Picker field. This node pulls the uploaded document into the workflow. -
Read the document
Add a Read Document node to allow the system to extract the full text of the file. -
Connect the nodes
- Link the Form Event node to the
runinput on the Read Document node - Connect the Form Data node to the
fileinput on the Read Document node
- Link the Form Event node to the
2.4 Collect User Inputs
Now that the document is ready, you’ll collect the topic, language, and rewrite style provided by the user — and pass them into the AI prompt.
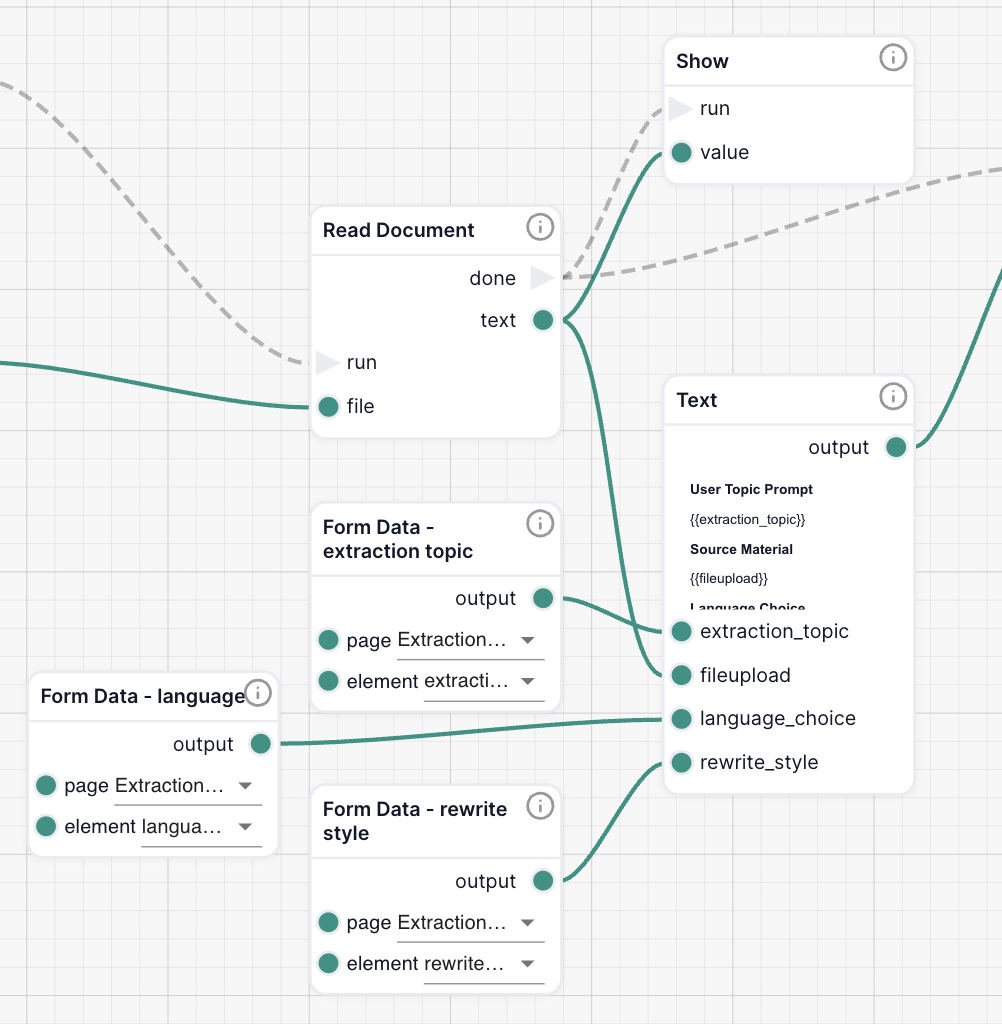
Each of these values must be pulled from the form using Form Data nodes and passed into a Text node using dynamic inputs.
-
Add Form Data nodes
- Add three Form Data nodes to retrieve values for:
extraction_topiclanguage_choicerewrite_style
- Add three Form Data nodes to retrieve values for:
-
Link each node to the correct form field
- In each Form Data node, set the
elementvalue to match the element name used in the form - For example:
extraction_topic,language_choice,rewrite_style - Ensure the correct form page is selected
- In each Form Data node, set the
-
Create a Text node for the AI prompt
- Add a Text node — this is where you’ll build the final prompt for the AI
- Inside the prompt, manually add handlebars to create dynamic input slots Learn more about using handlebars
{{extraction_topic}}
{{language_choice}}
{{rewrite_style}}
{{fileUpload}} - These will be replaced with the actual form and document values when the workflow runs
-
Connect the nodes
- Link each Form Data node to the corresponding input on the Text node
- Also connect the
textoutput from the Read Document node to thefileUploadinput on the Text node
2.5 Build the AI Prompt
Use the user’s inputs to generate a custom AI prompt. Learn more about Creating Better AI Prompts here
User Topic Prompt

{{extraction_topic}}

Source Material

{{fileUpload}}

Language Choice

{{language_choice}}

Rewrite Style

{{rewrite_style}}

You are an expert information extractor.

A user has uploaded a document and selected the following topic to focus on:

Topic {{extraction_topic}}

Your task is to scan the document and extract the most relevant information related to this topic. Use only what is found in the document — do not make assumptions.

Guidelines:

Be concise, clear, and informative. However, if a rewrite_style is chosen, output with this instead.

Please output in the language provided in the language_choice. If no Language Choice is provided, output in English.

Present the results in bullet points or short, well-organized paragraphs.

Reference where in the document the information was found so that the user can find it if desired. eg: (page 2)

If the topic is not explicitly covered, extract related or contextually useful content instead.

Start the response with a bold title that matches the selected topic.

Your output will be used in a workflow that may rewrite or translate it, so clarity and structure are important.
2.6 Generate the AI Response
Once your prompt has been built using the Text node, it’s time to send it to the AI to generate the summary.
You’ll use an AI Write node to process the prompt and return a relevant, well-formatted response.
-
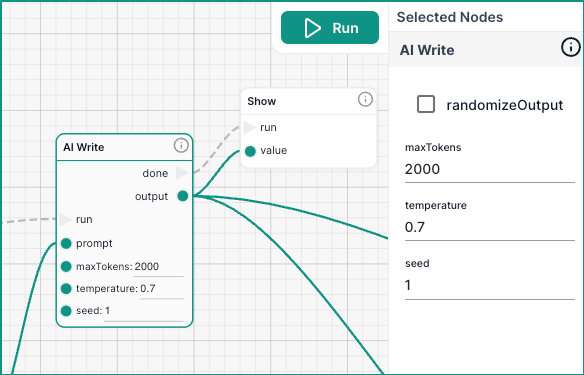
Add an AI Write node
- This node sends your custom prompt to the AI and returns a response
-
Connect the prompt input
- Connect the output of the Text node to the
promptinput on the AI Write node
- Connect the output of the Text node to the
-
Adjust optional AI settings
You can fine-tune the AI’s behavior using the following options. Learn more about AI settingsSetting Description maxTokensSets the maximum number of tokens (length) in the AI’s response temperatureControls creativity/randomness (lower = more focused, higher = more creative) seedMakes the output deterministic — same inputs will produce the same result
2.7 Display the Output
Now that the AI has generated a response, you’ll send that output back into the form so the user can see the result.
This step updates the form in real-time and ensures the summary is shown clearly on screen.
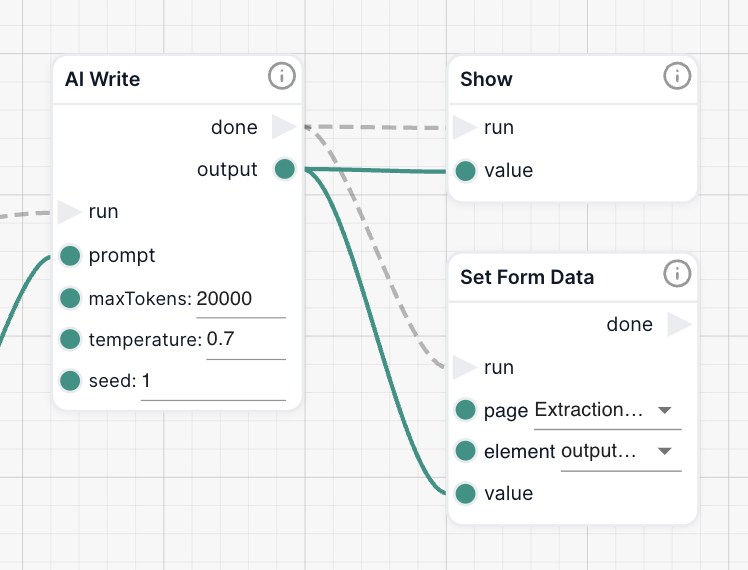
- Add a Set Form Data node
- Use this to send the AI response into the designated output field on the form (e.g. a text area).
(Optional) Add a Show node
- Use a Show node to display the AI response on screen. This is especially helpful for debugging or previewing outputs during development — it allows you to quickly confirm that the workflow (or a portion of your workflow) is returning the output you want.
- Connect the nodes
- Connect the output of the AI Write node to both:
- the
valueinput on the Set Form Data node - the
valueinput on the Show node (if used)
- the
- Trigger both nodes using the
doneoutput from the AI Write node
- Connect the output of the AI Write node to both:
Step 3: Run & Test the Workflow
With your form and workflow connected, it's time to try it out!
This step ensures that everything is wired correctly and gives you a chance to preview the results.
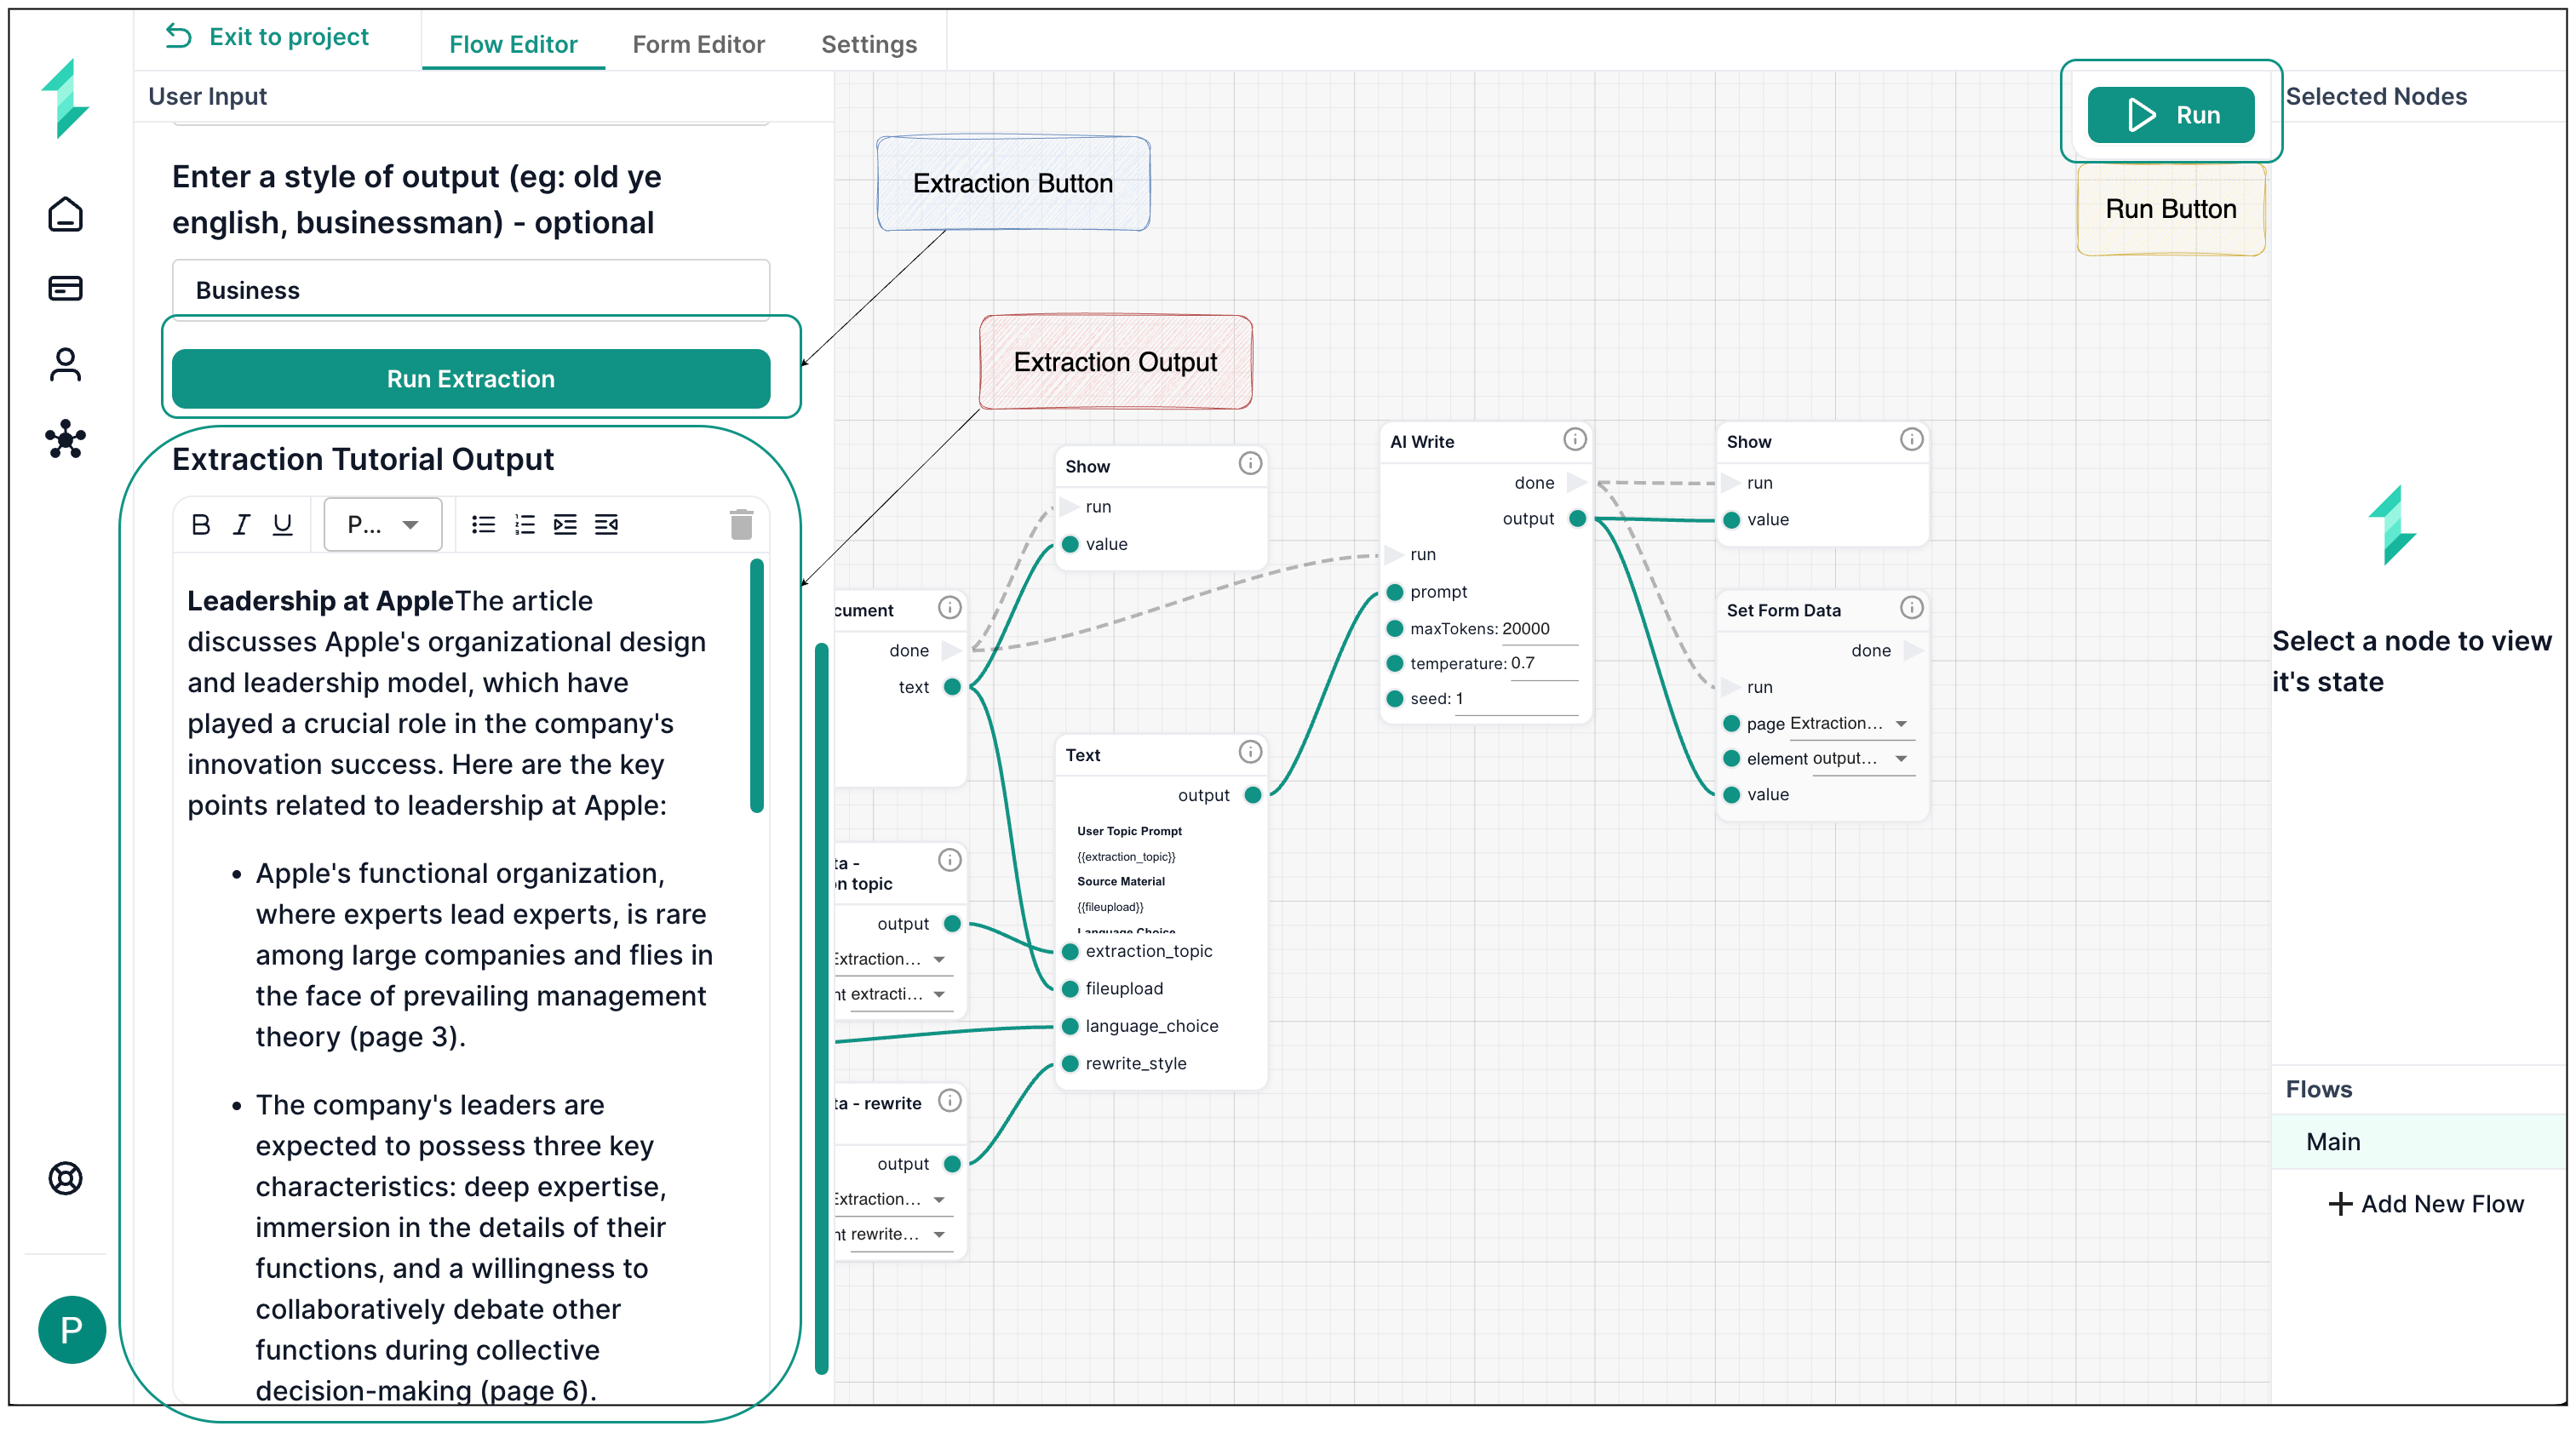
- Click Run in the top-right of the Workflow Editor
- Your form should be seen in the left of the screen. Go ahead and input test values for:
- Library Picker (document to summarize): HBR_How_Apple_Is_Organized_For_Innovation.pdf
- Topic: 'Leadership at Apple'
- Language (optional): 'English'
- Rewrite style (optional): 'Business'
- Click the Run Extraction button on the form
- Confirm that:
- The AI responds with a relevant summary
- The output is displayed back in the form
- Optional: Use the Show node to debug and verify results
Try It Yourself
Now that your workflow is live and tested, here are a few ways to explore and extend it:
-
Experiment with different inputs
Try new topics, languages, and writing styles to see how the AI adapts.- For example:
- Topic: “Organizational Design”
- Language: “Spanish”
- Style: “Formal”
- For example:
-
Add a new field to your form
Extend the functionality by adding a new input — summary length, or formatting preference.- Create the new form field
- Add a Form Data node to retrieve it
- Connect it to the Text node and update the prompt with a new
{{handlebar}} - This helps you get comfortable modifying workflows and customizing prompt logic
What You’ve Learned
By completing this tutorial, you've built and tested a complete topic extraction workflow that:
- Accepts flexible user input through a custom form
- Reads and parses selected documents
- Dynamically builds and sends a prompt to AI
- Outputs a tailored, structured summary inside the form
- Can be extended with new fields or logic as needed
You now have the confidence and structure to build powerful document-based workflows inside Intellectible — and customize them to meet real-world needs.