Tutorial 5: Building Forms & Implementations
Goal
In this tutorial, you’ll learn how to build a polished, on-brand input form in Intellectible and turn it into a shareable public tool using Implementations. You'll design a responsive, branded user experience and connect it to AI-powered logic that gives users instant feedback.
Use Case
You run a recruitment company and want to offer a free resume review tool on your website. Users upload their resume and enter their target job role. Behind the scenes, Intellectible uses AI to analyze the resume and return personalized recommendations for improvement — all within the same form.
What You’ll Build
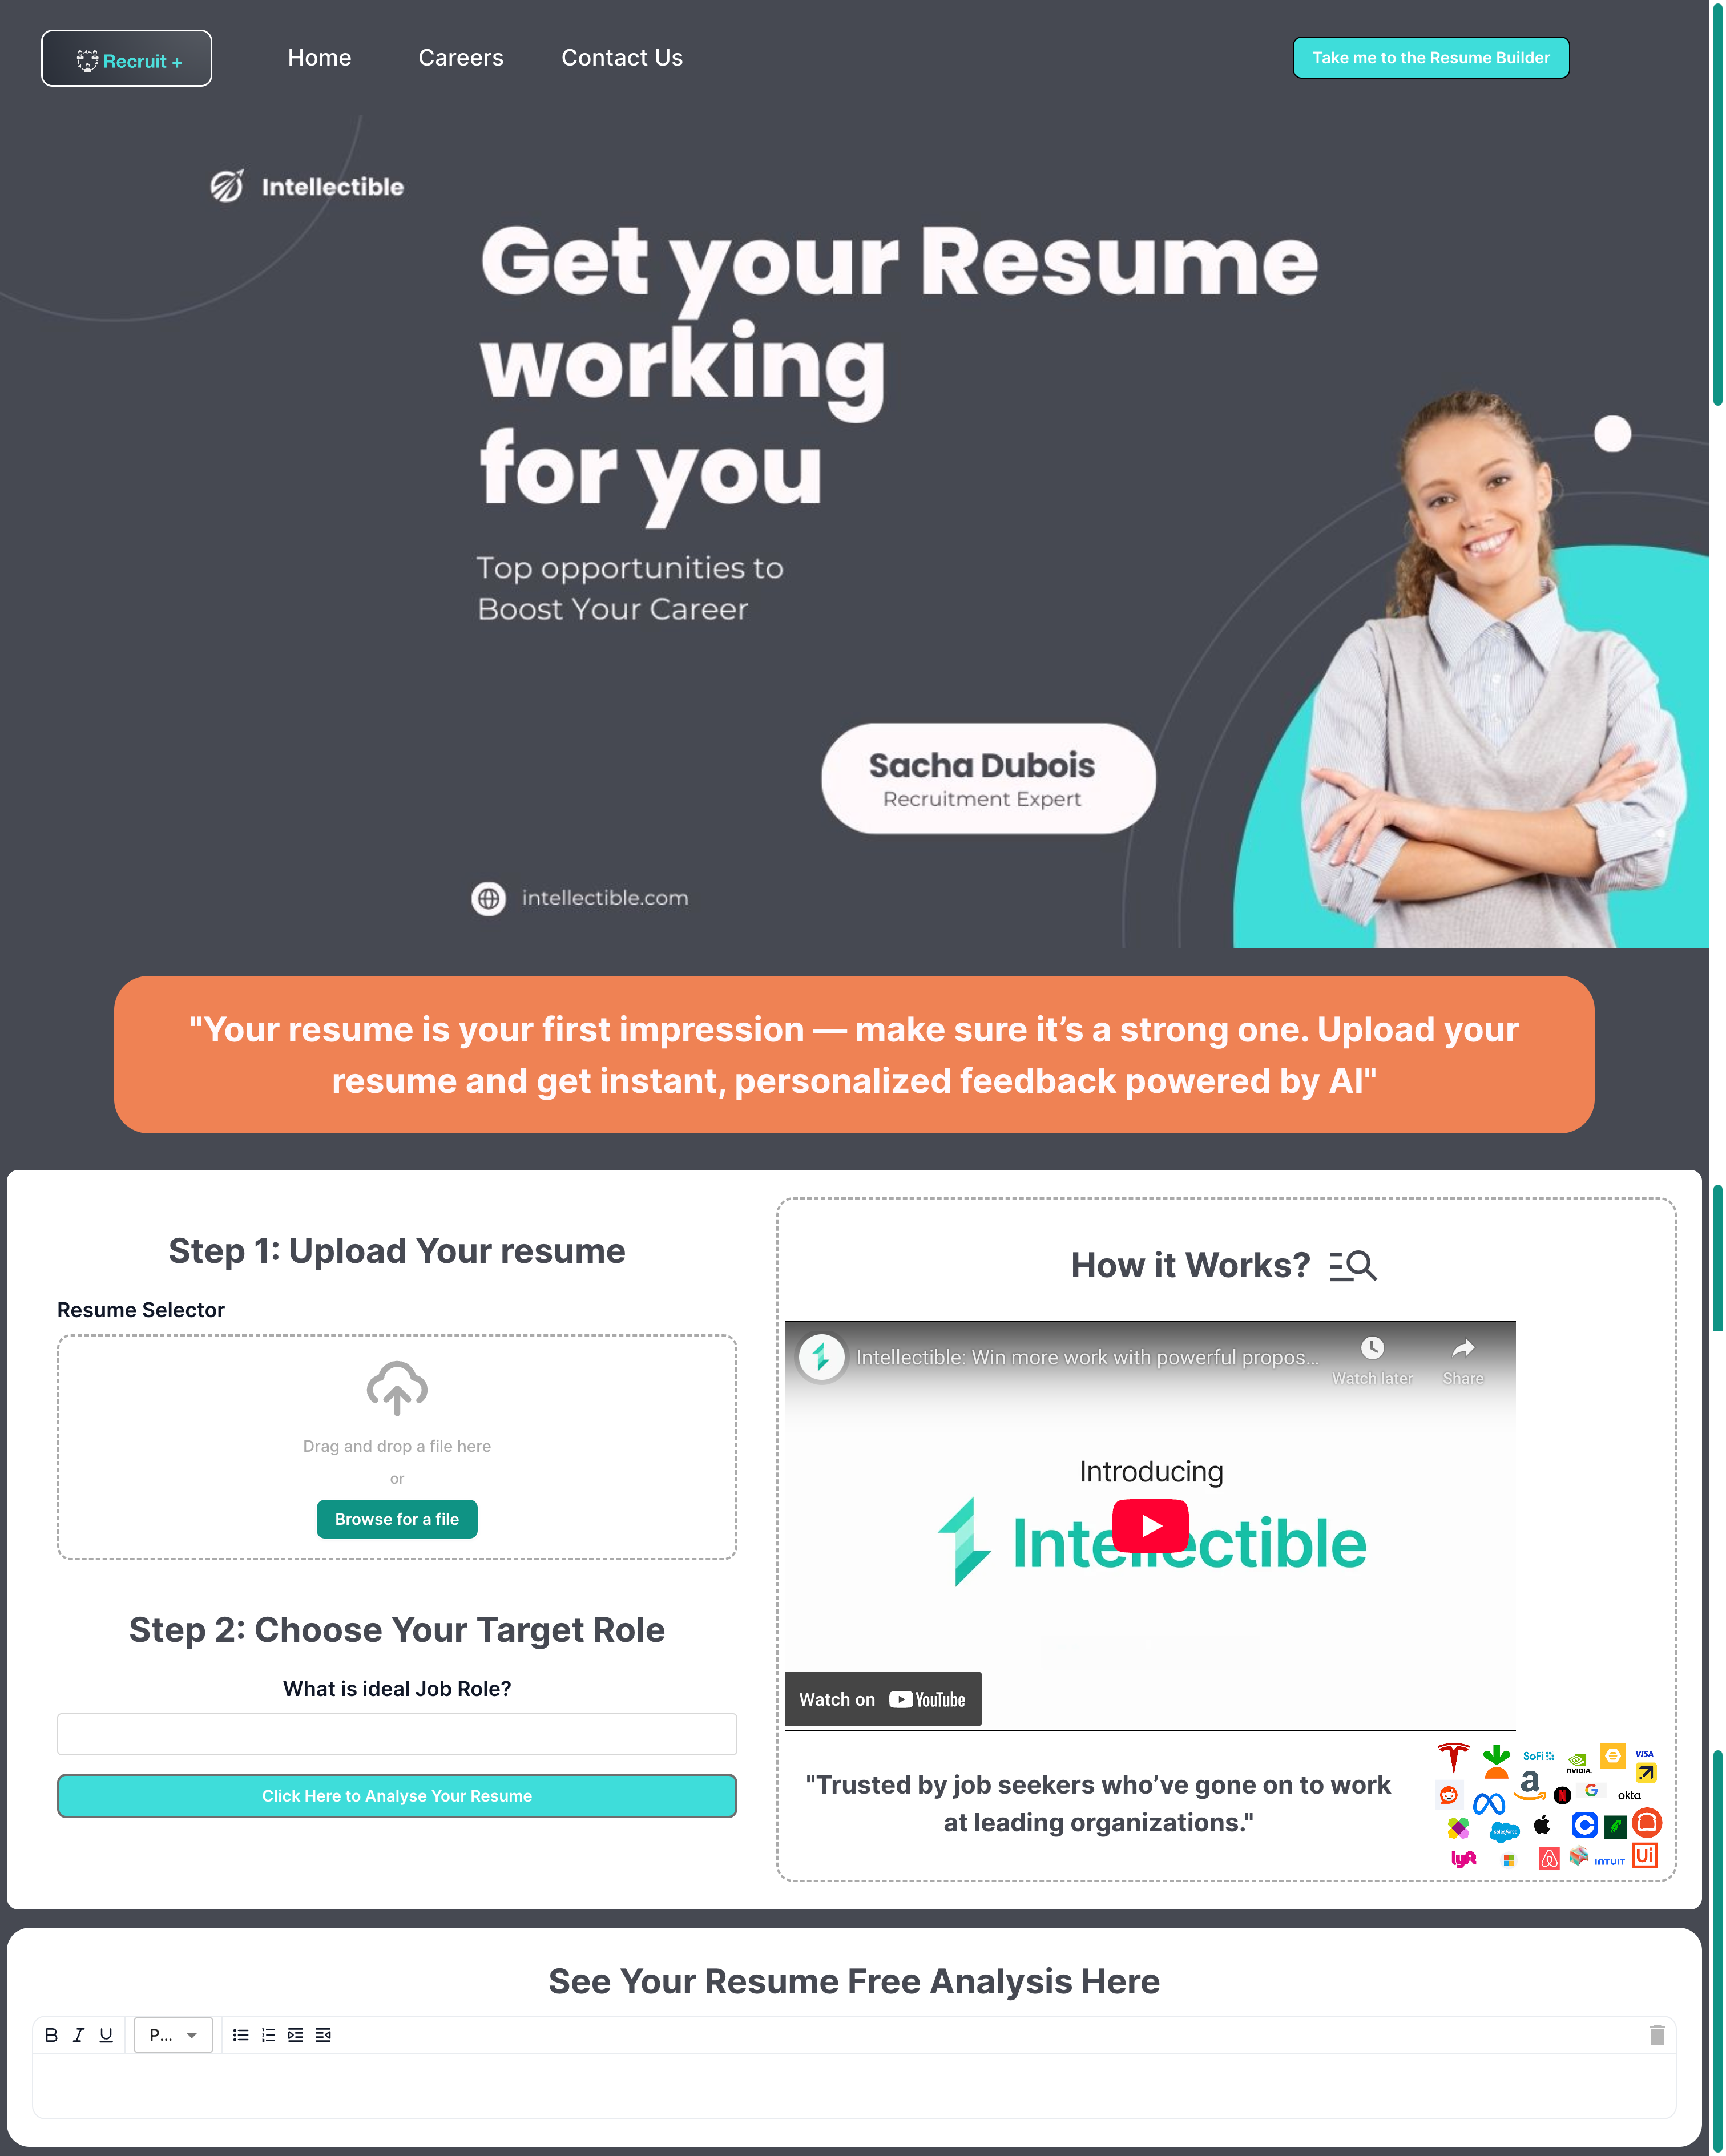
- A branded input form with step-by-step instructions and embedded video
- File upload for resumes and a text input for role targeting
- A clean call-to-action button to run the analysis
- AI logic that generates a tailored summary of improvements
- Dynamic output written back to the form
- A public implementation link that can be shared or embedded
Understanding Form Element Selection
As you start adding and arranging elements in the Form Editor, it's important to understand how element selection and nesting works:
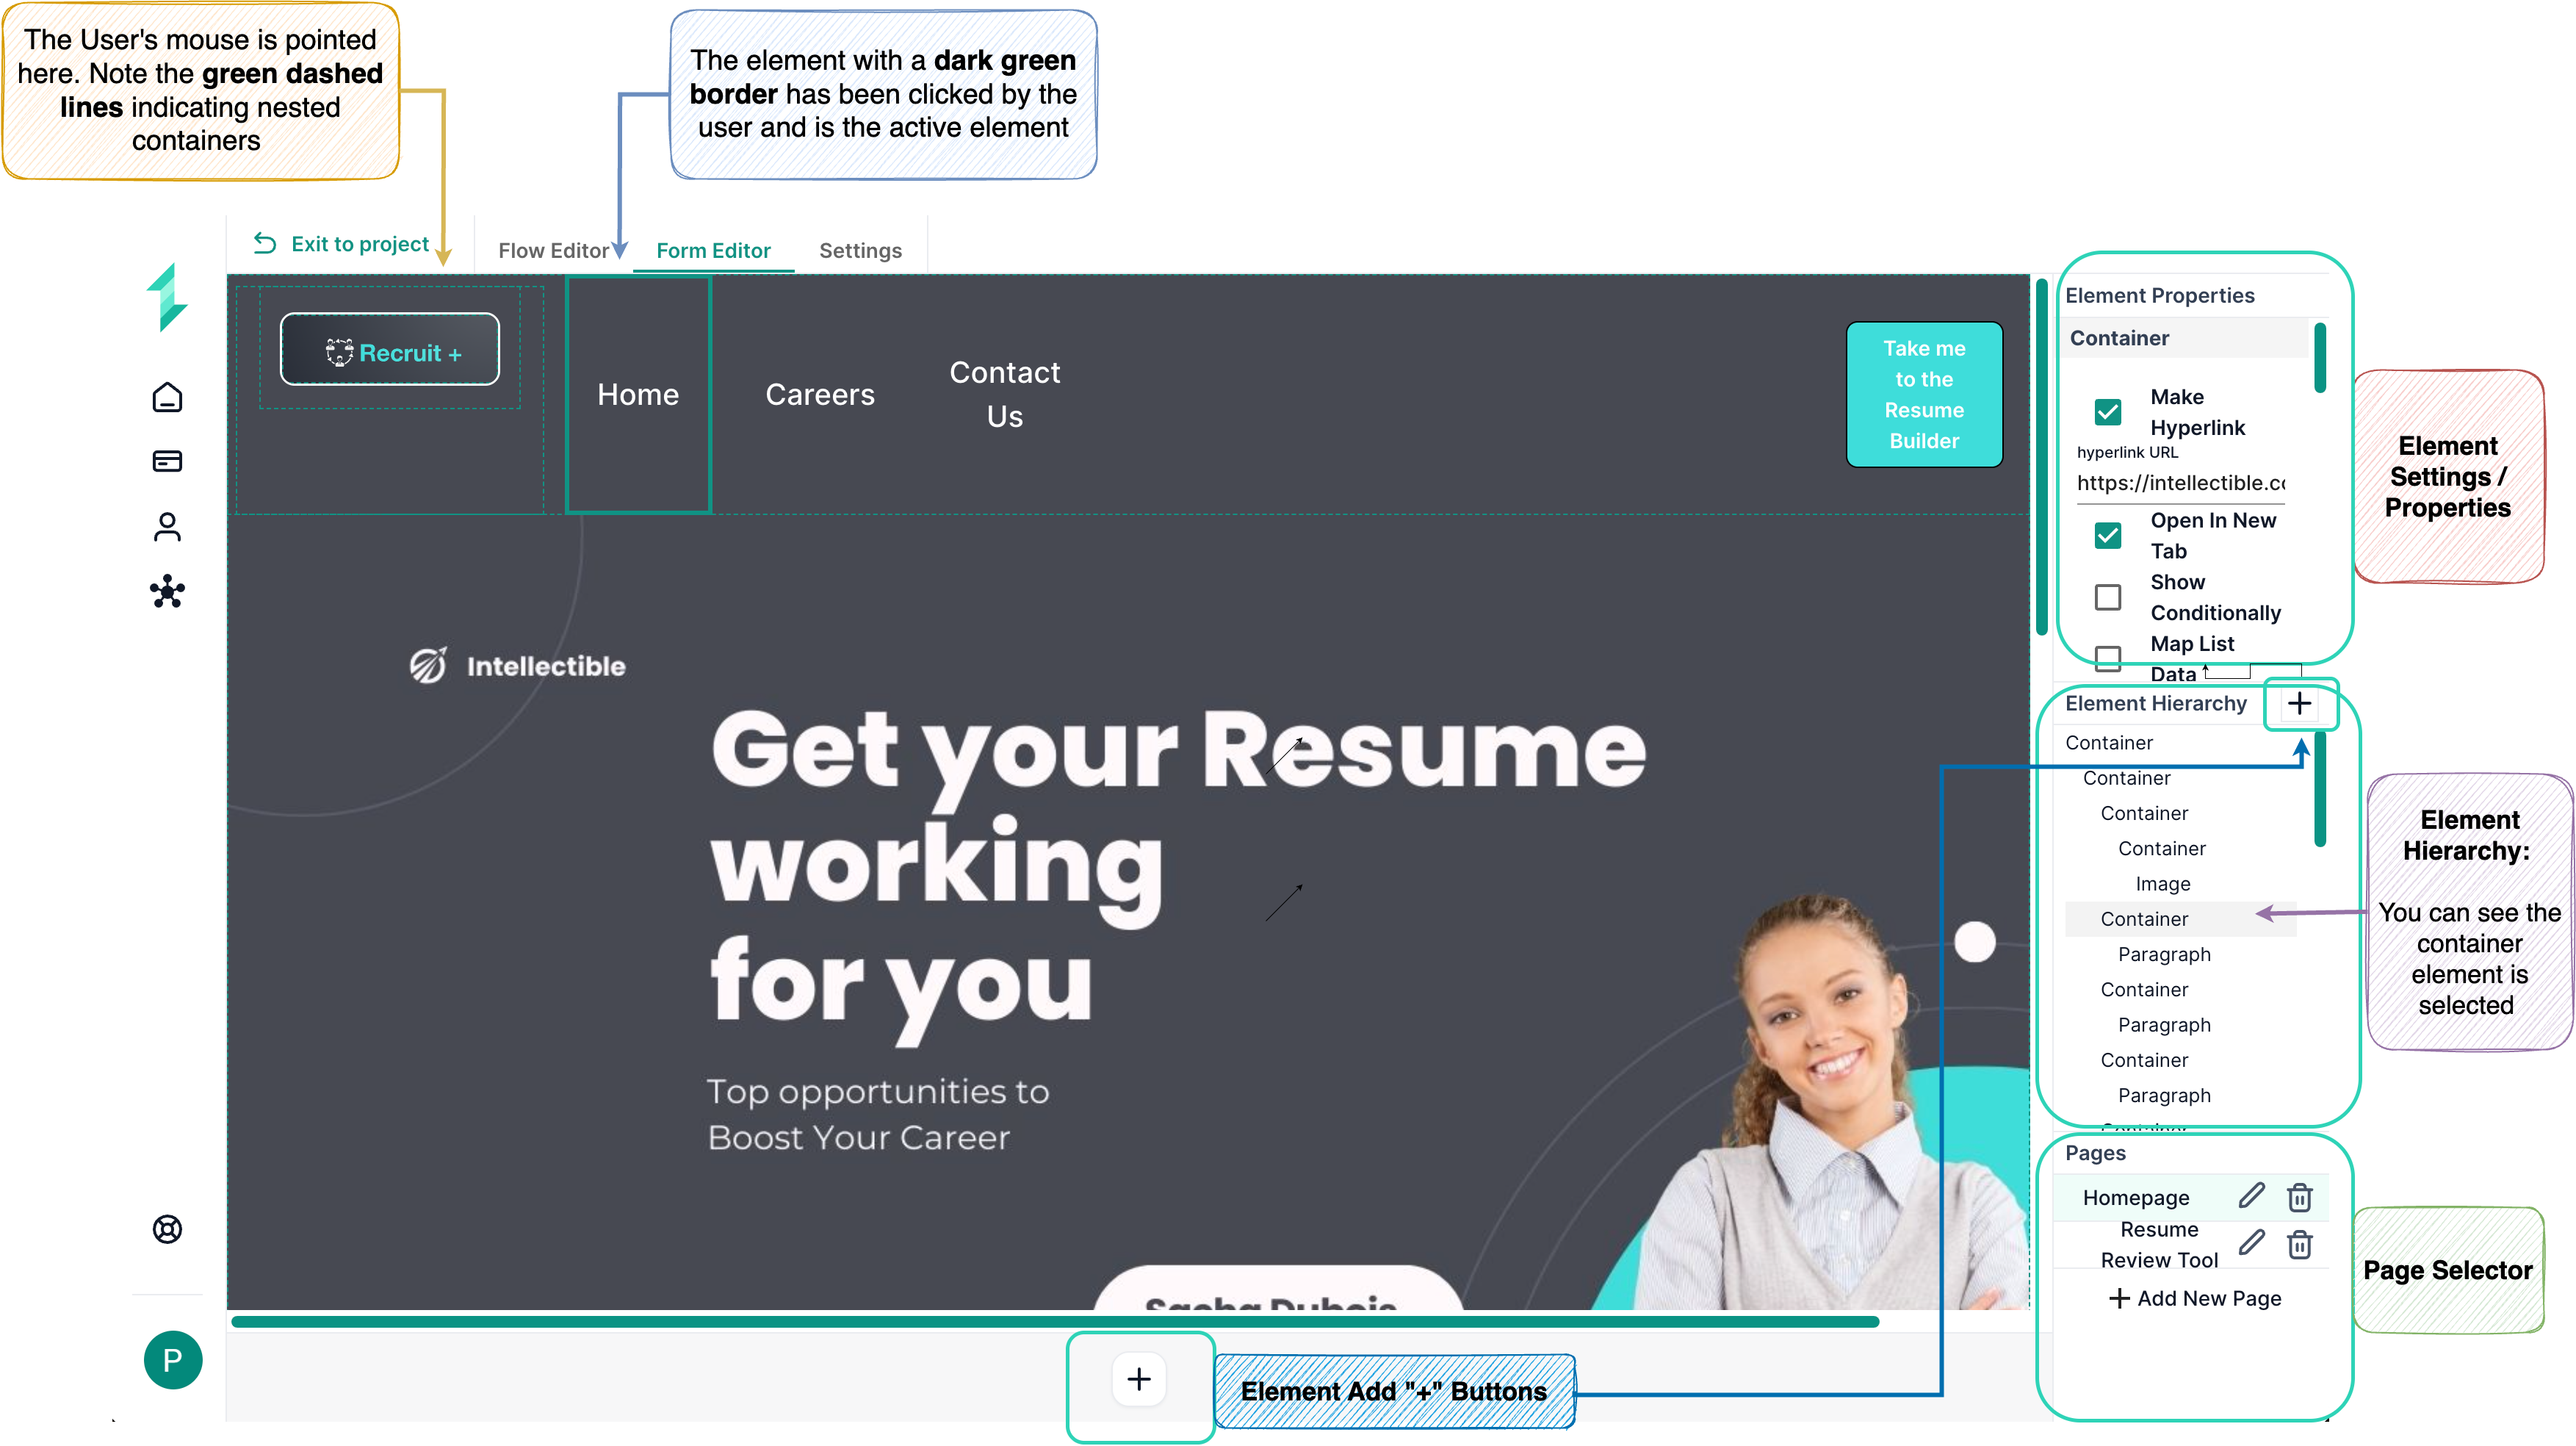
🔍 Hovering over an element
- When you hover over any element on the canvas (e.g. a button, paragraph, or image), Intellectible will highlight all the containers it sits inside of.
- These are shown as dashed green outlines, helping you understand how your layout is structured.
✅ Selecting an element
- When you click on an element:
- It gets a solid dark green border to show it's selected
- It also becomes highlighted in grey inside the Element Hierarchy panel on the right
Why this matters
- Intellectible’s forms are built using nested containers, so understanding which element is inside which container helps:
- Control layout and positioning
- Apply styling or hyperlinks correctly
- Easily reorder or group related elements
Always check the Element Hierarchy panel if you're unsure which container you’re editing — it's your map of the whole form.
Step-by-Step Instructions
Step 1: Design the Form Structure
Before we start configuring logic or linking this form to a workflow, it’s important to design a clear and intuitive layout that feels polished and easy to use. In this step, we’ll break the form into five major visual sections, each with a specific purpose.
You’ll build each of these in the next steps using Intellectible’s Form Editor.
🧠 Plan the Layout
This form is broken into five visual sections, each with a specific purpose and content.
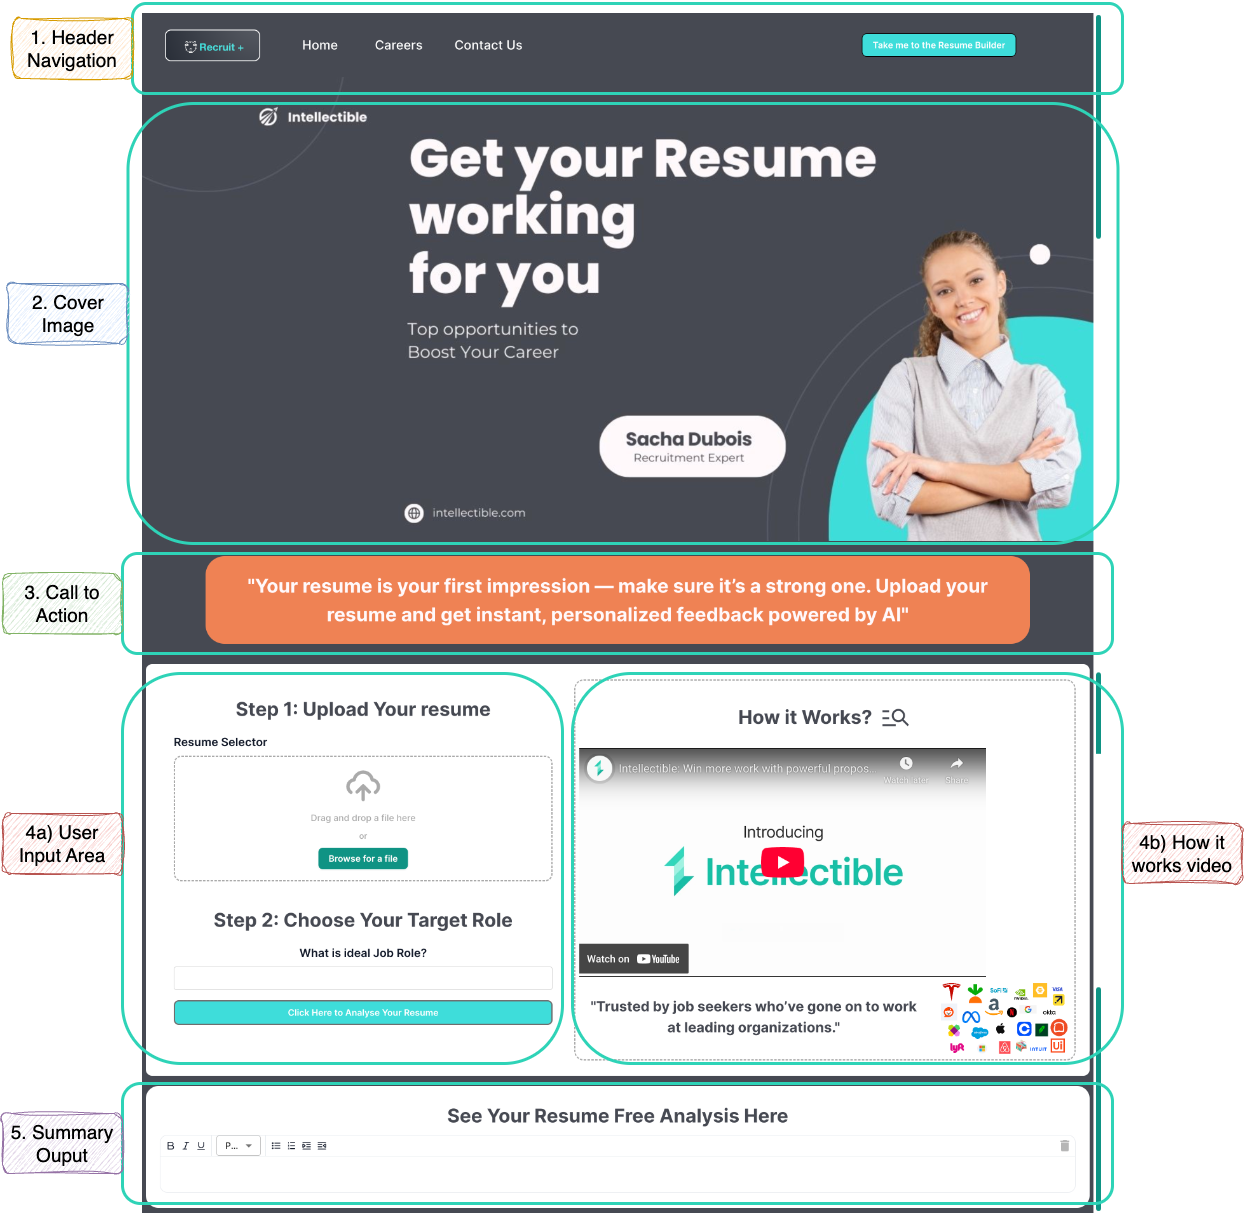
| Section | Purpose | Elements Used |
|---|---|---|
| 1. Header (Navigation) | Brand logo and links to other pages (not part of the form logic) | Image (Logo) Text/Buttons for “Services”, “About”, etc. |
| 2. Cover Image | Visually anchor the experience or promote branding | Image |
| 3. Call to Action | Encourage users to begin the form process | Paragraph (Headline) Paragraph (Subtext) Button (scroll or jump to form) |
| 4a. User Input Area | Collect resume + role input | Paragraph (Step Title) FileUpload ( resume)TextLine ( target_job)Button ( StartResumeReviewButton) |
| 4b. How It Works (optional) | Help users understand what happens after submitting | IFrame (YouTube) Paragraph (Caption or instructions) |
| 5. Resume Summary Output | Display feedback from the AI | Heading (Title) Markdown ( resume_output) |
Each section should feel like a self-contained block, organized with Containers, and styled with Paragraphs, Buttons, Input Fields, or Media as needed.
Step 2: Build the Form - One Section at a Time
2.1 Build the Header Navigation
This step creates a horizontally structured header with 5 inline containers: a logo, 3 individual navigation links, and a CTA button — all aligned center, with no padding.
1. Add a Parent Container
This is your navigation wrapper.
Style Settings:
- Padding:
0 - Flow Direction:
Horizontal - Align Items:
Center - (Optional) Add a background color to give it a header feel
2. Inside this parent container, add 5 child Containers
These are each siblings of one another — not nested:
| Container | Purpose | Contents |
|---|---|---|
| Container 1 | Logo | Image element (company logo) |
| Container 2 | Nav Link 1 | Paragraph – “Home” |
| Container 3 | Nav Link 2 | Paragraph – “Careers” |
| Container 4 | Nav Link 3 | Paragraph – “Contact” |
| Container 5 | CTA Button | Button – “Take me to the Resume Builder” |
Element Configuration
For the Logo (Container 1):
- Add an
Imageelement - Upload or link your logo file
- Set the width to around
100–150px
For each Nav Link Container (Containers 2–4):
- Add a
Paragraphelement - Set the text to: “Home”, “Careers”, “Contact”
- Enable “Make Hyperlink”
- Set each destination URL
- (Optional) Enable “Open in New Tab”
For the CTA Button (Container 5):
- Add a
Buttonelement - Label: “Take me to the Resume Builder”
- Enable “Make Hyperlink” and set the target URL
- Style the button to stand out visually (color, bold font, or spacing)
2.2 Build the Cover Image Section
This section gives the form a strong visual start by displaying a full-width image directly below the navigation bar. It helps draw attention, create visual separation, and reinforce your branding or theme.
1. Add a New Container Below the Header
This container will hold your cover image. You should place it after the header navigation container in the Element Hierarchy.
Style Settings:
- Padding:
0 - Flow Direction:
Vertical - Align Items:
Center - Width:
100%(automatically spans full form width) - (Optional) Add top or bottom margin to separate from other sections
2. Add an Image Element Inside the Container
- Click the plus icon (+) whilst inside the new container
- Choose
Image - Upload your desired cover image
Recommended Image Guidelines:
- Image dimensions: around
1200pxwide by300–400pxtall - Make sure the image is not too heavy for fast loading (under 500KB is ideal)
- Use a horizontal (landscape) image for best results
2.3 Build the Call to Action Section
This section adds a bold, styled paragraph that encourages users to take action — such as uploading a resume for instant AI-powered feedback. It uses two containers: the outer container centers the section, while the inner container applies background color, padding, and rounded corners.
1. Add a New Outer Container Below the Cover Image
This container wraps the entire CTA block.
Style Settings:
- Padding:
0 - Flow Direction:
Vertical - Align Items:
Center - Width:
100%
2. Inside This Container, Add Another Container (The CTA Box)
This is the visually styled box.
Style Settings:
- Padding:
16px(all sides) - Flow Direction:
Vertical - Align Items:
Center - Background Color:
#F37735 - Border Radius:
30px - Width:
Auto
3. Inside the CTA Box, Add a Paragraph Element
- Set the text to:
“Your resume is your first impression — make sure it’s a strong one. Upload your resume and get instant, personalized feedback powered by AI.” - Style it with bold text
- Align text to Center
- Set the text color to white (or another high-contrast color)
2.4 Build the Resume Upload + Explainer Section
This section adds two side-by-side panels inside a horizontal layout:
- 4a (left): Resume Upload + Target Role Input
- 4b (right): Explainer Video + Social Proof Quote
Both sections are placed inside a horizontal container that sits directly under the Call to Action section.
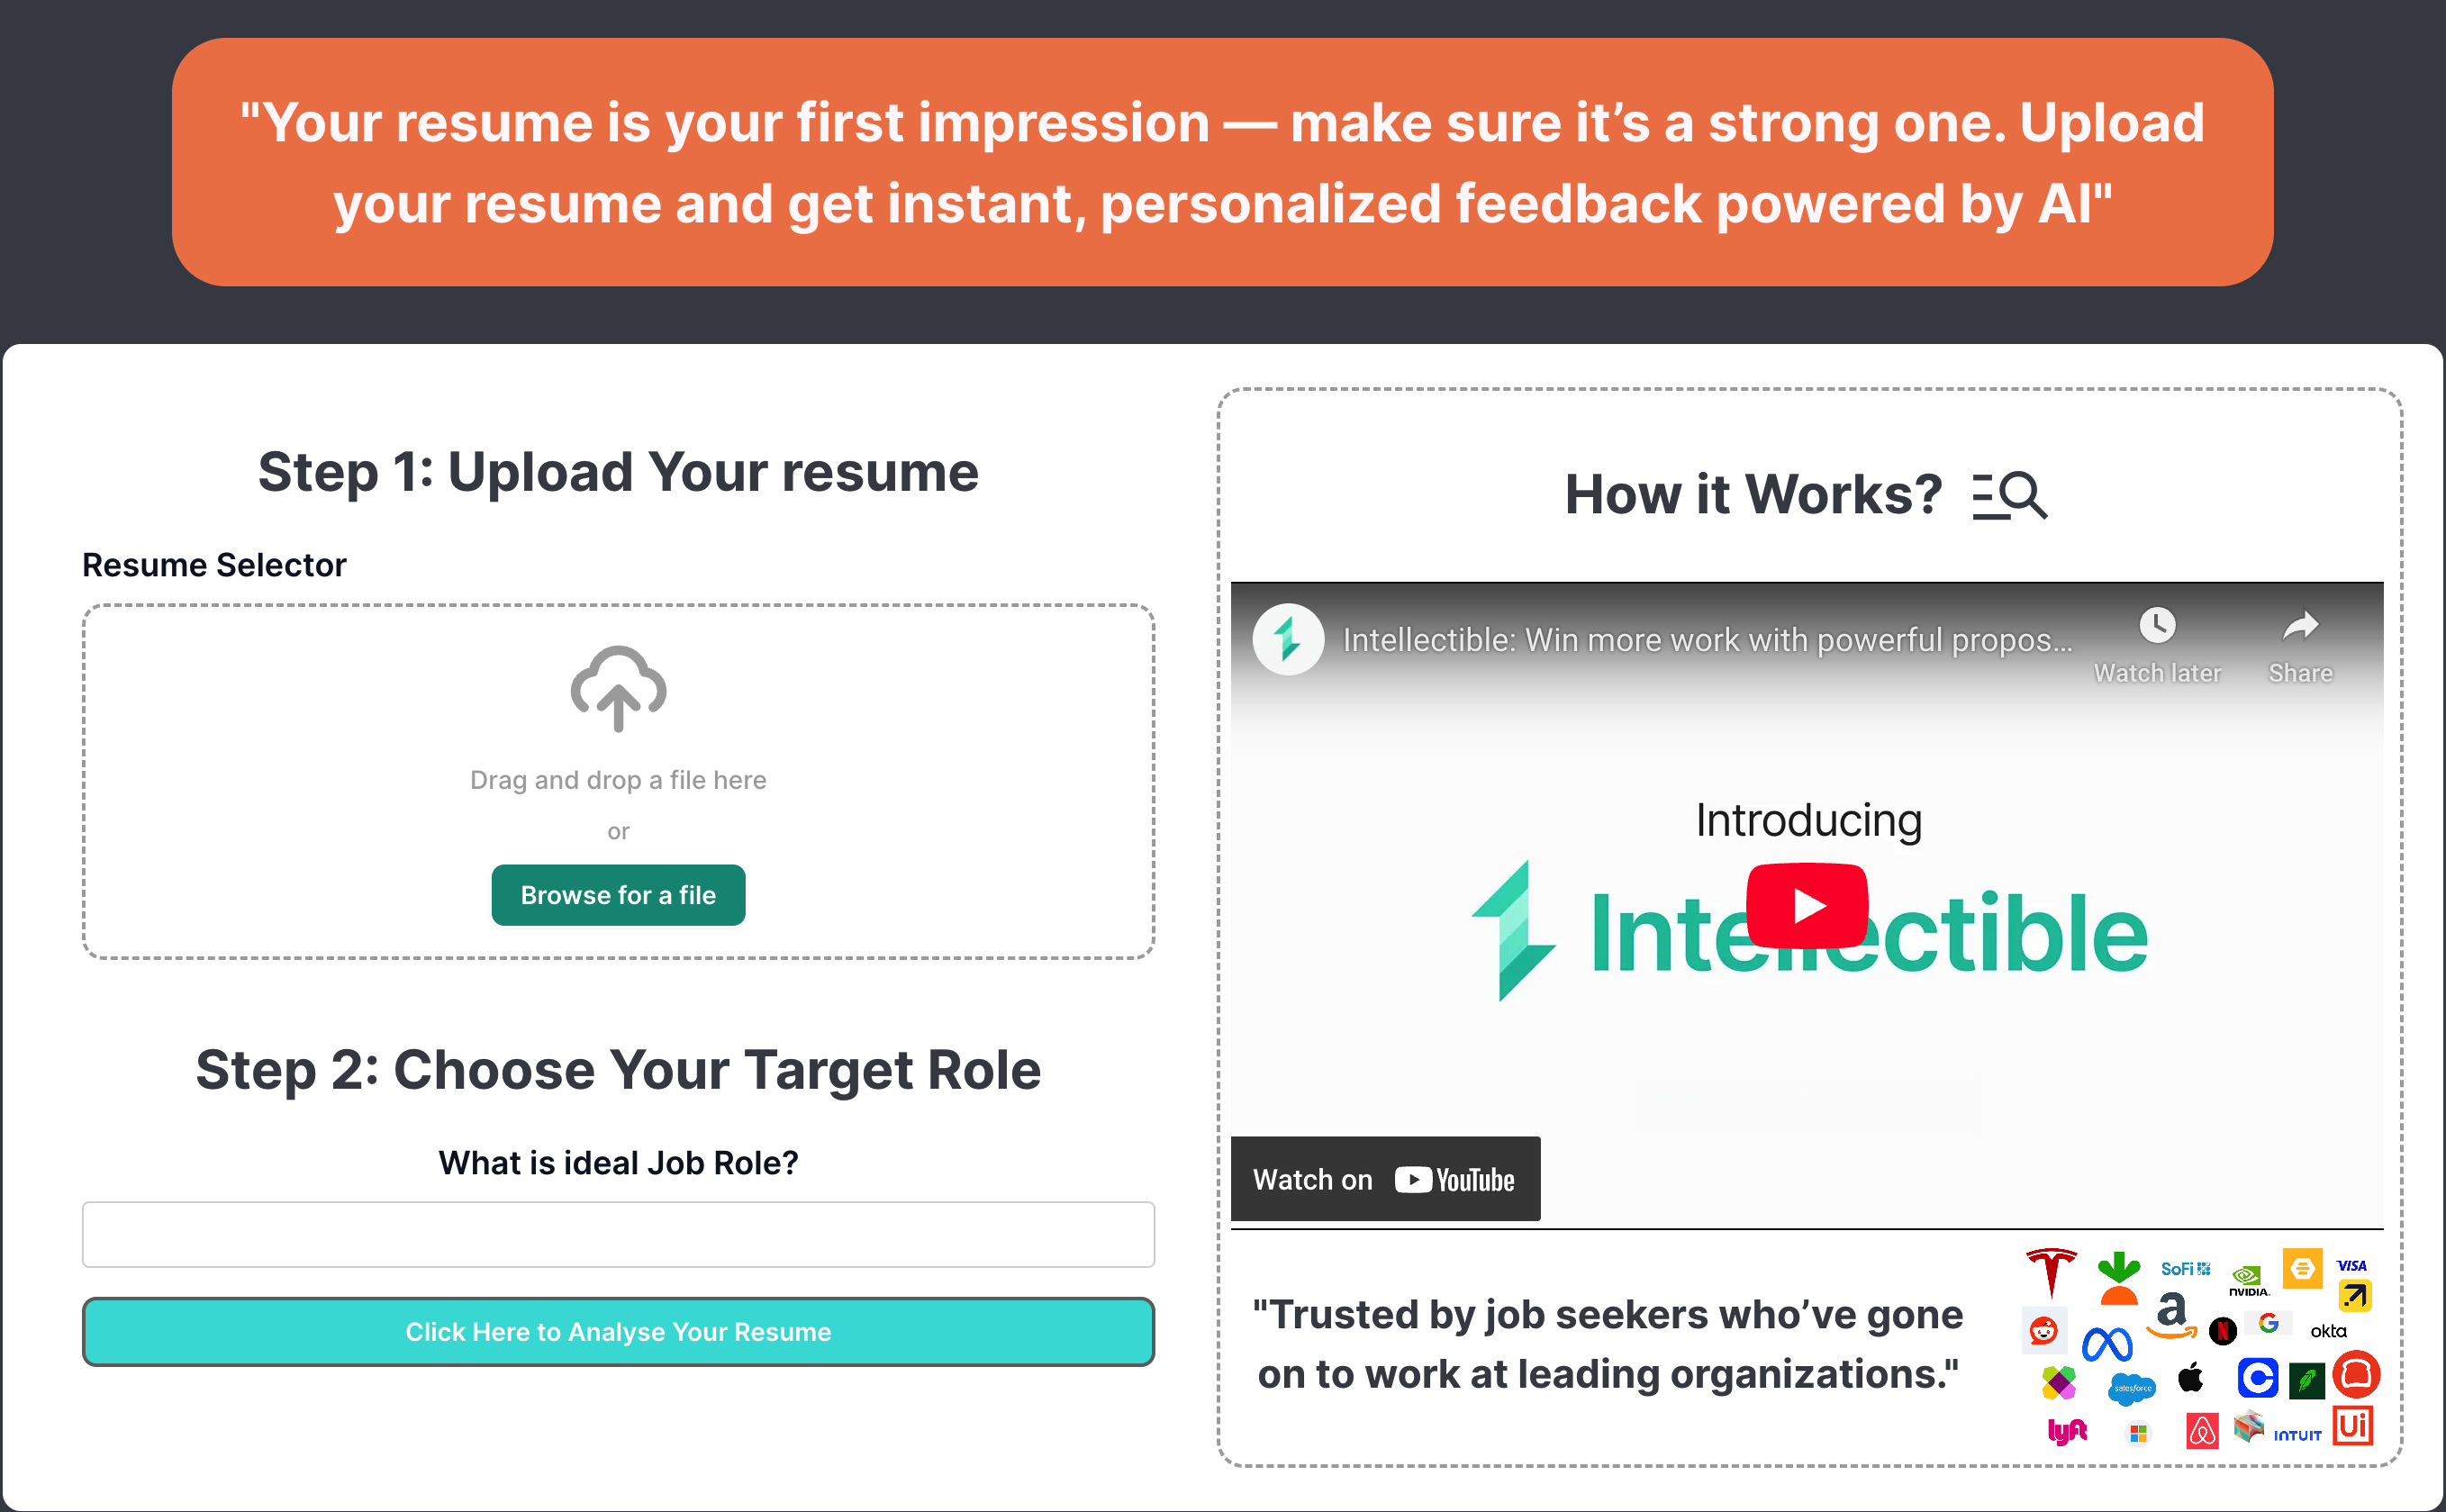
2.4a Resume Upload & Target Role Input
1. Add a New Horizontal Container Below the Call to Action Section
This container will hold the two side-by-side panels (4a and 4b).
Style Settings:
- Padding:
0 - Margin:
0 - Flow Direction:
Horizontal - Align Items:
Start - Width:
100%
2. Inside This Horizontal Container, Add a Vertical Container (Left Column – 4a)
This holds all resume-related elements.
Style Settings:
- Padding:
0 - Margin:
0 - Flow Direction:
Vertical - Align Items:
Start - Width:
50%(or adjust as needed)
3. Inside 4a Container, Add the Following Elements (Top to Bottom):
-
Paragraph
- Text:
Step 1: Upload Your Resume - Text Align:
Center - Style: Large, bold
- Text:
-
File Upload
- Name:
resume_selector - Enable drag-and-drop + browse
- Center aligned inside container
- Name:
-
Paragraph
- Text:
Step 2: Choose Your Target Role - Text Align:
Center - Style: Large, bold
- Text:
-
Text Line Input
- Name:
target_job - Placeholder:
e.g. Product Manager, UX Designer, Software Engineer - Text Align:
Center
- Name:
-
Button
- Label:
Click Here to Analyse Your Resume - Name:
resume-analysis-button - Style: Bold, full-width
- Center aligned inside container
- Label:
2.4b Explainer Video & Social Proof Quote
1. In the Same Horizontal Container, Add a Vertical Container (Right Column – 4b)
This sits beside 4a.
Style Settings:
- Padding:
0 - Margin:
0 - Flow Direction:
Vertical - Align Items:
Start - Width:
50%(or adjust as needed)
2. Inside 4b Container, Add the Following Elements (Top to Bottom):
-
Paragraph
- Text:
How it Works? - Text Align:
Center - Style: Large, bold
- Text:
-
IFrame
- URL: (Paste your YouTube or Vimeo embed URL)
- Width:
100% - Height: around
300px - Align: Center
-
Add a Nested Horizontal Container Below the IFrame
This container holds the quote and image side by side.
Style Settings:
- Padding:
0 - Margin:
0 - Flow Direction:
Horizontal - Align Items:
Center
- Inside That Container, Add:
-
Paragraph
- Text:
"Trusted by job seekers who’ve gone on to work at leading organizations." - Text Align:
Left - Style: Italic or quote-style
- Text:
-
Image
- Upload logo(s) or trust symbol
- Suggested width:
80–120px - Align: Right of paragraph
2.5 Build the Results Display Section
This section displays the AI-generated resume feedback. It appears directly below the previous layout and is updated by the workflow once analysis is complete.
1. Add a New Vertical Container Below the Resume Analysis Section
This container holds the output field for feedback.
Style Settings:
- Padding:
0 - Margin:
0 - Flow Direction:
Vertical - Align Items:
Center - Width:
100%
2. Inside the Container, Add a Text Area Element
- Name:
resume_feedback - Title:
See Your Resume Free Analysis Here. - Width:
100% - Height:
300–400px(adjust to fit your content) - (Optional) Style the background or border to make it stand out
You should now have a fully built form, which you’ll later publish using Intellectible’s Implementation feature to make it accessible online for users to interact with. But first, let's build the workflow.

Step 3: Build the Workflow
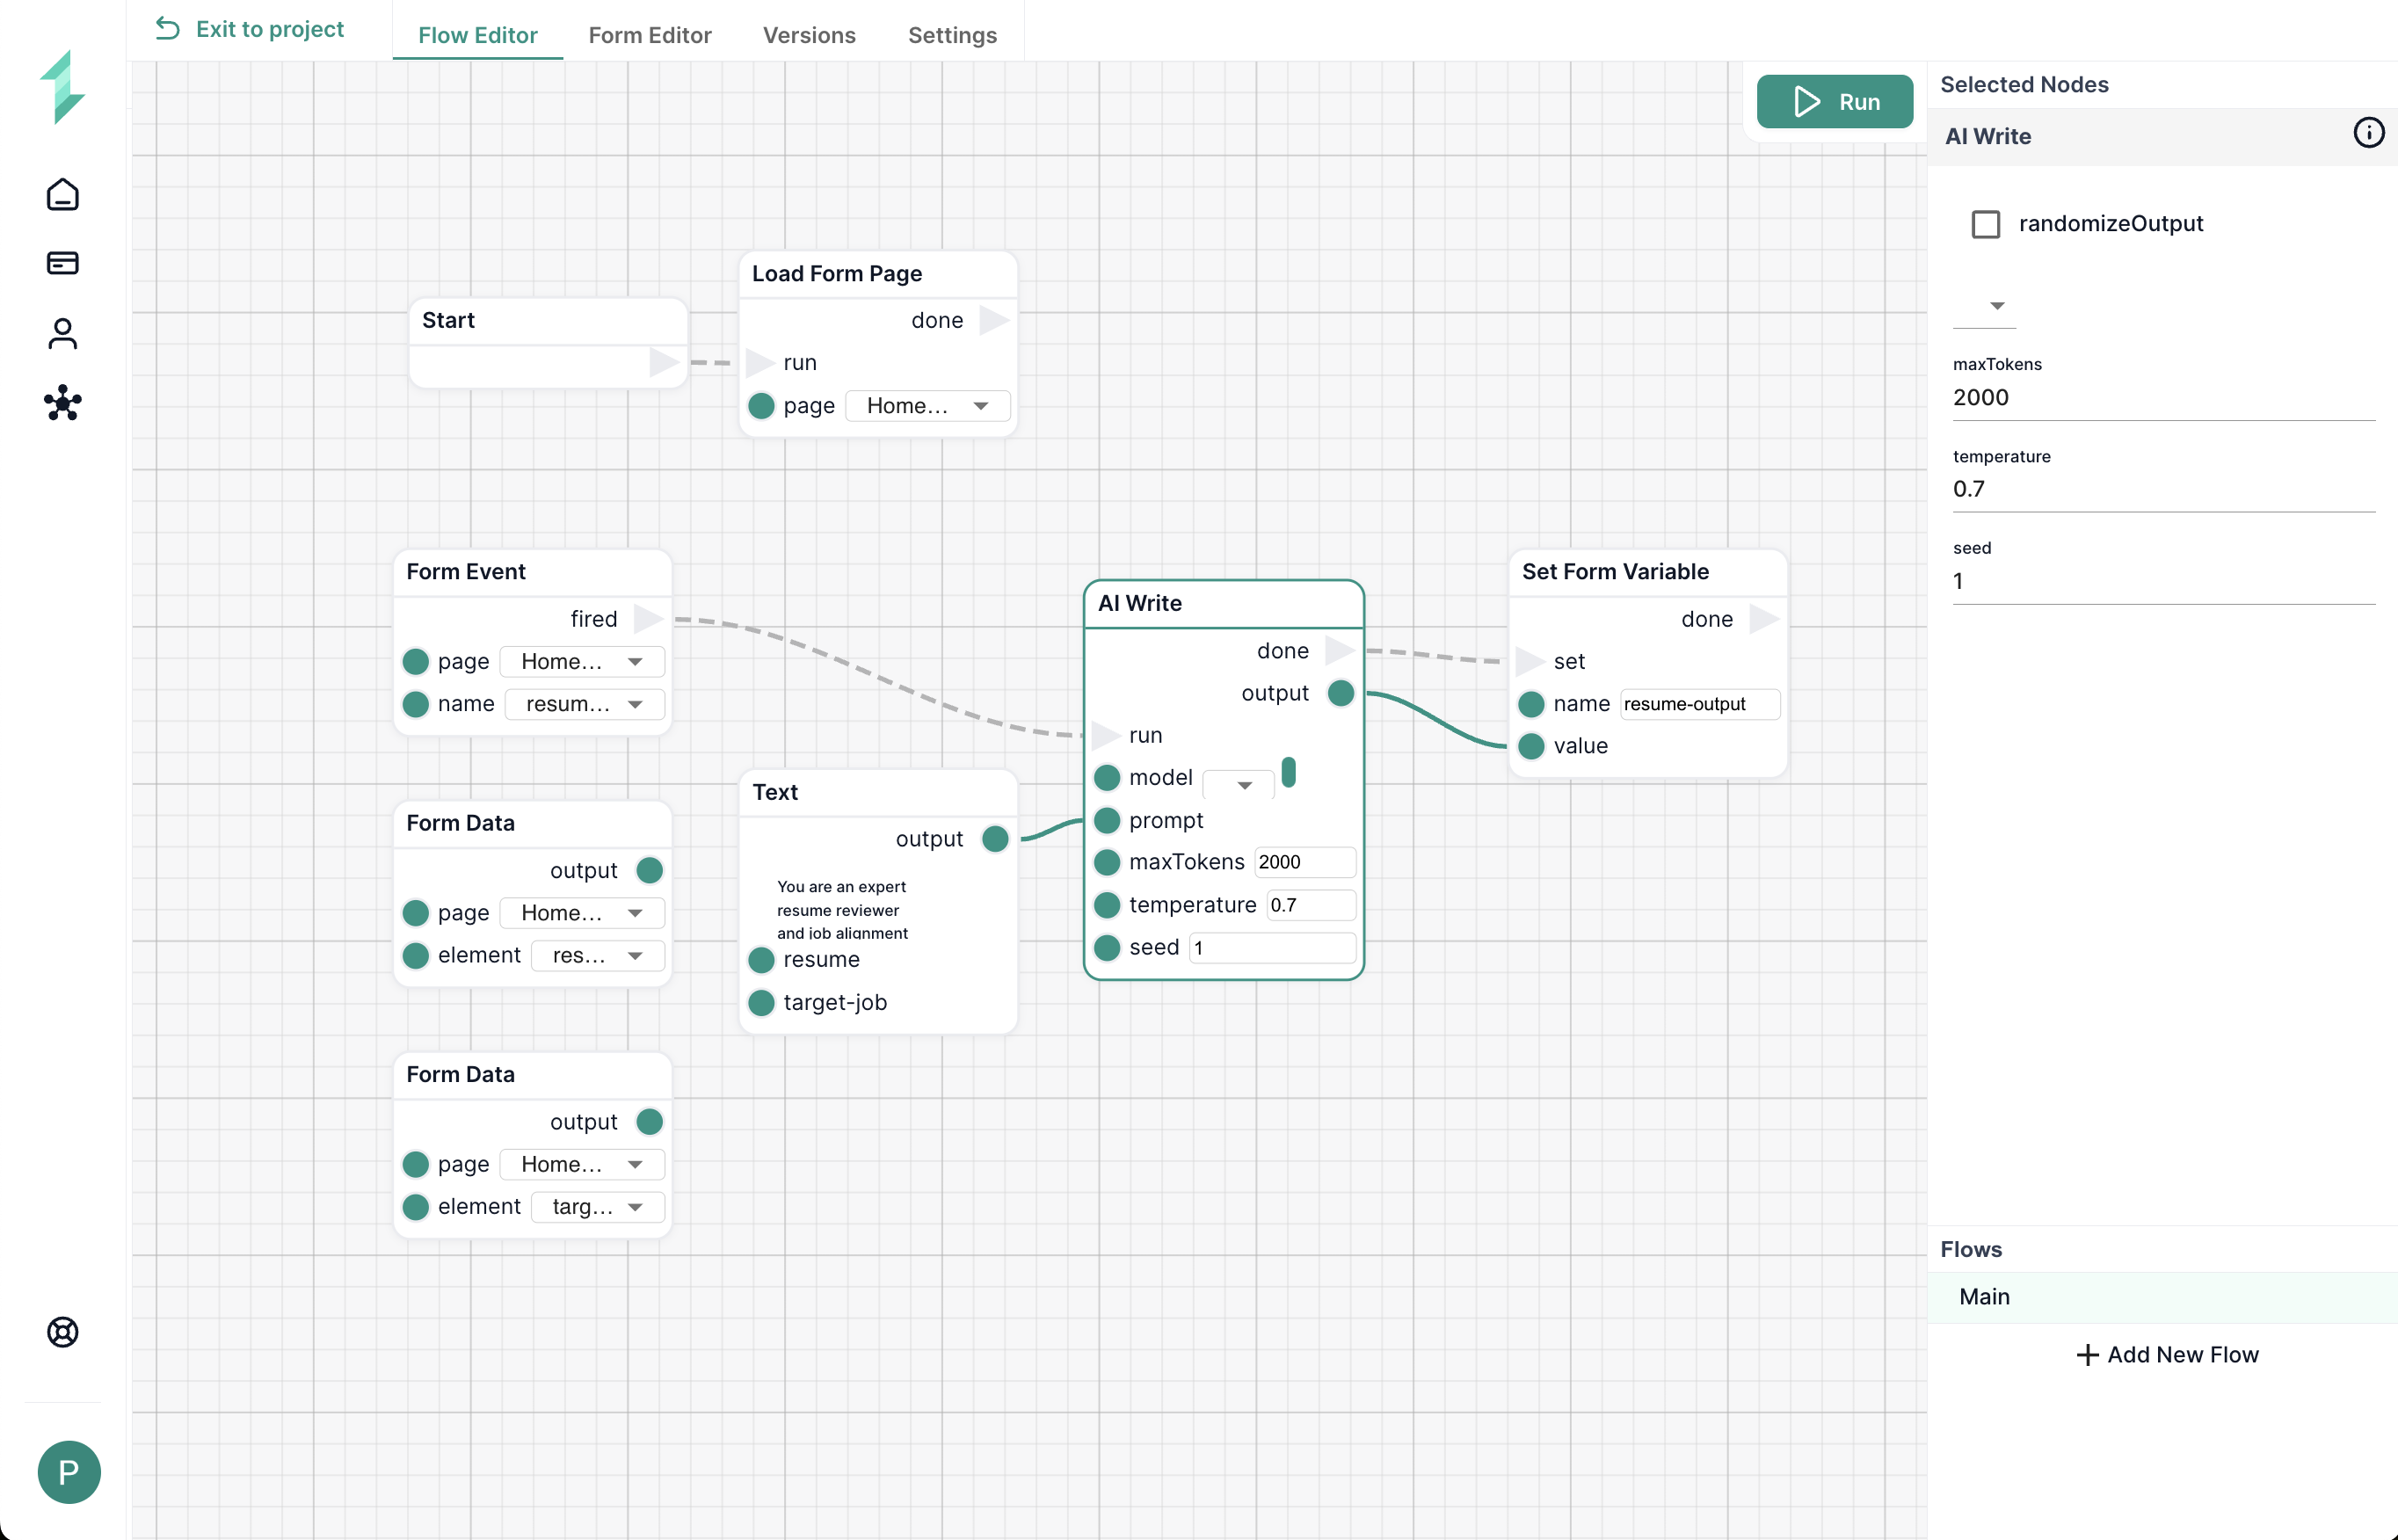
Now that your form is complete, you’ll build the workflow that powers the resume analysis. When the user clicks the “Click Here to Analyse Your Resume” button, the workflow will:
- Collect the uploaded resume and target job role
- Send both into a custom AI prompt
- Generate tailored resume feedback
- Display the result in the
resume-outputmarkdown area
Nodes Used
| Node Name | Purpose & Usage |
|---|---|
| Load Form Page | Initializes the form when the page is opened |
| Form Event | Triggers the workflow when the button is clicked |
| Form Data | Captures user input: resume file and job role |
| Text | Builds an AI prompt using both resume and job title |
| AI Write | Generates the personalized resume improvement advice |
| Set Form Variable | Displays the generated output in the form in Markdown format |
3.1 Load the Form Page
This ensures the workflow is connected to the correct form and activates when the page loads.
1. Add a Load Form Page Node
- Connect it to the Start node
- Page:
Homepage
3.2 Trigger the Workflow on Button Click
This step triggers the workflow when the user clicks the resume analysis button on the form.
1. Add a Form Event Node
- Page:
Homepage - Name:
resume-analysis-button
3.3 Get the Uploaded Resume & Target Role
Here you’ll collect the two form inputs needed for AI analysis: the uploaded resume and the target job role.
1. Add a Form Data Node
- Page:
Homepage - Element:
resume_selector
2. Add another Form Data Node
- Page:
Homepage - Element:
target_job
3.4 Build the AI Prompt
This combines the resume and job role inputs into a structured AI prompt using a Text node.
1. Add a Text Node
- Inputs:
{{resume}},{{target_job}} - Connect the output of both Form Data nodes into this Text node
- Prompt: Create your own, or insert the example prompt below.
You are an expert resume reviewer and job alignment strategist with deep knowledge of industry hiring trends, role-specific expectations, and resume best practices.

The user has uploaded the following resume:

{{resume}}

They are targeting the following role:

{{target_job}}

Please review the resume and provide clear, actionable feedback to help them align better with their target role. Focus on clarity, tone, structure, and relevance. Use a professional tone and format the response with headings or bullet points.
3.5 Generate the Resume Feedback
This node sends the prompt to the AI and returns a response based on the user's inputs.
1. Add an AI Write Node
- Connect the output of the Text node to the Prompt input
- maxTokens:
2000 - temperature:
0.7 - seed:
1
3.6 Display the AI Output in the Form
Finally, push the AI-generated feedback into the form so the user can view the results immediately. We use the Markdown Element in the form as it outputs a format which is well structured and does not allow editting.
1. Add a Set Form Variable Node
- Name:
resume_output - Value: Output of the AI Write node
3.7 Test the Workflow
Before publishing the form or turning it into an implementation, it’s important to test the workflow to make sure everything works as expected.
1. Click “Run” in the top-right of the Workflow Editor
This opens a live preview of your form and runs the workflow in real-time.
2. Fill in test values
Upload a sample resume using the file picker and enter a job role (e.g. “UX Designer”).
3. Click the analysis button
The workflow should trigger and generate resume feedback based on your inputs.
4. Check the output
Make sure the resume_output markdown area is populated with relevant AI-generated feedback. If nothing appears or the results are incorrect, double-check your node connections.
Step 4: Publish the Form as an Implementation
Now that your form and workflow are complete, it’s time to make your tool live by turning it into a shareable, interactive page using Intellectible’s Implementation feature.
Implementations let anyone interact with your form and run the workflow — without needing access to your project or the editor. They’re ideal for launching tools publicly, sending forms to clients, or embedding resources into a website. Learn more about how implementations work →
4.1 Enable the Workflow for Implementation
Before creating an implementation, you must mark the workflow as eligible.
1. Open your workflow
Go to the Settings tab at the top.
2. Toggle “Use Workflow in Implementation”
This allows the workflow to appear when creating an implementation.
4.2 Create a New Implementation
Now you’ll create a standalone version of your form and workflow.
1. Go to the “Implementations” tab in your project
Click Create New Implementation.
2. Name your implementation
Give it a clear, user-facing name like “Resume Review Tool”.
3. Click Create
The new implementation will appear in your list, ready to configure.
4.3 Configure the Implementation Settings
This step controls how your implementation behaves and who can access it.
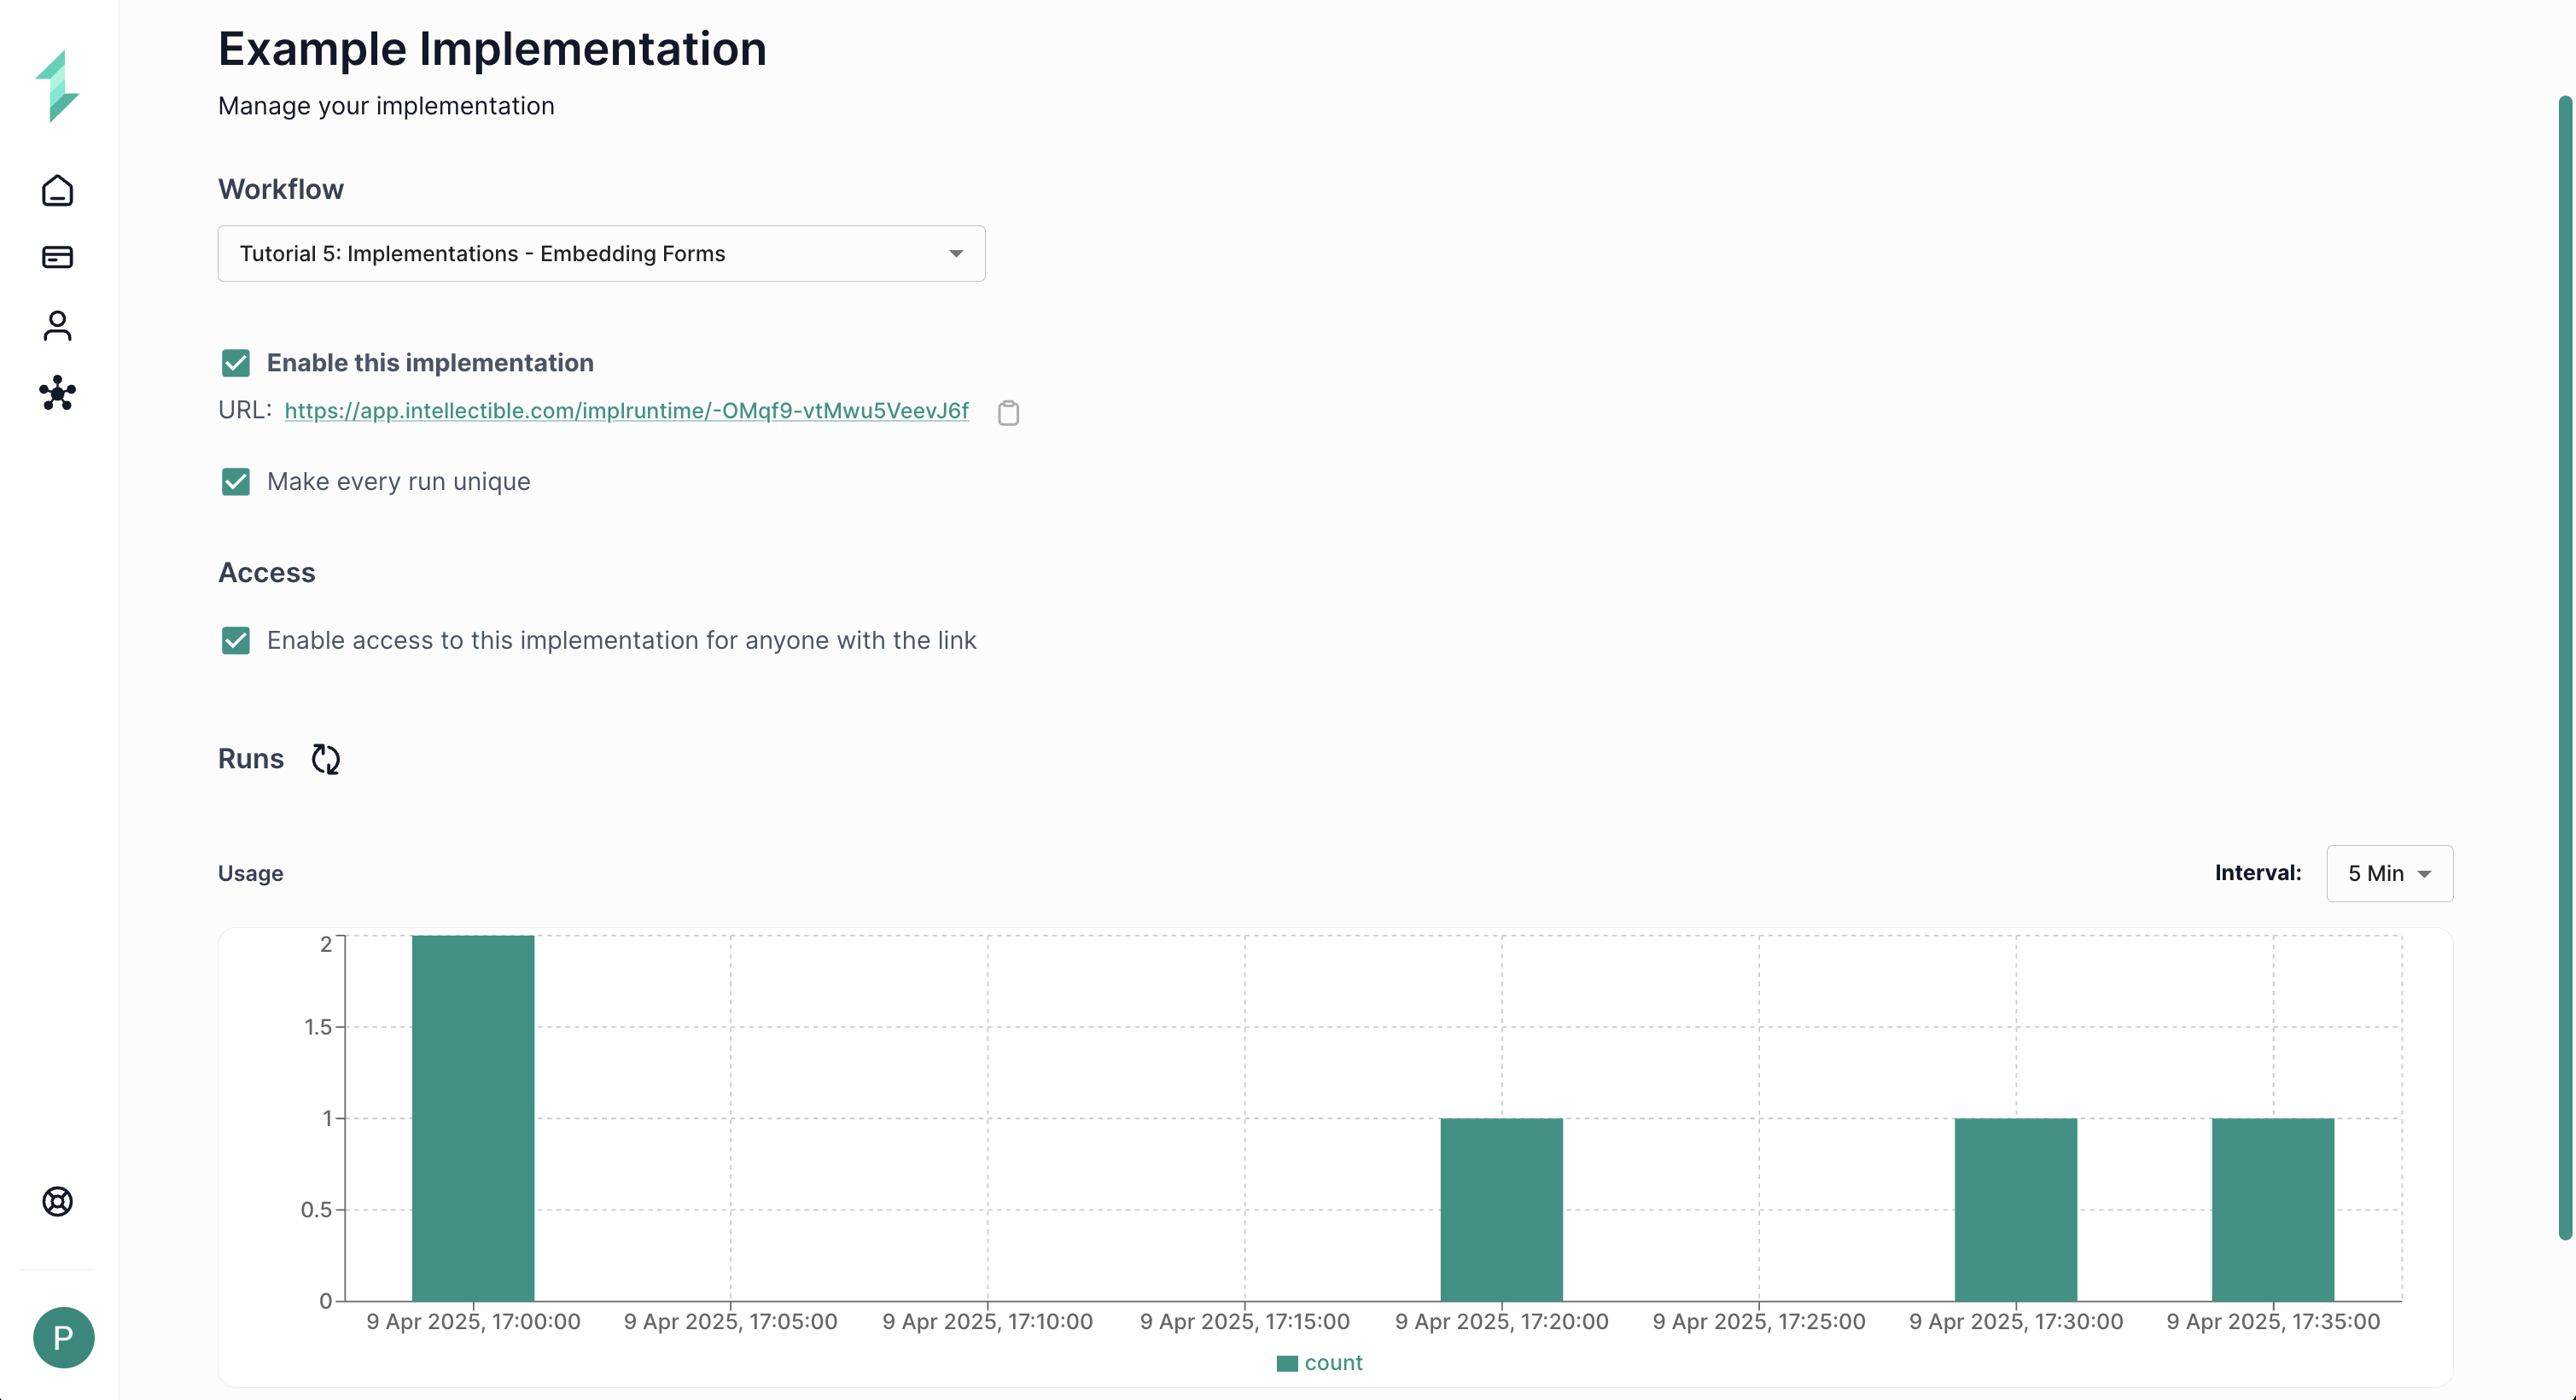
1. Enable the implementation
This activates the public URL.
2. Versioning
Choose whether to use the latest version of your workflow or lock to a specific version.
3. Access Settings
Choose from:
- Anyone with the link (public access)
- Restricted (only approved Intellectible users)
4. (Optional) Run Mode
Enable “Make Each Run Unique” if you want each user to have an isolated session. This is ideal for personalized results.
4.4 Test the Implementation
Before sharing your implementation, test it to make sure it behaves as expected.
To ensure your implementation behaves exactly as it would for a first-time user, open the link in an incognito browser window. This gives you a clean, session-free view — perfect for testing and final checks.
1. Click the implementation link
Open it in a new tab or incognito window.
2. Confirm it works
Check that:
- The form loads properly
- Inputs and buttons behave as expected
- The workflow runs and outputs show up
- Access restrictions are correct
You’re Live!
You should now have a working public-facing version of your tool. You can embed the link on a website, send it to clients, or use it internally across your team.
You’ve officially launched your first AI-powered, form-driven experience — fully built and deployed with Intellectible.
Try It Yourself
Now that your workflow is live and tested, here are a few quick ways to explore and customize it:
-
Tweak the design
Adjust colors, font sizes, spacing, and alignment to match your brand or improve readability. Try styling buttons, adding section dividers, or changing background colors. -
Refine the layout
Reorganize containers to test horizontal vs. vertical flows. Use nested containers to group related inputs or create better visual separation. -
Add a custom input
Try adding an optional field like tone or feedback style. Connect it to the prompt using a new{{handlebar}}. -
Duplicate and remix
Use this flow as a template for tools like cover letter analysis or interview prep.
What You’ve Learned
By completing this tutorial, you’ve built and tested a complete resume analysis workflow that:
- Accepts live user inputs through a branded form
- Uploads and processes resume files
- Dynamically builds and sends a custom AI prompt
- Returns targeted feedback in a readable format
- Can be published and shared using the Implementation feature
- Is fully extensible — ready to adapt to new inputs, formats, or use cases
You now have everything you need to build client-ready, AI-powered form tools inside Intellectible — and the skills to keep iterating from here.