Tutorial 2: Variables – Sales Notes to Summary
Goal
Learn how to use variables in Intellectible workflows to store and evolve information over time. In this tutorial, you'll build a workflow that collects sales notes one at a time and transforms them into:
- A detailed Client Summary with structured sections
- A section of AI-Inferred Insights
- A personalized Follow-Up Email
By the end, you’ll understand how to set, reuse, and overwrite a variable — the foundation of building workflows that feel dynamic and intelligent.
Use Case
You're on a client call. You're typing in notes as they speak — challenges, tools, goals, next steps, and more. Instead of organizing everything later, this workflow allows you to input notes in real time, storing them in a variable that evolves with every submission.
Each time you add a new note, the workflow updates the summary and improves the output — helping you capture context and insights progressively without breaking your focus.
What You’ll Build
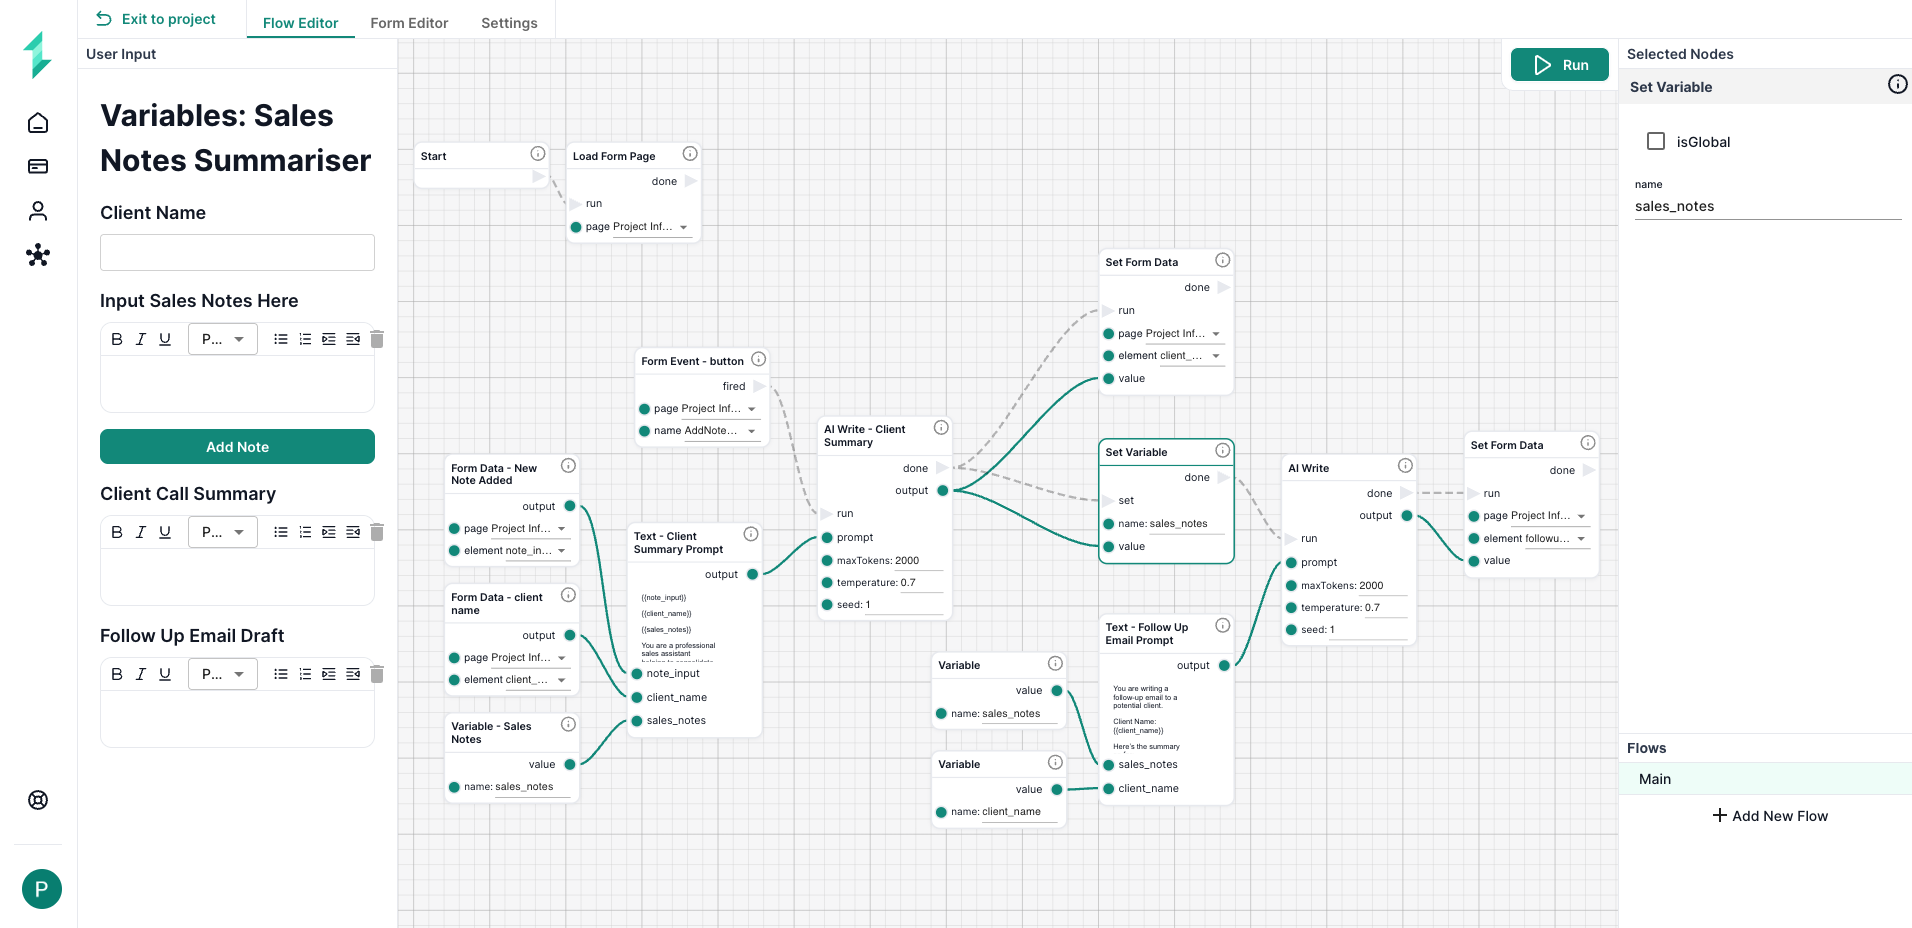
You’ll build a workflow that:
- Accepts short sales notes from a form
- Uses the note, client name, and previous summary (stored in a variable)
- Rewrites all of it into a structured Client Summary with AI
- Updates the summary variable with each new note
- Generates a professional follow-up email from the summary
- Displays both outputs in the form
Nodes Used
| Node Name | Purpose & Usage |
|---|---|
| Load Form Page | Initializes the form when the page loads |
| Form Event | Triggers the workflow on button click |
| Form Data | Retrieves inputs: note_input and client_name |
| Variable | Retrieves the current summary from sales_notes |
| Text | Builds dynamic AI prompts using new note + stored summary |
| AI Write | Calls AI to return an updated summary and then an email |
| Set Variable | Overwrites sales_notes with the new summary |
| Set Form Data | Displays summary and email in the form |
| Show (optional) | Used for debugging preview |
Step-by-Step Instructions
Step 1: Create the User Input Form
The form collects one new sales note at a time and displays two outputs: a progressively built client summary and an AI-generated follow-up email. This form will act as the front-end interface for the workflow.
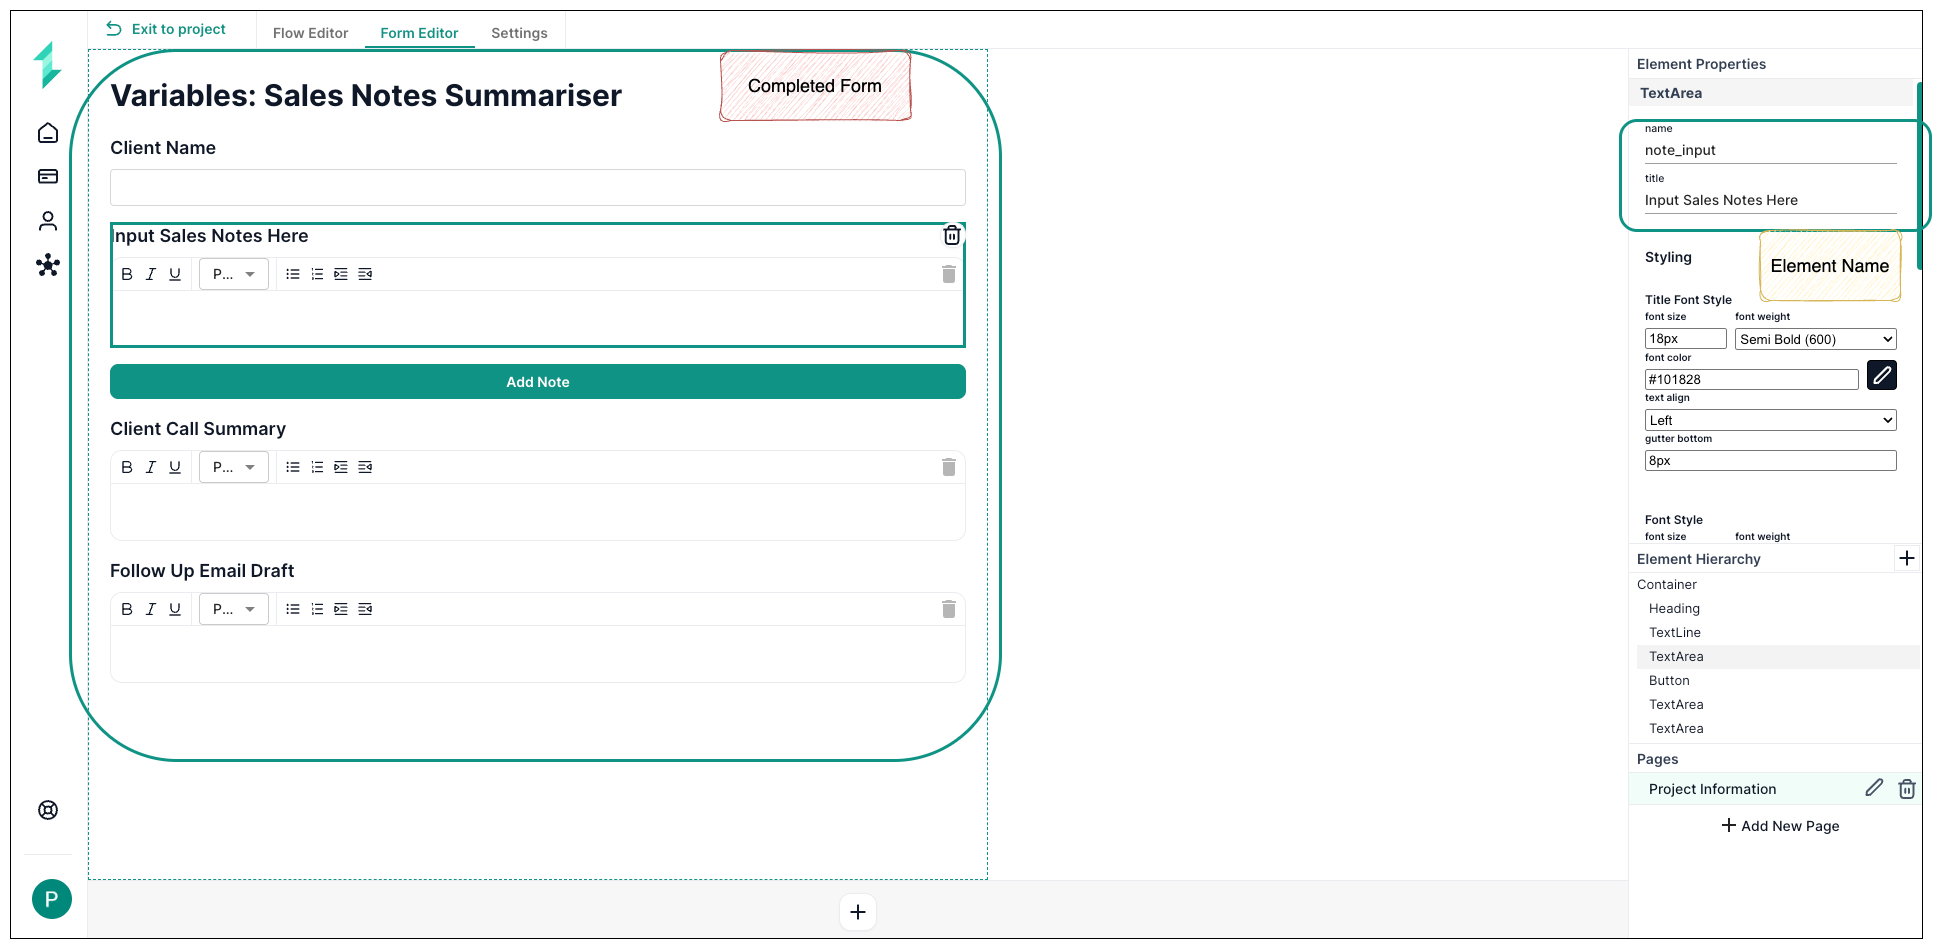
In the Form Editor, add the following elements:
-
Text Line Input
Name:client_nameTitle: "Client Name"
-
Text Area Input
Name:note_inputTitle: "Add a Sales Note"
-
Button
Name:AddNoteButtonTitle: "Add Note"
-
Text Area Output (Read-only)
Name:client_summaryTitle: "Client Call Summary"
-
Text Area Output (Read-only)
Name:followup_emailTitle: "Follow-Up Email Draft"
Step 2: Build the Workflow
This step connects the form inputs to the backend logic. Each time the user submits a note, the workflow will:
- Retrieve the new input
- Combine it with existing notes stored in a variable
- Generate a new AI-written summary
- Use that summary to generate a follow-up email
- Display both back in the form
2.1 Load the Form
Before anything else can happen, the workflow must be aware that the form has been opened. This ensures the rest of the logic has access to the page and is ready to respond to user input.
Add a Load Form Page node.
- Connect it to the Start node.
2.2 Detect the Button Click
Once the form is loaded, we need a trigger to begin processing. This step sets the workflow in motion when the user actively chooses to submit a note.
Add a Form Event node:
page: your form namename:AddNoteButton
2.3 Retrieve the Latest User Inputs
After the user clicks the button, we want to capture what they entered into the form. These are the two most recent values: the client's name and the latest note they added.
Add two Form Data nodes:
note_inputclient_name
2.4 Retrieve the Existing Summary (Sales Notes)
We now retrieve the summary that was built from previous notes. This allows us to combine the old and new information together before regenerating the output.
Add a Variable node:
name:sales_notes
2.5 Build the Prompt for AI to Expand the Summary
Now that we have the new note, the client name, and the existing summary, we can create a prompt for the AI. This will help rewrite the content and present it in a structured, professional format — while adding inferred insights.
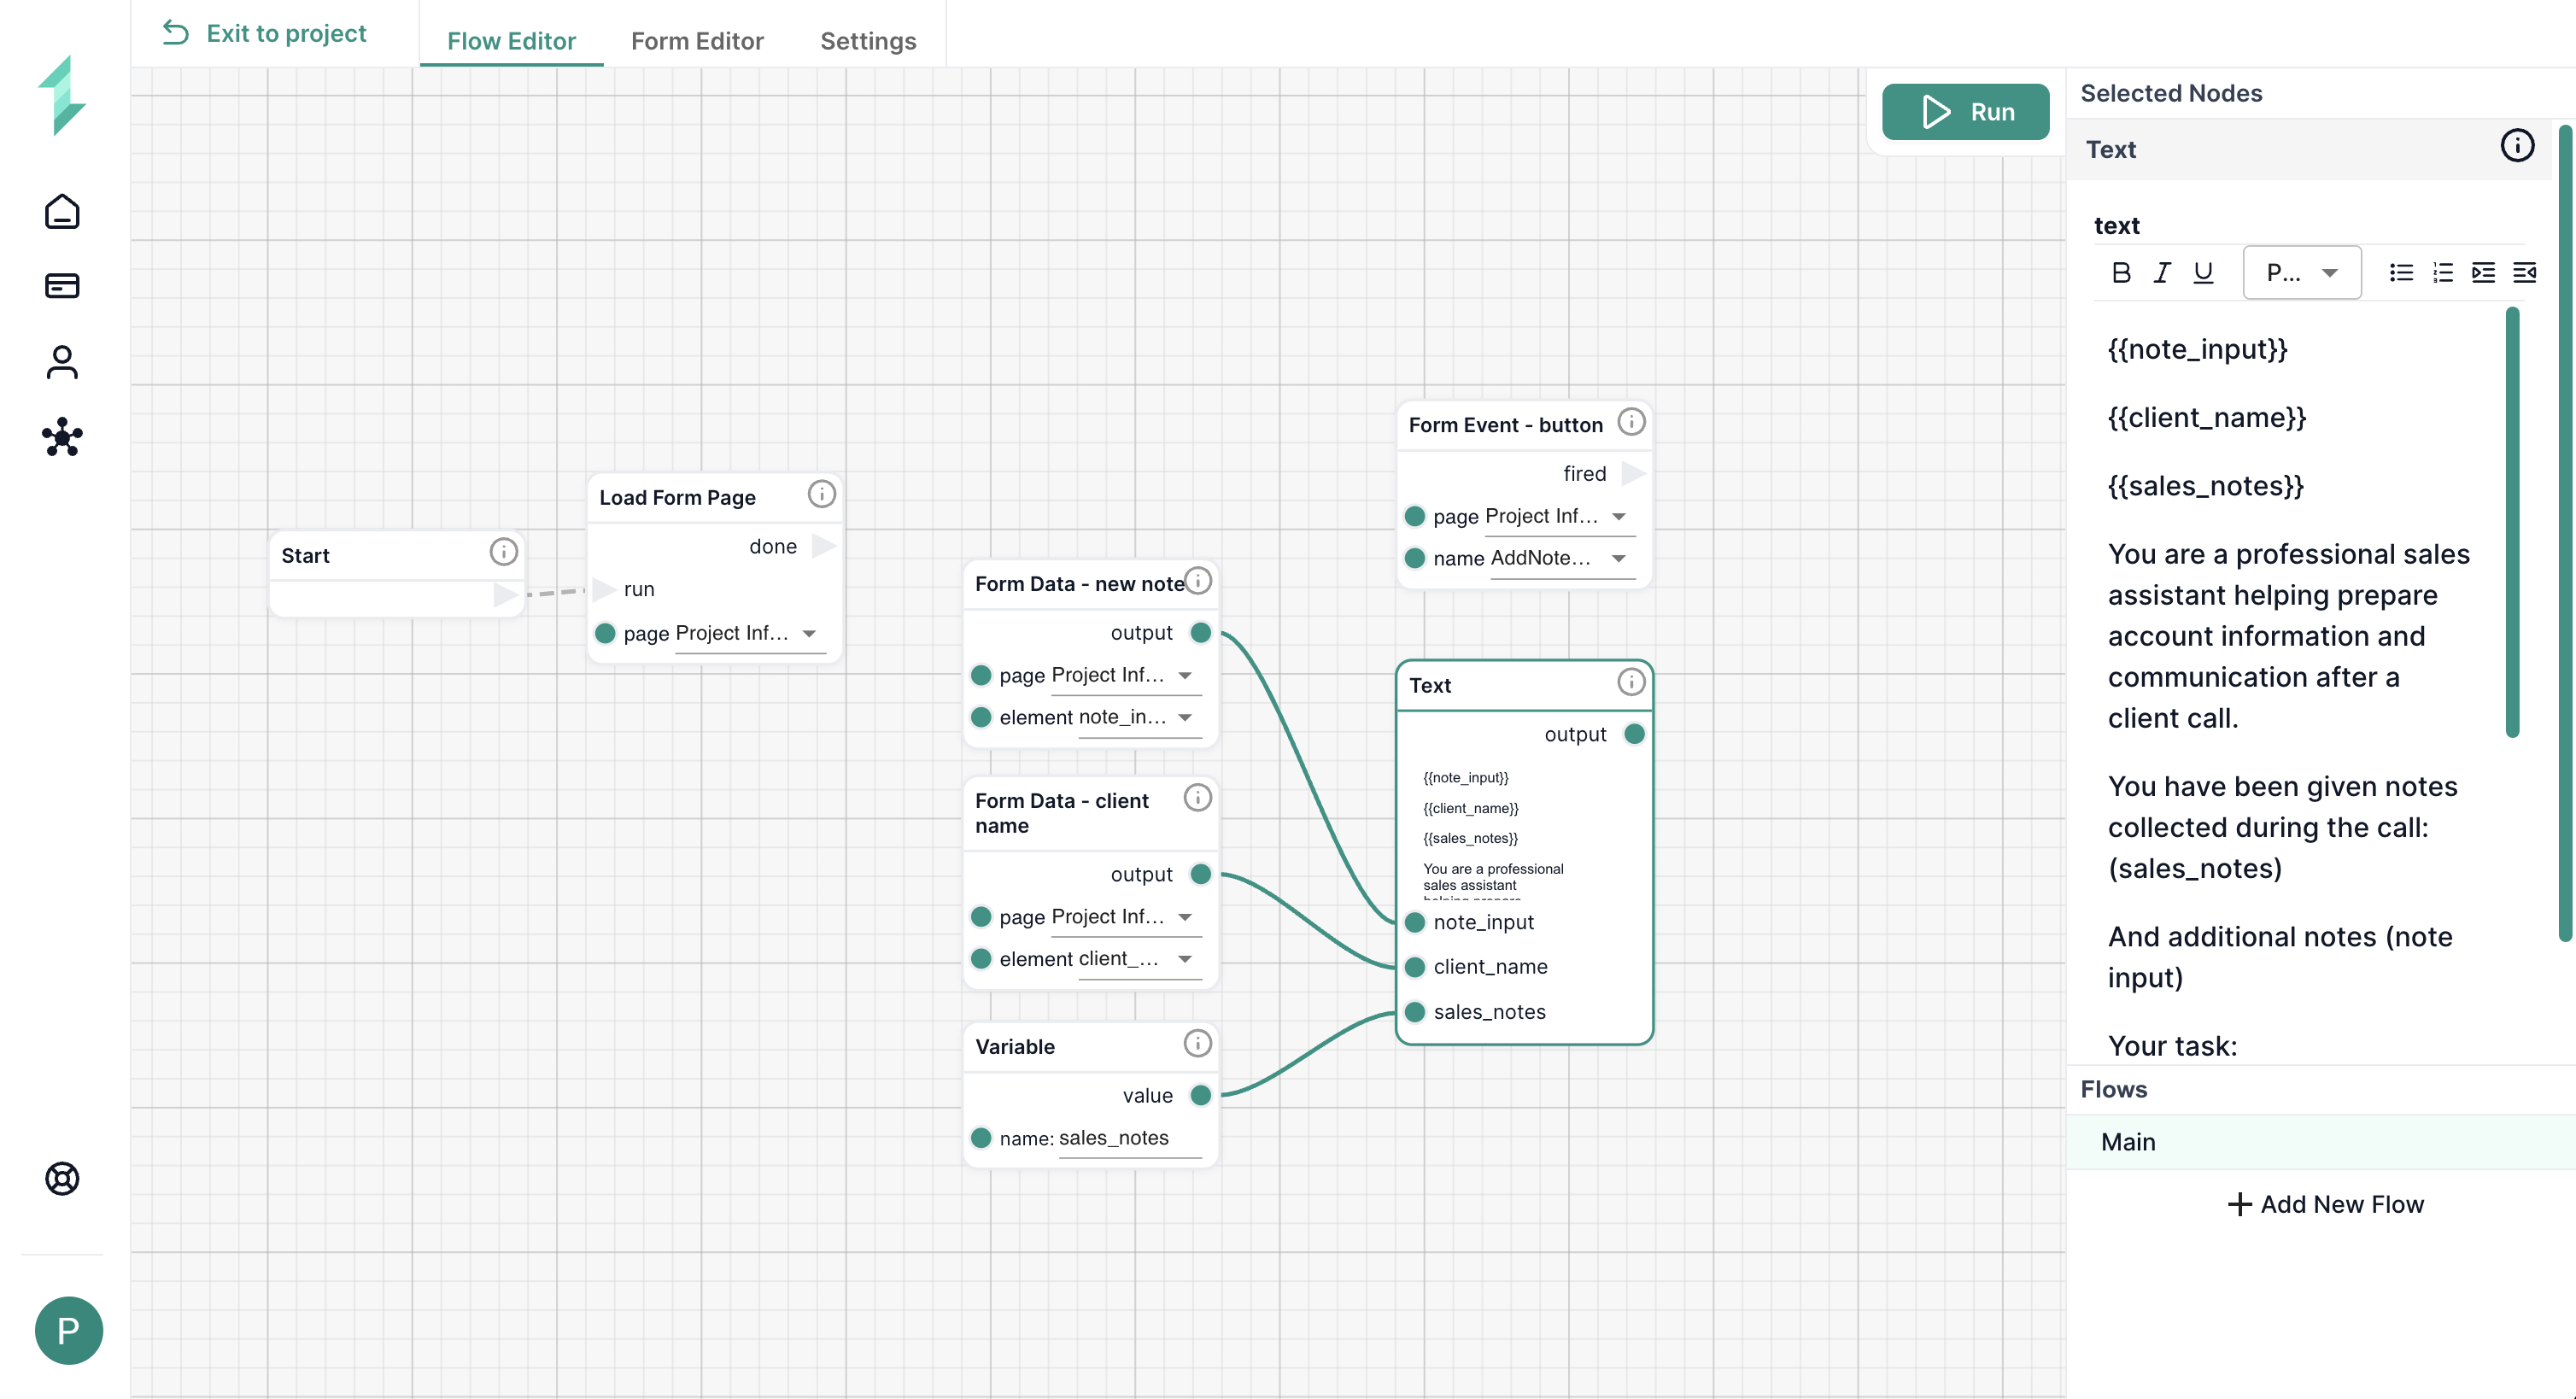
Add a Text node:
- Use
{{note_input}},{{client_name}}, and{{sales_notes}} - Build the prompt to organize sections and summarize everything (example prompt below)
{{client_name}}

You are a professional sales assistant helping to consolidate and organize key client information.

Below is a collection of sales notes submitted over time:

{{sales_notes}}

Here is the most recent note added:

{{note_input}}

Your task is to create an updated, organized Client Summary that reflects everything we know about this client so far.

Instructions:

- Organize the information into clear categories (e.g., Company Info, Tools Used, Pain Points, Goals, Next Steps)

- Integrate the newly added note into the appropriate place in the summary

- Maintain all previously relevant information — do not remove earlier points unless they are clearly incorrect or superseded

- Add helpful context if applicable (e.g., if the client uses Notion, briefly mention it's used for team collaboration)

- Ensure the tone is professional, thorough, and easy to read

- Avoid repeating information

Then, at the bottom, include a separate section titled:

AI-Inferred Insights

In this section, provide 1–3 useful suggestions or observations based on the notes. These can include:

- Potential automation opportunities

- Risks or blockers to address

- Suggestions for framing a solution

- Observations based on the client’s industry or stack

Clearly Label this section and keep it concise.
2.6 Generate the Updated Client Summary
Once your prompt has been built using the Text node, it’s time to send it to the AI to generate the summary.
You’ll use an AI Write node to process the prompt and return a relevant, well-formatted response.
Add an AI Write node:
prompt: Connect the Text nodemaxTokens: 2000temperature: 0.7seed: 1
2.7 Update the Summary 'sales_notes' Variable
After receiving the updated summary, we store it back into the sales_notes variable. This ensures that when the user adds another note later, the latest information is preserved and built upon.
Add a Set Variable node:
name:sales_notesvalue: Output of the AI Write node
2.8 Generate a Follow-Up Email
Now that we have a strong summary, we want to use it to generate a helpful and professional follow-up message. This helps continue the conversation based on what was just discussed.
Add a Text node:
- Use
{{client_name}}and{{sales_notes}}to generate a follow-up email prompt (example prompt below)
You are writing a follow-up email to a potential client.

Client Name: {{client_name}}

Here’s the summary so far:

{{sales_notes}}

Write a short, professional follow-up email addressed to the client name. Reference the client’s pain points and goals. Keep it friendly and suggest a next step.
Then add another AI Write node:
- Input: the Text node
maxTokens: 2000temperature: 0.7seed: 1
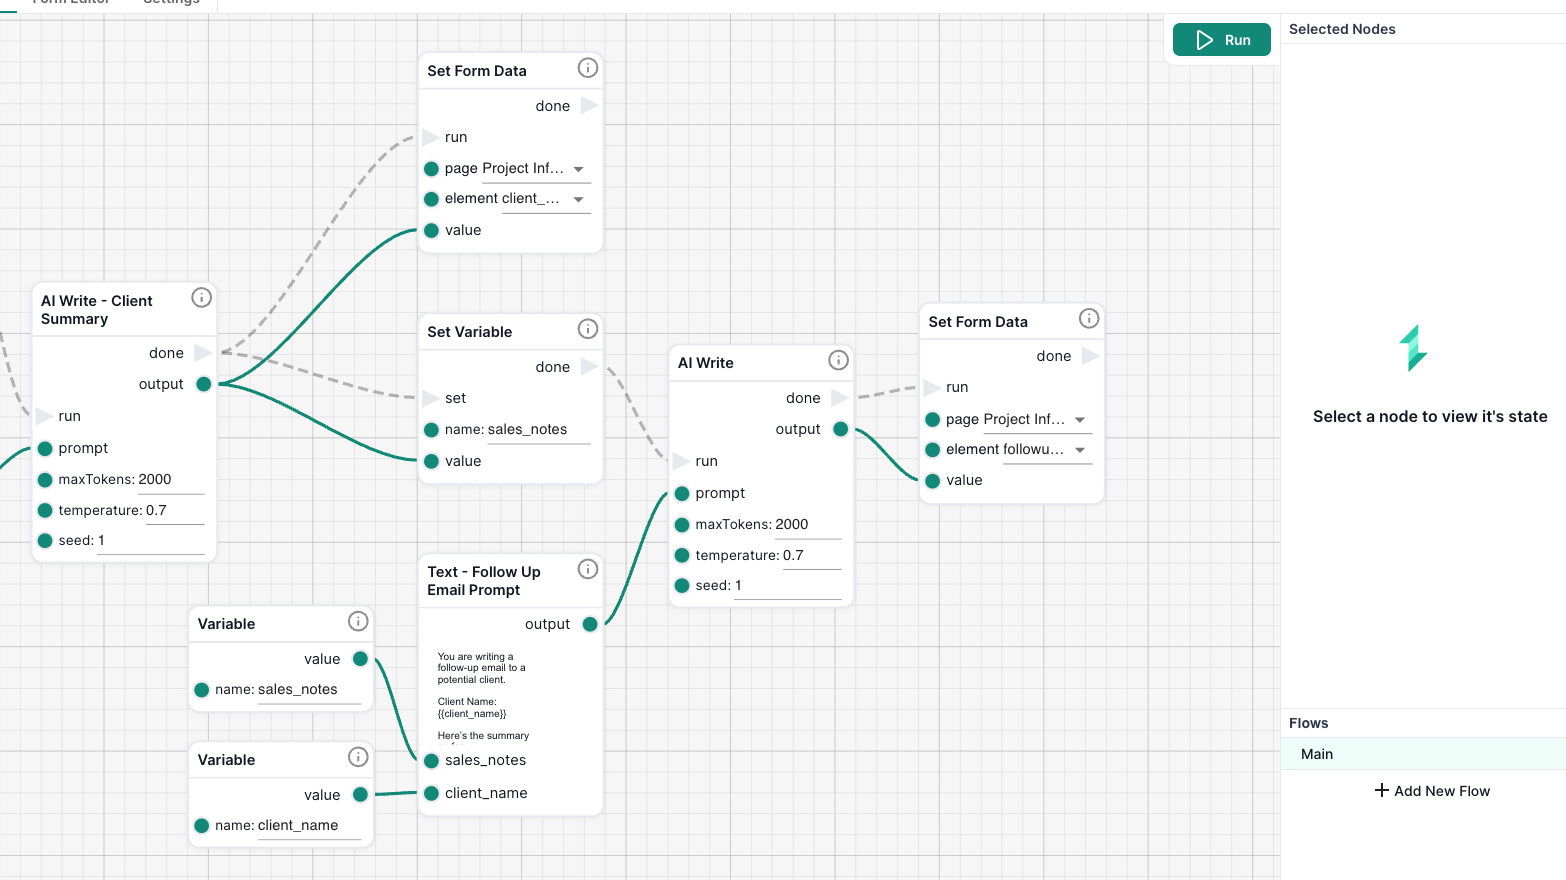
2.9 Display the Results in the Form
To finish the cycle, we return the generated summary and email back into the form. This gives immediate feedback to the user and confirms that their input was processed.
Add two Set Form Data nodes:
client_summary: Connect to the AI response from Step 2.6followup_email: Connect to the AI response from Step 2.8
(Optional) Add a Show node to make the outputs visible.
Step 3: Run & Test the Workflow
With everything connected, it’s time to try it out. Testing the workflow ensures the logic is working, and that notes are successfully updating the client summary and generating emails as expected.
-
Click Run in the top-right corner of the Workflow Editor
-
Input test values:
client_name: Lumora Analyticsnote_input: “They’re a data analytics startup based in Stockholm.”- Click Add Note
-
Then try more notes - all at once, or one at a time:
- “15 people, mostly data scientists”
- “Use Google Sheets and Tableau”
- “Want better KPI dashboards”
- “Prepping for funding round in Q3”
-
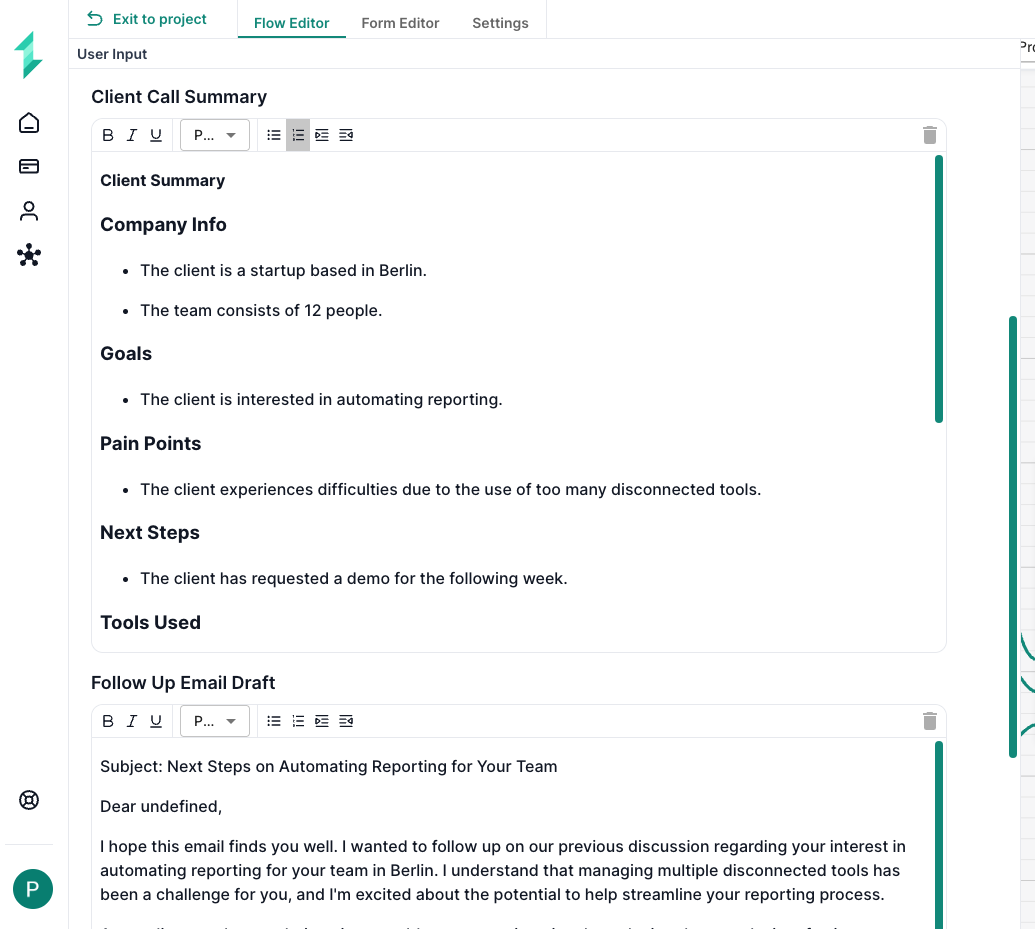
Watch the summary and email evolve with each addition.
Try It Yourself
Use these notes one at a time to simulate your own client:
- “Startup in Berlin, 12-person team”
- “Interested in automating reporting”
- “Pain point: too many disconnected tools”
- “Wants a demo next week”
Check how the summary improves and how the tone of the email adapts.
What You’ve Learned
- How to store and evolve information using variables
- How to rebuild context over time with AI + memory
- How to connect form fields, variables, and dynamic prompts
- How to deliver structured outputs and polished communication from rough notes
You're now ready to build workflows that feel personalized, intelligent, and context-aware — with just a few inputs and the power of variables.