Tutorial 6: Build a Semantic Search Workflow with Python
Goal
Learn how to use Python code nodes to build an intelligent document search system that understands meaning, not just keywords. You'll download a machine learning model, process natural language, and rank documents by semantic relevance.
Use Case
You have a collection of documents and want users to find the most relevant ones based on the meaning of their query, not just exact keyword matches.
Traditional keyword search:
- Query: "computer vision applications"
- Finds: Documents containing those exact words
Semantic search (what you'll build):
- Query: "computer vision applications"
- Finds: Documents about "image recognition," "visual AI systems," "object detection" — even if they don't contain your exact words
This is how modern search engines and AI systems understand what you're really looking for.
What You'll Build
You'll create a workflow that:
- Accepts a search query from the user
- Loads a collection of documents to search
- Downloads and caches a machine learning model (first run only)
- Encodes the query and documents into semantic vectors
- Computes similarity scores using cosine similarity
- Returns the top 5 most relevant documents with scores
What makes this powerful:
- ⚡ Fast after first run - Model caches automatically (~500ms execution)
- 🧠 Understands meaning - Not just keyword matching
- 📦 No infrastructure - Runs in isolated containers
- 🔄 Reusable - Works for any document collection
What You'll Learn
By completing this tutorial, you'll master:
- Writing Python code nodes with inputs and outputs
- Installing Python packages (sentence-transformers, scikit-learn, PyTorch)
- Using prebuild scripts to download ML models
- Working with JSON inputs and outputs
- Implementing semantic search with cosine similarity
- Handling errors and edge cases in code nodes
- Understanding code node caching and performance
Prerequisites
- Basic Python knowledge (reading JSON, using libraries)
- Understanding of Intellectible workflows and forms
- Familiarity with the workflow editor
If you're new to Intellectible, start with Get Started With Intellectible in 5 Minutes.
Step-by-Step Instructions
Step 1: Create a New Workflow
Let's set up a fresh workflow for our semantic search system.
- Go to your Dashboard
- Navigate to your project (or create a new one)
- Go to the Workflows tab
- Click Create New Workflow
- Name it
Semantic Document Search - Open the workflow in the editor
Step 2: Build the User Interface
Before writing code, let's create a simple form for users to enter their search query.
Switch to the Form Editor and add the following elements:
-
Container - Main layout
- Padding:
20px - Flow Direction:
Vertical - Alignment:
Center - Background:
#f5f5f5
- Padding:
-
Heading element
- Text:
Semantic Document Search - Font Size:
32px - Font Weight:
Bold (700) - Text Align:
Center
- Text:
-
Paragraph element
- Text:
Enter your search query to find the most relevant documents using AI-powered semantic matching. - Font Size:
16px - Text Align:
Center - Max Width:
600px
- Text:
-
Text Line input
- Name:
query - Control Variable:
query_value - Placeholder:
e.g., "neural networks for image processing" - Font Size:
18px - Width:
100% - Max Width:
600px
- Name:
-
Button element
- Text:
Search Documents - Event Name:
search_clicked - Background Color:
#4CAF50 - Text Color:
#ffffff - Padding:
12px 24px - Border Radius:
8px
- Text:
Your form should now have a clean search interface ready to receive user input and display results.
Step 3: Add the Code Node
Now let's add a Python code node that will perform the semantic search.
- Switch to the Flow Editor
- Add a Load UI Page node and connect it to the start node
- Add a UI Event node
- Page: Select your form page
- Event:
search_clicked
- Add a UI Variable node
- Variable:
query_value
- Variable:
- Add a Data node
- Add a Code node (Python)
- Connect the nodes:
- Load UI Page runs on workflow start
- UI Event waits for the search button click
- UI Variable reads the query from the form's control variable
- Data node combines the query with documents
- Code node receives the complete JSON and executes
Step 4: Configure the Code Node
Now comes the exciting part — writing the Python code!
- Select the Code node
- Set Language to
Python - Click Edit Code to open the code editor
Add the Main Python Code
Copy this code into the code editor:
import sys
import json
from pathlib import Path

# Check if model is available
model_dir = Path("./model")
if not model_dir.exists():
    print(json.dumps({
        "success": False,
        "error": "Model directory not found - prebuild may have failed"
    }))
    sys.exit(1)

# Import ML libraries after checking model exists
from sentence_transformers import SentenceTransformer
import numpy as np
from sklearn.metrics.pairwise import cosine_similarity

def main():
    # Load inputs from previous nodes
    with open("inputs.json", "r") as f:
        inputs = json.load(f)

    # Extract search parameters
    query = inputs.get("query", "machine learning")
    documents = inputs.get("documents", [])
    top_k = inputs.get("top_k", 5)

    # Load the pre-downloaded model
    print(f"Loading model from {model_dir}...", file=sys.stderr)
    model = SentenceTransformer(str(model_dir))

    # Encode query and documents into semantic vectors
    print(f"Encoding query and {len(documents)} documents...", file=sys.stderr)
    query_embedding = model.encode(query, convert_to_tensor=False)
    doc_embeddings = model.encode(documents, convert_to_tensor=False)

    # Compute cosine similarity between query and each document
    similarities = cosine_similarity([query_embedding], doc_embeddings)[0]

    # Get indices of top-k most similar documents
    top_indices = np.argsort(similarities)[::-1][:top_k]

    # Build results array
    results = []
    for idx in top_indices:
        results.append({
            "document": documents[idx],
            "score": float(similarities[idx]),
            "rank": len(results) + 1
        })

    # Build structured output
    output = {
        "success": True,
        "query": query,
        "total_documents": len(documents),
        "top_k": top_k,
        "results": results,
        "model_info": {
            "name": "sentence-transformers/all-MiniLM-L6-v2",
            "embedding_dimension": len(query_embedding)
        }
    }

    # Write to output.json for Intellectible to capture
    with open("output.json", "w") as f:
        json.dump(output, f, indent=2)

    # Also log summary to stdout for debugging
    print(f"✓ Processed query: {query}")
    print(f"✓ Found {len(results)} relevant documents", file=sys.stderr)

if __name__ == "__main__":
    try:
        main()
    except Exception as e:
        # Handle any errors gracefully
        error_output = {
            "success": False,
            "error": str(e),
            "error_type": type(e).__name__
        }

        # Write error to output.json
        with open("output.json", "w") as f:
            json.dump(error_output, f, indent=2)

        # Also log to stderr for debugging
        print(f"ERROR: {str(e)}", file=sys.stderr)
        sys.exit(1)
What this code does:
- Validates environment - Checks that the ML model was downloaded successfully
- Loads inputs - Reads query and documents from
inputs.json - Loads the model - Uses the cached sentence transformer model
- Encodes text - Converts query and documents into 384-dimensional vectors
- Computes similarity - Uses cosine similarity to measure semantic closeness
- Ranks results - Sorts documents by similarity score
- Writes output - Saves results to
output.jsonfor the workflow to use - Handles errors - Catches exceptions and writes error details to output.json
Step 5: Add the Prebuild Script
The prebuild script downloads the ML model once during the first run. Subsequent runs use the cached model.
In the Code node configuration, find the Prebuild Script field and add:
#!/bin/bash
set -e

echo "[Prebuild] Installing CPU-only PyTorch and dependencies..."

# Install everything in ONE command to avoid version conflicts
pip install --target=. --no-cache-dir \
  --extra-index-url https://download.pytorch.org/whl/cpu \
  torch==2.5.1+cpu \
  sentence-transformers==3.3.1 \
  scikit-learn==1.5.0

echo "[Prebuild] Downloading sentence transformer model..."

# Download the model using Python
python3 << "DOWNLOAD_MODEL"
from sentence_transformers import SentenceTransformer
import os

# Download and cache the model (~90MB)
model_name = "sentence-transformers/all-MiniLM-L6-v2"
print(f"Downloading {model_name}...")

model = SentenceTransformer(model_name)

# Save to local directory
model_dir = "./model"
os.makedirs(model_dir, exist_ok=True)
model.save(model_dir)

print(f"Model saved to {model_dir}")
print(f"Model embedding dimension: {model.get_sentence_embedding_dimension()}")

# Show model size
import subprocess
result = subprocess.run(["du", "-sh", model_dir], capture_output=True, text=True)
print(f"Model size: {result.stdout.strip()}")
DOWNLOAD_MODEL

echo "[Prebuild] Model downloaded successfully"
ls -lh model/
What this script does:
- Installs packages - CPU-only PyTorch, sentence-transformers, scikit-learn using
--target=.to install locally - Downloads the model - Fetches
all-MiniLM-L6-v2from HuggingFace (~90MB) - Saves locally - Stores model in
./model/directory - Reports progress - Shows download status and model info
Why --target=. and CPU-only PyTorch:
- Installing to current directory (
.) avoids version conflicts - CPU-only PyTorch is much smaller and sufficient for inference
- All packages are installed in one command for consistency
Important: This only runs during the first execution. After that, the entire environment (packages + model) is cached and loads in ~500ms.
Step 6: Create the Input Data Node
Now we'll create a Data node that combines the user's query from the form with the document collection.
- Add a Data node
- In the Data node, paste this JSON template:
{
  "query": "{{query}}",
  "documents": [
    "Machine learning is a subset of artificial intelligence that focuses on algorithms that learn from data.",
    "Deep learning uses neural networks with multiple layers to learn hierarchical representations.",
    "Natural language processing enables computers to understand and generate human language.",
    "Computer vision allows machines to interpret and understand visual information from the world.",
    "Reinforcement learning is about training agents to make decisions through trial and error.",
    "Supervised learning uses labeled data to train models to make predictions.",
    "Unsupervised learning finds patterns in data without explicit labels.",
    "Transfer learning applies knowledge from one domain to another related domain.",
    "Transformers revolutionized NLP with attention mechanisms and parallel processing.",
    "Convolutional neural networks are highly effective for image recognition tasks.",
    "Recurrent neural networks are designed for sequential data like time series.",
    "Gradient descent is an optimization algorithm used to minimize loss functions.",
    "Backpropagation computes gradients for training neural networks.",
    "Overfitting occurs when a model learns noise in the training data.",
    "Regularization techniques help prevent overfitting and improve generalization.",
    "Cross-validation is used to assess model performance on unseen data.",
    "Feature engineering involves creating useful input features from raw data.",
    "Ensemble methods combine multiple models to improve predictions.",
    "The bias-variance tradeoff is fundamental to understanding model performance.",
    "Data augmentation increases training data diversity to improve robustness."
  ]
}
- Connect the nodes:
- UI Event
doneoutput → Data noderuninput (triggers the Data node) - UI Variable node output → Data node
queryinput (provides the query value from control variable) - Data node output → Code node input (sends the complete JSON to code)
- UI Event
doneoutput → Code noderuninput (triggers code execution)
- UI Event
Important connection notes:
- The Data node needs a
runtrigger - connect the UI Event'sdoneoutput to it - The UI Variable node reads from the TextLine's control variable
query_value - The handlebars
"query": "{{query}}"needs quotes around it for valid JSON - The Data node combines the user's query with the hardcoded document list
What this does:
- The UI Variable node reads
query_valuefrom the TextLine component - The value is passed to the Data node via the
queryinput - The Data node injects it into the JSON using handlebars:
{{query}} - Provides the complete document collection to search through
- Passes everything as a single JSON object to the Code node
Step 7: Format and Display Results
Now we need to take the JSON results from the code node and display them nicely in the form.
- Add a Text node (we'll call this "Format Results")
- In the Text node, write a template to format the results using Handlebars:
-
Connect the Code node output → Format Results Text node
codeOutputinput -
Add a Set Form Data node
- Page: Select your form page
- Element:
results - Connect Format Results output → Set Form Data
valueinput - Connect Form Event
done→ Set Form Dataruninput
-
Add a Show node to reveal the results
- Page: Select your form page
- Element:
results - Connect Set Form Data
done→ Showruninput
Step 8: Test the Workflow
Time to see your semantic search in action!
-
Click Run in the top-right corner of the workflow editor
-
The form will appear on the left side
-
Enter a search query, for example:
"neural networks for image processing""learning from labeled examples""preventing models from memorizing noise"
-
Click Search Documents
-
First run: Wait 60-90 seconds (downloading model + packages)
-
Subsequent runs: Results appear in ~1-2 seconds (cached environment)
-
Observe the results:
- Documents ranked by semantic relevance
- Similarity scores (0.0 to 1.0)
- Most relevant documents appear first
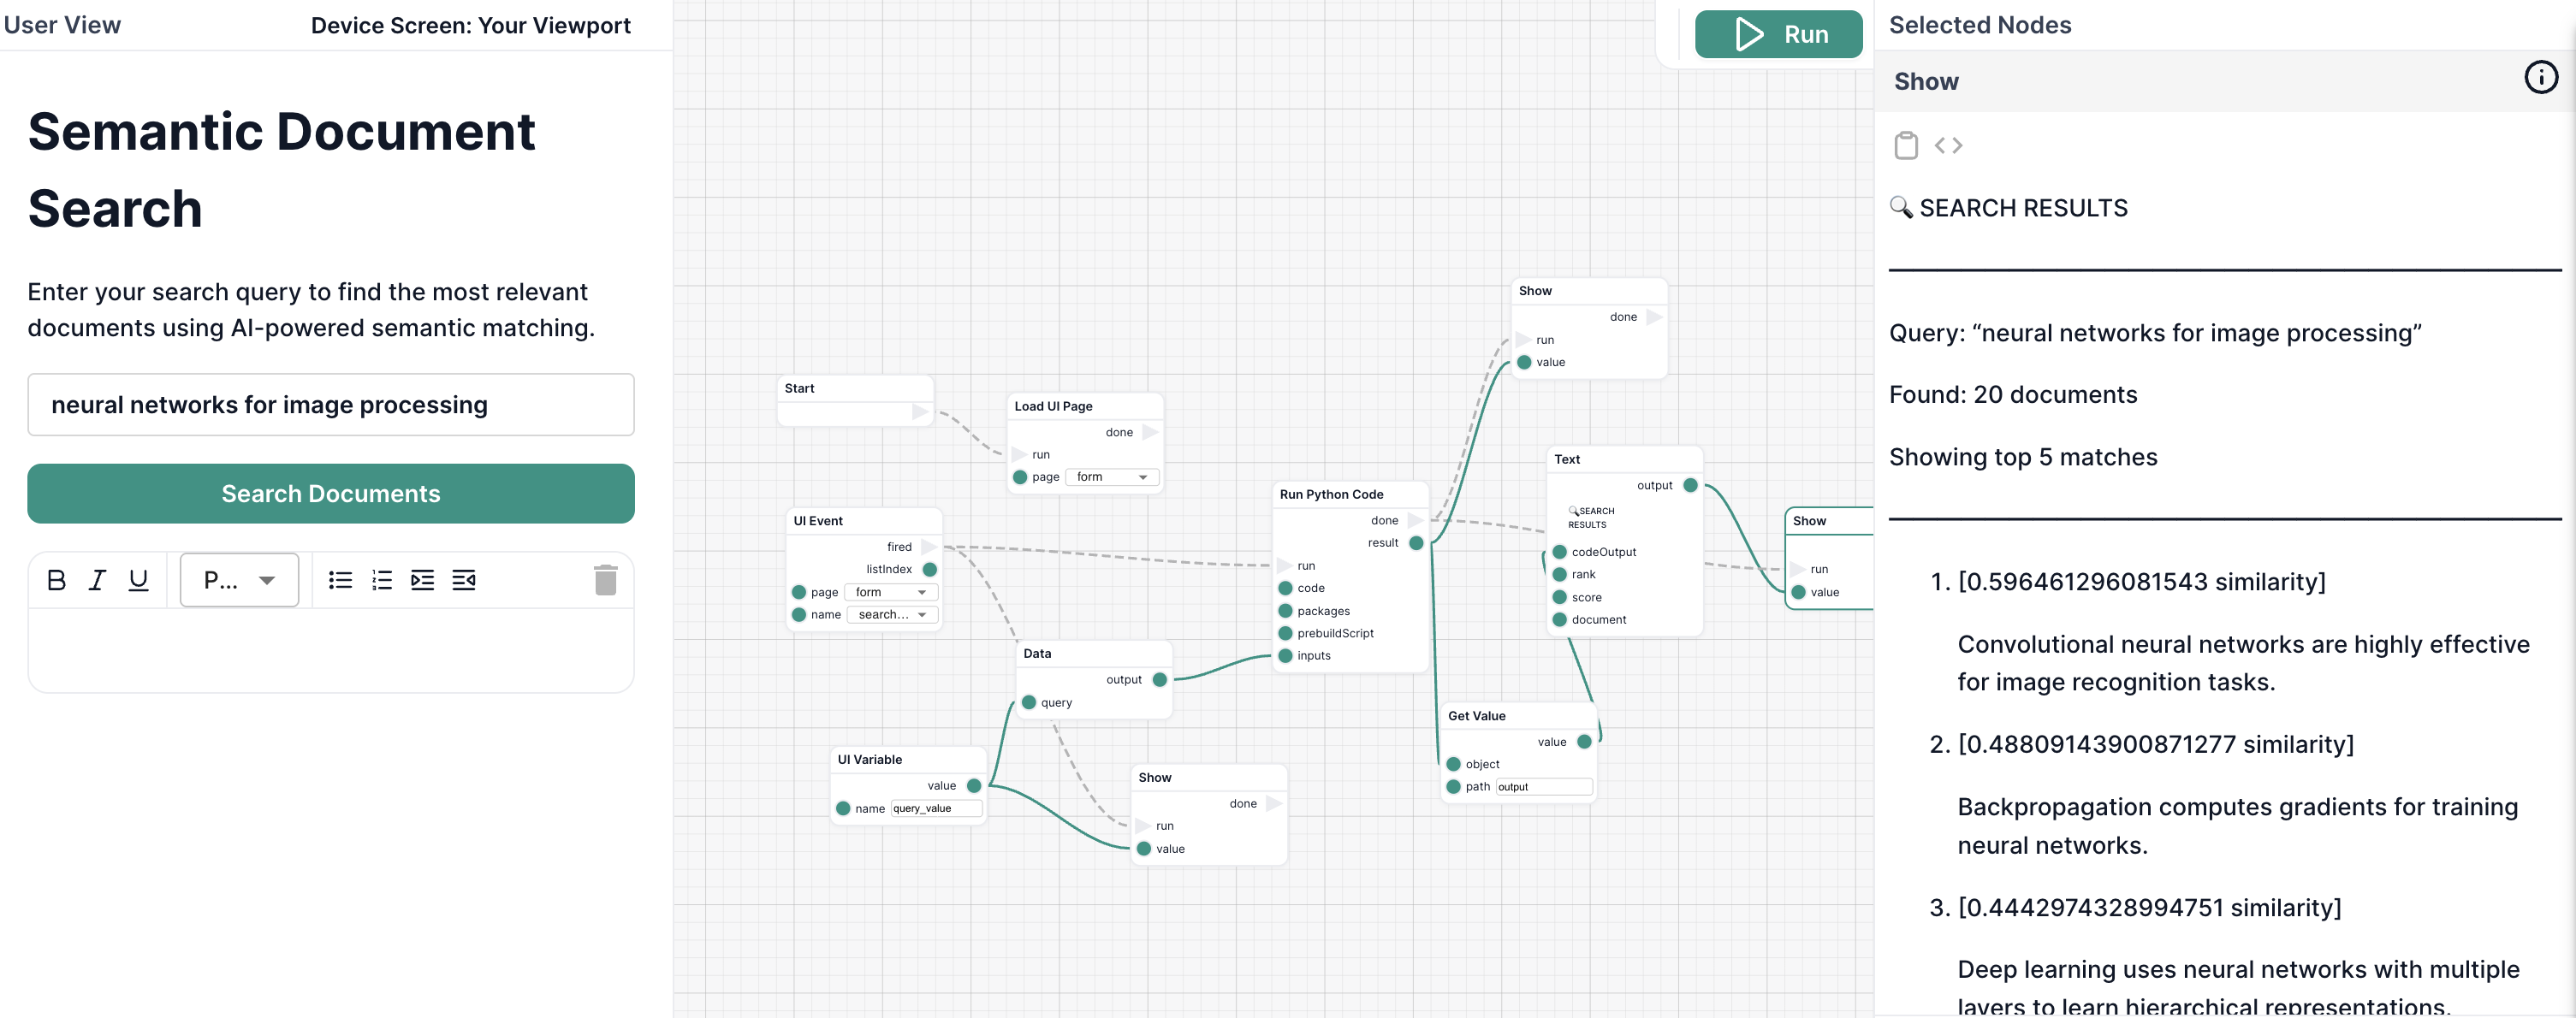
Example Results:
Query: "neural networks for image processing"

1. [0.89 similarity]
   Convolutional neural networks are highly effective for image recognition tasks.

2. [0.78 similarity]
   Deep learning uses neural networks with multiple layers to learn hierarchical representations.

3. [0.71 similarity]
   Computer vision allows machines to interpret and understand visual information from the world.

4. [0.64 similarity]
   Backpropagation computes gradients for training neural networks.

5. [0.58 similarity]
   Transfer learning applies knowledge from one domain to another related domain.
Notice how it found relevant documents even though they don't contain the exact phrase "neural networks for image processing"!
Step 9: Understand the Performance
Your workflow now demonstrates the power of code node caching:
First Execution (~60-90 seconds):
1. Download packages: sentence-transformers, torch, scikit-learn (~30-40s)
2. Install dependencies (~10-20s)
3. Run prebuild: Download ML model (~20-30s)
4. Execute code (~1-2s)
Subsequent Executions (~1-2 seconds):
1. Load cached environment (~500ms)
2. Execute code (~1-2s)
The entire environment — packages, model, everything — is cached using a content-addressed hash. If you don't change the code, packages, or prebuild script, you get instant loading.
Try It Yourself
Now that you have a working semantic search system, here are some experiments to try:
Experiment 1: Different Queries
Try these queries and observe how semantic search understands meaning:
"algorithms that improve through experience"→ Should find reinforcement learning"visual pattern recognition"→ Should find computer vision and CNNs"avoiding overfitting"→ Should find regularization and cross-validation"sequential data processing"→ Should find RNNs and time series
Experiment 2: Change the Number of Results
Modify the top_k input:
- Change from
5to3to show only top 3 results - Change to
10to see more matches
Experiment 3: Add Your Own Documents
Replace the sample documents with your own content:
- Product descriptions
- FAQ entries
- Article summaries
- Knowledge base entries
The same code will work for any text collection!
Experiment 4: Add a Minimum Score Filter
Modify the Python code to only return documents above a threshold:
# After computing similarities, filter by minimum score
min_score = inputs.get("min_score", 0.5)  # Default 0.5

# Filter results
results = []
for idx in top_indices:
    score = float(similarities[idx])
    if score >= min_score:  # Only include if above threshold
        results.append({
            "document": documents[idx],
            "score": score,
            "rank": len(results) + 1
        })
Then add a min_score input to your form and workflow!
What You've Learned
Congratulations! You've built a production-ready semantic search system using Python code nodes. You now understand:
✅ Writing Python code nodes - Reading inputs, writing outputs, handling errors
✅ Installing packages - Specifying exact versions for reproducibility
✅ Using prebuild scripts - One-time setup for downloading models
✅ Content-addressed caching - Why subsequent runs are fast
✅ Machine learning integration - Using sentence-transformers for semantic encoding
✅ Cosine similarity - Measuring semantic closeness between texts
✅ Workflow integration - Connecting code nodes with forms and other nodes
✅ Error handling - Graceful failures with informative messages
✅ Performance optimization - Sub-second execution after caching
Next Steps
Now that you've mastered Python code nodes, explore these advanced topics:
Enhancement 1: Load Documents Dynamically from Library
Instead of hardcoding documents, load them from your project library using the LibraryClient SDK:
from intellectible_execution import LibraryClient
import requests

library = LibraryClient()

# List all text files in library
files = library.list_files()
text_files = [f for f in files if f['type'] in ['text/plain', 'text/csv']]

# Download and extract content from each file
documents = []
for file in text_files:
    download_url = library.create_download_url(file['id'])
    response = requests.get(download_url)
    documents.append(response.text)

# Now use these documents for semantic search
This allows you to search across all documents in your library dynamically!
Learn more: LibraryClient SDK Reference
Enhancement 2: Log Search Queries to Database
Track which queries users are searching for using the DatabaseClient SDK:
from intellectible_execution import DatabaseClient
from datetime import datetime

database = DatabaseClient()

# Use an existing database and create a queries table (first run only)
databases = database.list_databases()
db_id = databases[0]['id']

tables = database.list_tables(db_id)
if 'queries' not in tables:
    database.create_table(db_id, 'queries')
    database.create_column(db_id, 'queries', 'query_text', 'text')
    database.create_column(db_id, 'queries', 'result_count', 'number')
    database.create_column(db_id, 'queries', 'timestamp', 'text')

# Log this search
database.insert_rows(db_id, 'queries', [{
    'query_text': query,
    'result_count': len(results),
    'timestamp': datetime.now().isoformat()
}])
Later, you can analyze which topics users are most interested in!
Learn more: DatabaseClient SDK Reference
Enhancement 3: Cache Embeddings in Database
For large document collections, cache embeddings to avoid recomputing them every time:
# Check if embeddings exist in database
cached = database.query(db_id, 'document_embeddings',
    'SELECT * FROM "document_embeddings"'
)

if len(cached) > 0:
    # Load cached embeddings
    doc_embeddings = [json.loads(row['embedding']) for row in cached]
else:
    # Compute and store embeddings
    doc_embeddings = model.encode(documents).tolist()

    rows = [{'document': doc, 'embedding': json.dumps(emb)}
            for doc, emb in zip(documents, doc_embeddings)]
    database.insert_rows(db_id, 'document_embeddings', rows)
This dramatically speeds up searches for large collections!
Other Advanced Topics
- Build an API - Expose semantic search via workflow API
- Use larger models - Try different sentence-transformer models for better accuracy
- Combine with web scraping - Search content from crawled websites
- Add filters - Allow users to filter by date, category, or metadata
Explore Data Access
Learn more about accessing project data from code nodes:
- 📖 Code Node Data Access Guide - Complete guide with patterns
- 📚 LibraryClient SDK Reference - File operations API
- 📚 DatabaseClient SDK Reference - Database operations API
Common Issues & Solutions
Issue: "Model directory not found" error
Cause: Prebuild script failed to download the model
Solution:
- Check that the prebuild script has no syntax errors
- Ensure you have
sentence-transformersin the packages list - First run can take up to 90 seconds — wait longer
Issue: Execution timeout (10 minutes)
Cause: Too many documents or slow model loading
Solution:
- Reduce number of documents (try 20-50 for large collections)
- Ensure model is cached (should be fast after first run)
- Use a smaller model:
all-MiniLM-L6-v2is already quite small
Issue: Results don't make sense
Cause: Semantic models require meaningful text to work well
Solution:
- Ensure documents have enough content (not just keywords)
- Try different queries to see how the model interprets meaning
- Consider using a different model for specialized domains
See Also
- Code Nodes Guide - In-depth guide to code nodes
- Prompt Writing - Combining code nodes with AI
- Workflows Overview - Understanding workflow architecture
- Forms Guide - Building user interfaces